This is a great thread! Great work @FloppyKnockers
You are using an out of date browser. It may not display this or other websites correctly.
You should upgrade or use an alternative browser.
You should upgrade or use an alternative browser.
Another bar build - Speakeasy style
- Thread starter FloppyKnockers
- Start date

Help Support Homebrew Talk - Beer, Wine, Mead, & Cider Brewing Discussion Forum:
This site may earn a commission from merchant affiliate
links, including eBay, Amazon, and others.
FloppyKnockers
Well-Known Member
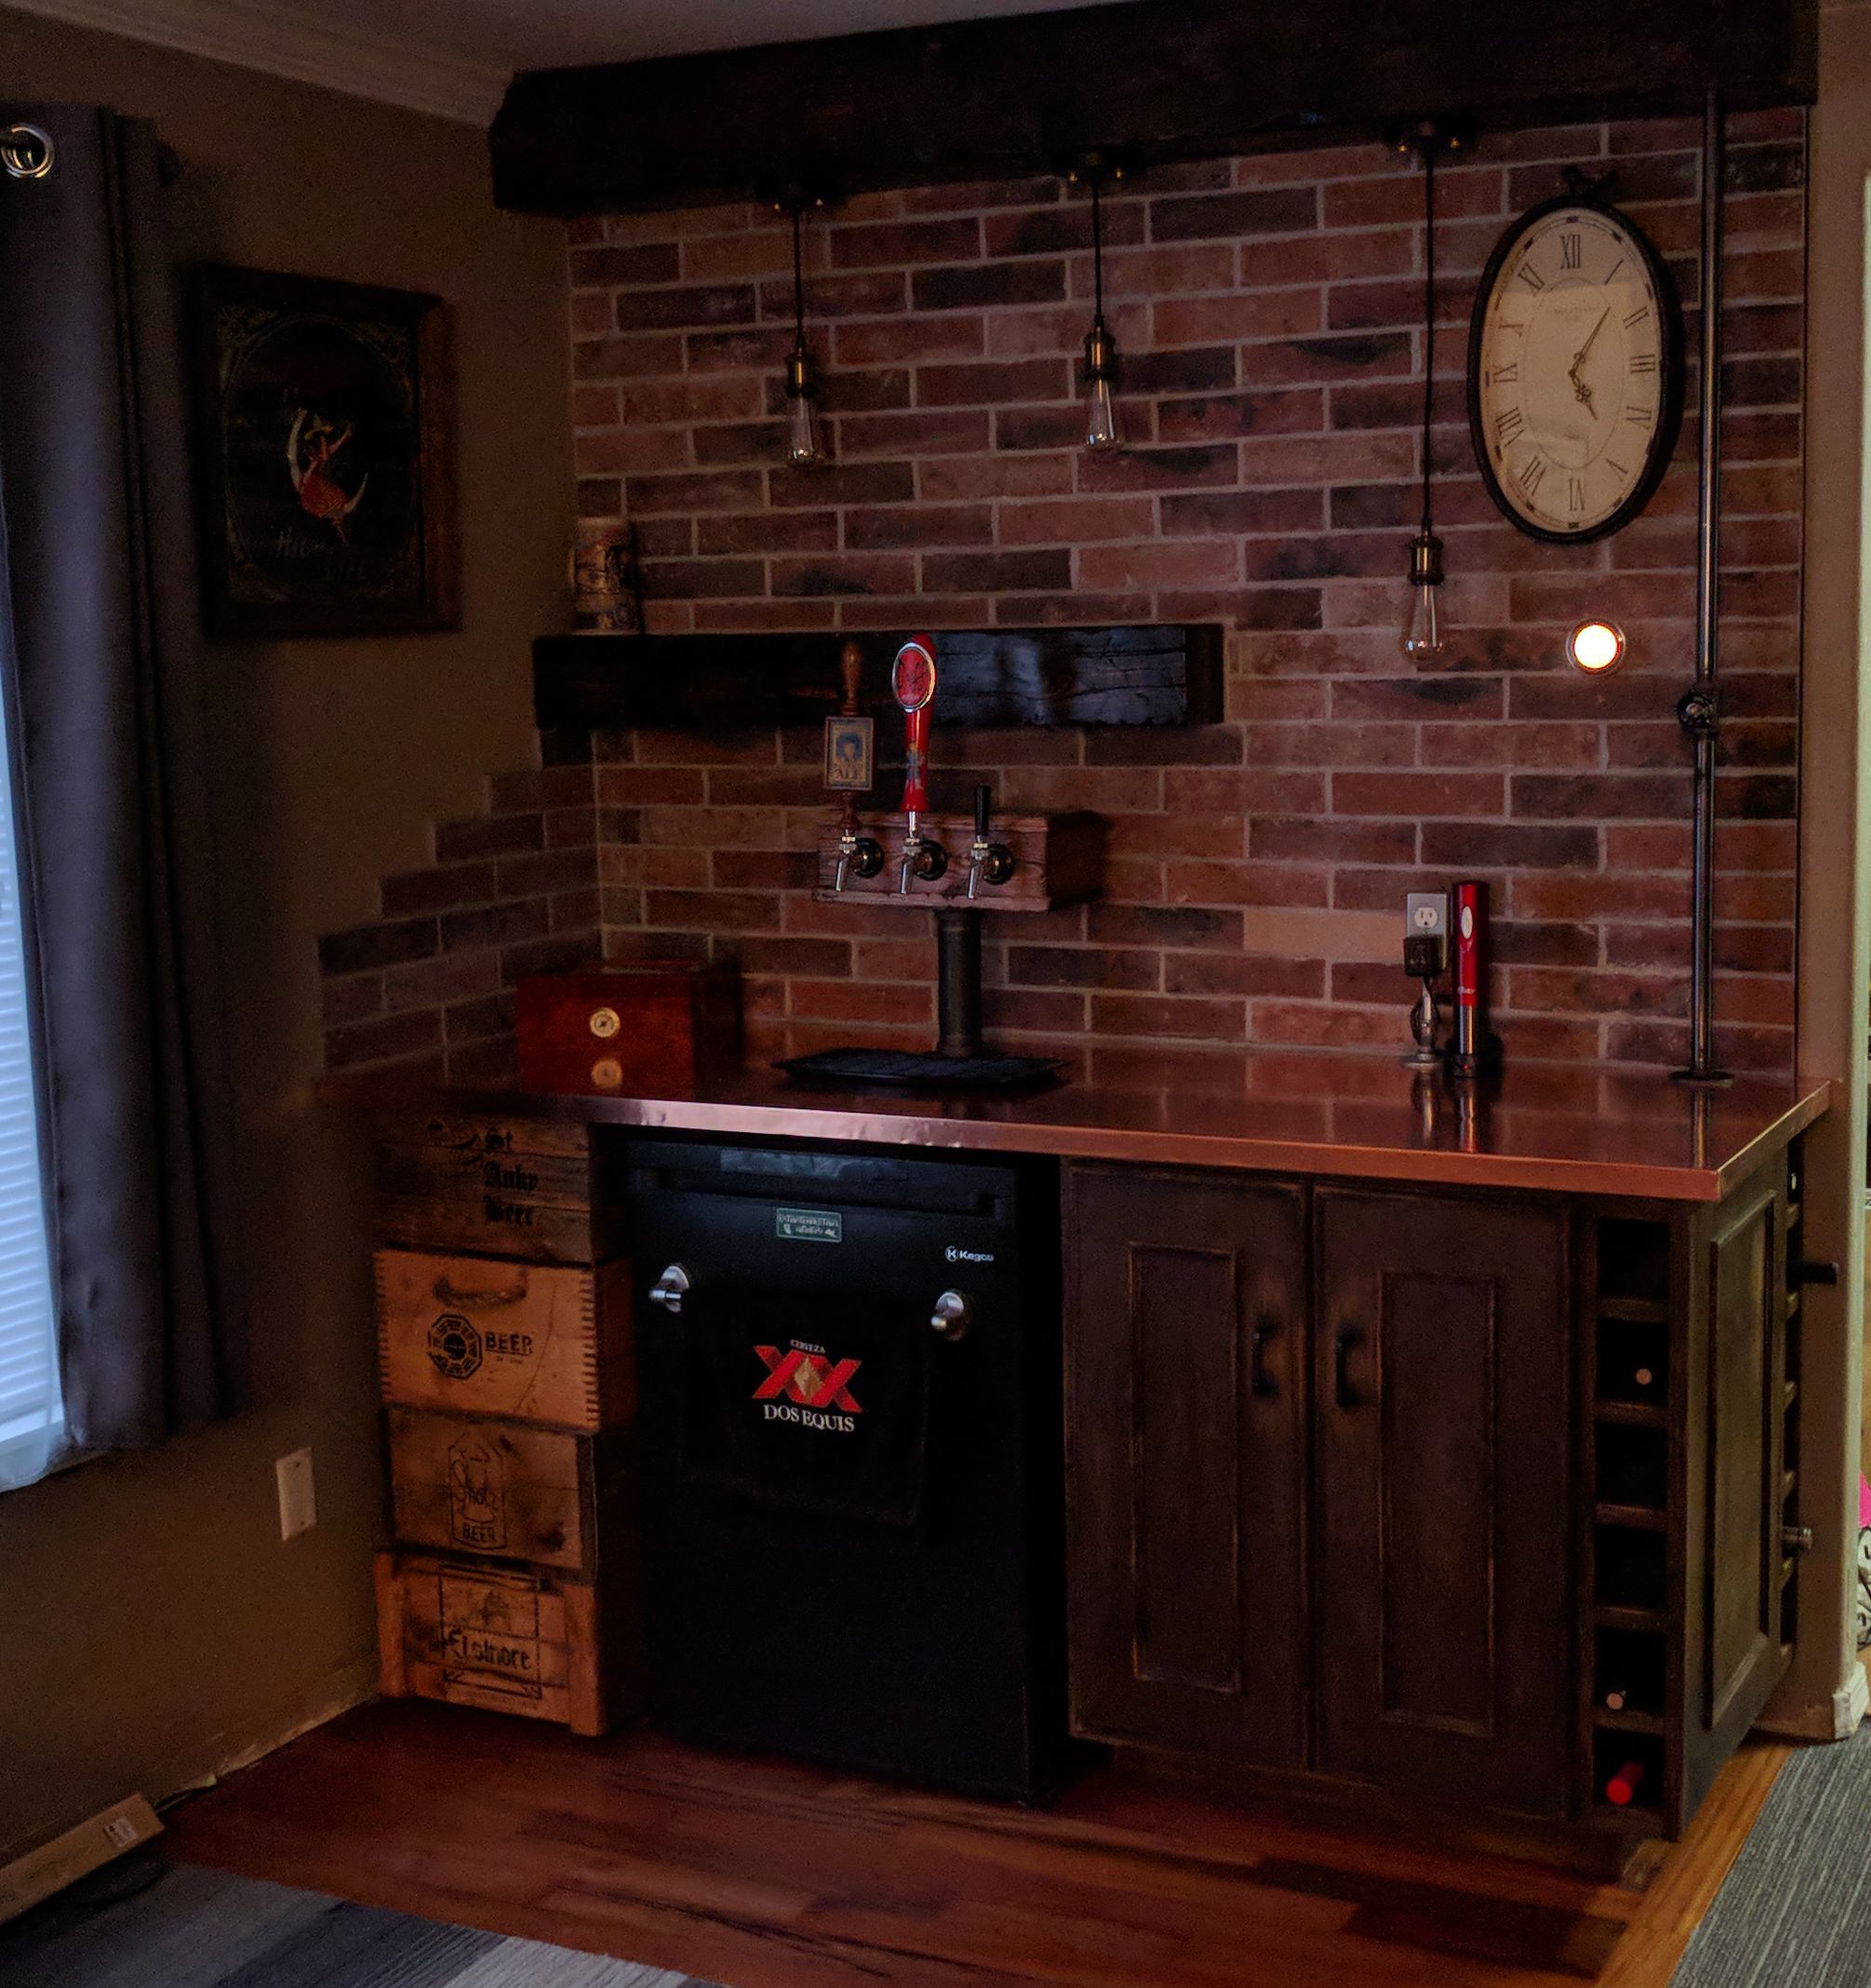
Alright. I think I can stick a fork in this one. I got some tile from the big orange place that looks just like brick. This isn't the stuff you got 10 years ago where you can still see to tiny dots from the printer. This looks like legitimate brick! After it set-up I got the grout done and an outlet put in. I have a bit of trim to put back and a little touch-up paint, but I'm calling this one done.
Lights on....

Lights off...

First on tap(s) will be
1) Hazelnut Brown
2) Mirror Pond clone
3) IDon'tKnowWhatToCallItBecauseIJustThrewThingsAndStuffInTheKettle Lager.
I'll post pictures in a few months after the copper has had some time to age. I'm really anxious to see how that progresses.
Lights on....

Lights off...

First on tap(s) will be
1) Hazelnut Brown
2) Mirror Pond clone
3) IDon'tKnowWhatToCallItBecauseIJustThrewThingsAndStuffInTheKettle Lager.
I'll post pictures in a few months after the copper has had some time to age. I'm really anxious to see how that progresses.
The faux brick is the home run. Really pulls it all together! I was looking at that for part of my basement remodel.
aces-n-eights
Well-Known Member
Beautiful, really nice! Maybe i missed it, but how did you set up the "water valve electrical switch"?
Well done!
Well done!
FloppyKnockers
Well-Known Member
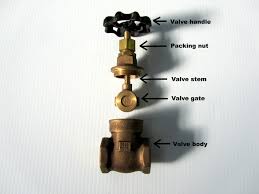
You didn't miss it. I didn't get detailed on that one. Making one isn't hard at all. All you need is a gate valve, rotary switch, and black iron tee.Beautiful, really nice! Maybe i missed it, but how did you set up the "water valve electrical switch"?
Well done!

Dismantle the valve and discard the body and gate.

Remove the knob from the rotary switch. Use a small piece of tubing (we should all have a bit of that) to connect the stem to the rotary switch.
The endgame is to have the rotary switch inside the black iron tee and the valve bonnet threaded onto the tee with a piece of tubing connecting the valve stem and the switch.
There is no hard and fast rules on how to do this because we are creating something out of materials ill-designed for the purpose. Differences from brand to brand will also differ the construction method. In my case I had to shorten the stem of the rotary switch and valve stem to get it to work. Also, the threads on the tee and bonnet are not the same, but I'm not going for water tight - just tight so I just wrenched it down. Some JB weld and hot glue later I had a working switch. I ran lamp cord through the pipe, made my connections, and voila... lights.
If all else fails, you can grab a pre-wired one from e-bay for slightly more than the cost of the materials.
leftcontact
Well-Known Member
Alright. I think I can stick a fork in this one. I got some tile from the big orange place that looks just like brick. This isn't the stuff you got 10 years ago where you can still see to tiny dots from the printer. This looks like legitimate brick! After it set-up I got the grout done and an outlet put in. I have a bit of trim to put back and a little touch-up paint, but I'm calling this one done.
Lights on....
View attachment 559224
Lights off...
View attachment 559225
First on tap(s) will be
1) Hazelnut Brown
2) Mirror Pond clone
3) IDon'tKnowWhatToCallItBecauseIJustThrewThingsAndStuffInTheKettle Lager.
I'll post pictures in a few months after the copper has had some time to age. I'm really anxious to see how that progresses.
Wow. Just.... wow.
aces-n-eights
Well-Known Member
Thanks for the write up on the switch - you're a pretty creative guy!
#3-Shagot lager. Because you just threw in what shagot.
FloppyKnockers
Well-Known Member
One more thing I'd like to add. I did a lot of research about passive vs. powered tower coolers and both have opinions and reviews for and against. So needless to say, I was very back and forth on that part. I ended up doing a passive cooler because I had some copper pipe on hand that would cost me nothing throw in - just needed to pick up a couple elbows. Worst case, it doesn't work and do a powered cooler.
It was as easy as running the tubing through the pipe and elbows then running the pipe through the insulation. The lines in the kegerator extend a couple inches down with the help of a tee that has an empty pipe connected to it touching the cold plate. So far all my pours are perfect. No foaming whatsoever.
No fasteners and no soldering - everything is a really snug fit.

Huge fan of copper tubing to de foam lines. Has always worked, is cheap, and easy.
davidjgabriel
Member
- Joined
- Oct 13, 2013
- Messages
- 5
- Reaction score
- 1
Looking good Billie Ray!
Looking good Billie Ray!
Feeling good, Brewis!
probablynotnick
Well-Known Member
Looks awesome! Definitely saving a pic of that to help sway the wife in the future...
I love this, if it were my place I'd be awfully tempted to let it spread to the entire room! Great inspiring build!
EDIT: @FloppyKnockers is my spirit animal.
EDIT: @FloppyKnockers is my spirit animal.
The copper bar top is super clutch. I friggin' love coppah!
FloppyKnockers
Well-Known Member
Thanks, man. It's aging quite well too. I'll post up some pics soon.The copper bar top is super clutch. I friggin' love coppah!
FloppyKnockers
Well-Known Member
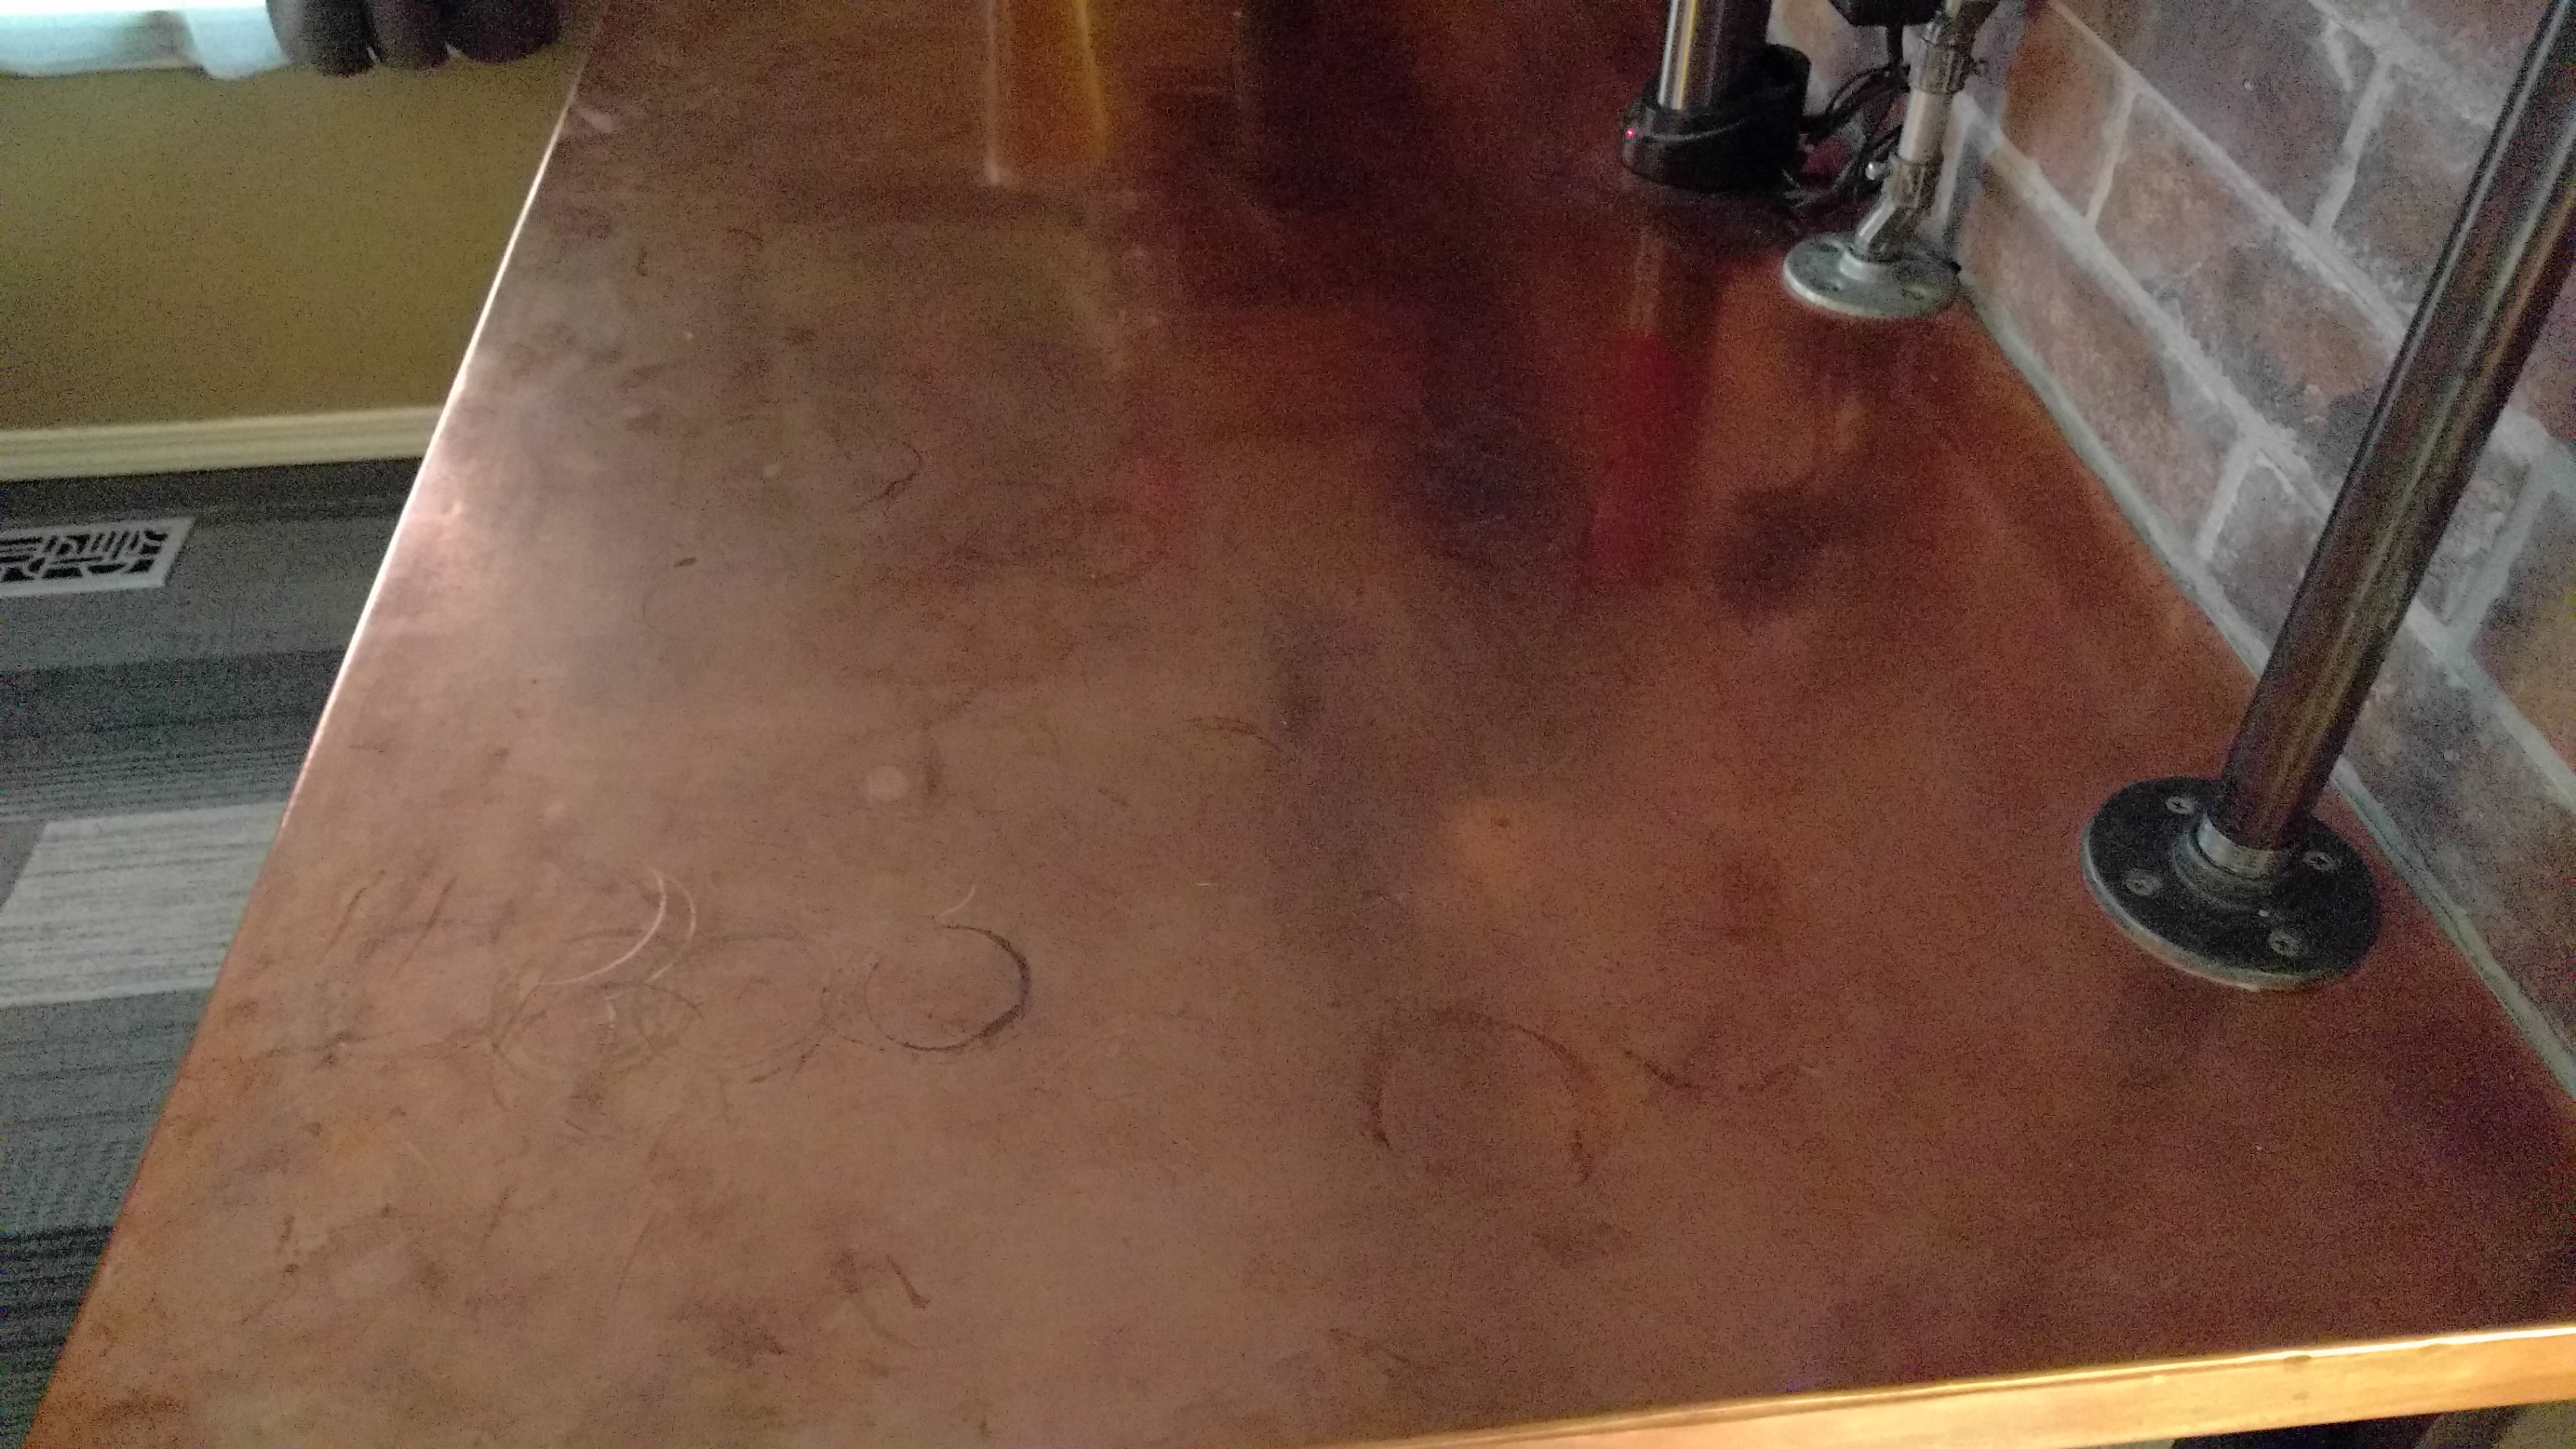
Okay, it's been a few months since I installed the counter top. No sealants, no treatments, just letting it age and wear naturally.


It's definitely taking on the 'old penny' feeling. It's cool to see the glass rings and spills appear and age. This counter top is NOT for the OCD clean-freak!


It's definitely taking on the 'old penny' feeling. It's cool to see the glass rings and spills appear and age. This counter top is NOT for the OCD clean-freak!
cyberbackpacker
Well-Known Member
Did you just use cheap pine for your beams?
FloppyKnockers
Well-Known Member
Did you just use cheap pine for your beams?
Pretty much. I got this stuff from Home Depot. I could've gone cheaper, but I didn't want to do a whole lot of clean-up on the lumber to get a good joint.
Peruvian802
Well-Known Member
Mitch S
Well-Known Member
Working on this over the weekend, I got the faux beams all finished. It wasn't as hard as I thought, but wasn't as easy either. It's not just a matter of beating the hell out of some wood then "ta da"....looks old. I actually had to put some though into it.
The top beam is the biggest (8x8). This will hold the wiring for the lights. The smaller beam (6x6) will act as a shelf. I started by mitering all the joined edges and corners and gluing up.
View attachment 555603
After that all dried I began the distressing. I used pictures of railroad ties for reference. Although the ends were made of face grain I did my best to make it look like end grain. I used a combination of screwdriver, awl, hammers, reciprocating saw, razors, and files/rasps to get the look I was going for.
View attachment 555605
After I was happy with the distressing I applied the first coat of stain. I chose ebony to get the best contrast I could.
View attachment 555606
After the ebony I applied two coats of dark walnut.
View attachment 555607
I then applied two coats of satin poly and will let it dry for a couple days. After that I will wire the large beam for lights and install it. Anybody have any good ideas for lighting? Something 1920's-ish that would go with the whole theme.
While I'm waiting on this I think I'll start building the cabinets.
I know this is a year old thread, but did you use just standard framing wood from Home Depot or Lowe's? I have a living room that looks straight out of the 70's with overhead beams that are "smooth finished" for lack of a better term. Buying pre-made distressed beams is not an option ($500 per 16' long beam cover).
this is awesome and i wish i saw this sooner. i work at a bar that has a hammered or dimpled copper bar top. it's the defining feature of the bar areaGot to the counter top yesterday. The wife was voting for copper, I was voting for concrete... I lost 1-1. So copper it is. Got a roll of 10 mil from basiccopper.com. I've done laminate counters in the past, but nothing like this. It was like extremely heavy tin foil. I managed to get it glued in place and folded over the edges and must say it looks pretty sweet. We went with raw, untreated copper so it will age naturally. It should take about 4 months to start looking like an old penny taking all the spills, glass circles, dents, and scratches with it along the way.
View attachment 558985
ancientmariner52
Well-Known Member
Check Youtube for videos about 'distressing' wood. You'll find many techniques there. Some 'beams' in high end homes are made of drywall. Smh. You could make distressed covers for your existing beams, or do the work in place. Personally, I'd build and finish covers on sawhorses, then lift them into place. Working overhead stinks.I know this is a year old thread, but did you use just standard framing wood from Home Depot or Lowe's? I have a living room that looks straight out of the 70's with overhead beams that are "smooth finished" for lack of a better term. Buying pre-made distressed beams is not an option ($500 per 16' long beam cover).
Mitch S
Well-Known Member
That's my plan for the distressing part. I was looking to see what wood OP was using, like a typical 2x4 or if it was something different. Based on the pricing of the beam "covers", I can see why they do it in drywall. As an estimator for a commercial General Contractor, one of the first things I tell owners to cut if they have a budget issue is any wood ceiling or wood wall display.Check Youtube for videos about 'distressing' wood. You'll find many techniques there. Some 'beams' in high end homes are made of drywall. Smh. You could make distressed covers for your existing beams, or do the work in place. Personally, I'd build and finish covers on sawhorses, then lift them into place. Working overhead stinks.
ancientmariner52
Well-Known Member
Oops. Once again, I'm trying to give swimming lessons to a shark! I will say that the cheapest pine is best for faux beams, as long as it is reasonably straight. Knots and coarse grain make the job easier.That's my plan for the distressing part. I was looking to see what wood OP was using, like a typical 2x4 or if it was something different. Based on the pricing of the beam "covers", I can see why they do it in drywall. As an estimator for a commercial General Contractor, one of the first things I tell owners to cut if they have a budget issue is any wood ceiling or wood wall display.
Mitch S
Well-Known Member
Nah you're good. Even as I approach 10 years in the industry I still learn things that seem like common sense.Oops. Once again, I'm trying to give swimming lessons to a shark! I will say that the cheapest pine is best for faux beams, as long as it is reasonably straight. Knots and coarse grain make the job easier.
I know this is a year old thread, but did you use just standard framing wood from Home Depot or Lowe's?
That's my plan for the distressing part. I was looking to see what wood OP was using, like a typical 2x4 or if it was something different.
O.P. actually said that he used Home Depot lumber in his last post. About 2 posts up from yours.
Home Depot Lumber
Mitch S
Well-Known Member
Yep, see it now. I posted this when I saw it on page 1 and didn't get to page 2. Kind of a "Eureka!!!" moment and started typing.O.P. actually said that he used Home Depot lumber in his last post. About 2 posts up from yours.
Home Depot Lumber
FloppyKnockers
Well-Known Member
@Mitch S Yeah, it's just the standard 1-by's. Knotty and straight are key. The joints have to be tight too because you're going to chamfer them and expose any sloppy joints. You could butt joint, but I feel that would be pretty apparent in the finished product. Distressing was done by hitting it randomly with various objects, hitting a piece of copper wire on it to resemble worm holes, stabbing it with a screwdriver, and using a scratch awl to for cracks. Finally, it has to be sanded. You don't want it to look like you just distressed it yesterday. My favorite technique is using a reciprocating saw laid sideways and drug backwards at different angles to resemble hand sawn marks.
Soulshine2
Well-Known Member
those pipe handles are cool.Update: I finally got the main cabinet done. Waiting for stain to dry is like watching paint dry, just not as fun. As I said before, I don't stain things so this was educational for me. I don't distress things either, so this definitely had its challenges.
I used Sande plywood because of the look of the grain. It has a tendency to chip and splinter because of its voids so taping your cut line and using a fine-tooth blade is vital. Stain really does make the grain 'pop'.
View attachment 557771
All the pieces of the cabinet (except the inside) got two coats of Dark Walnut, some sanding the wear parts, a coat of Colonial Maple, then satin clear. These wine bottle shelves really showcase the different layers.
View attachment 557772
Here's the assembled cabinet ready for more stain.
View attachment 557773
The face frames were made from poplar and stained in the same manner.
View attachment 557774
The doors are made from a couple pieces of leftover plywood, framed, and panel moulding attached.
View attachment 557775
The door were then stained and distressed. Here's a side-by-side comparison of the doors. The left one has just stain. The right has been distressed.
View attachment 557776
A coat of finish later they are done. I chose handles that look like iron pipe to match the tower and light switch.
View attachment 557777
Here's the finished cabinet.
View attachment 557778
This week I learned a couple things.
1) I hate staining.
2) The fumes from stain will be sucked into your gas dryer (even though your dryer is not in your shop) and burn. Out near the exhaust it will smell like charcoal lighter fluid. The next day at work your clothes you will smell like kerosene.
Up next I am going to work on the other cabinet that will house the CO2 tank. I was going to do something that matched the main cabinet, but am having second thoughts.
Mitch S
Well-Known Member
Thanks for the info! The whole speakeasy concept you have going is awesome, and love the execution of it in the space. I definitely wish I had space to do something like that.@Mitch S Yeah, it's just the standard 1-by's. Knotty and straight are key. The joints have to be tight too because you're going to chamfer them and expose any sloppy joints. You could butt joint, but I feel that would be pretty apparent in the finished product. Distressing was done by hitting it randomly with various objects, hitting a piece of copper wire on it to resemble worm holes, stabbing it with a screwdriver, and using a scratch awl to for cracks. Finally, it has to be sanded. You don't want it to look like you just distressed it yesterday. My favorite technique is using a reciprocating saw laid sideways and drug backwards at different angles to resemble hand sawn marks.
Similar threads
- Replies
- 1
- Views
- 861
Latest posts
-
-
-
-
-
Iowa Bottoms Up Beer Dispensers - Used, Untested - $100
- Latest: ChickenLambChops
-
-

