Adventures in Homebrewing Economy wort chiller thoughts

Homebrew Talk - Beer, Wine, Mead, & Cider Brewing Discussion Forum

Help Support Homebrew Talk - Beer, Wine, Mead, & Cider Brewing Discussion Forum:

This site may earn a commission from merchant affiliate links, including eBay, Amazon, and others.

dkeller12

Well-Known Member
Joined
Sep 9, 2012
Messages
424
Reaction score
63
Location
Chapin
I am in the market for a wort chiller and want to keep the price down. I saw this wort chiller and wonder if anyone is using it and how they feel about it.

http://www.homebrewing.org/25-38-Economy-Copper-Wort-Chiller_p_2734.html

My main concern is my kettle is almost 15" tall and this is only 12" tall. I assume I can bend it to make it taller but not sure it will make it out of the kettle. I would like the clamps and vinyl tubing outside of the kettle in case it leaks.

Any thought or suggestions would be greatly appreciated.

Thanks!


Sent from my iPad using Home Brew
 
AiH is pretty awesome; I think their description gives you a good idea of what you're getting.

The height is probably not that much of an issue, you can probably work around that. I had a similar chiller years ago (my first chiller) and that vinyl tubing will get pretty soft from the hot water and the description is accurate in that the clamps could be a bit dangerous.

I think the title says it all, it's an "economy" chiller. You'll likely replace it later which couple mean $40 down the drain. If you don't have anything right now and can't go the next step up, then it's probably better than nothing.
 
A wort chiller is just about the easiest thing to build.

If you are trying to do it on the cheep, get a 20' coil of 1/4" tube for about $20. Then you need about 10' of clear vinyl hose cut into 5' lengths, 3 hose clamps, and a garden hose or faucet adapter.

To make the coil, bend it around something about 1' to 1.5' in diameter.

Except that one is 25' of 3/8" tubing for $40. This chiller would probably cost about the same as making one when you're purchasing quantities for a single chiller. DIY isn't always cheaper.
 
Except that one is 25' of 3/8" tubing for $40. This chiller would probably cost about the same as making one when you're purchasing quantities for a single chiller. DIY isn't always cheaper.

And that is the main issue. I was planning on building one but the price for the 25' of 3\8 copper tubing is $30 near me. With the fittings and tubing cost not to mention the time to build it, it seems easier to buy this one. That is unless any of you know where to source the tubing cheaper than $30.
 
Yes, I am in Florida. So are the clamps that hold on the vinyl tubing more likely to leak or only if you don't treat the chiller properly? or is it better to just go with pressure fittings right from the start? I want to keep the costs down but as it has been mentioned, I don't want to end up doing this all over again later.
 
What is your batch size?

Is this a full 5 gallons you're trying to chill?

Outside or stovetop?

--

I feel like being in Florida with warmer water ground water, this will probably not be the last chiller you own. If you think you're going to be in the hobby for a while, I would probably step up a level unless you're just doing 3 gallon partial boils on the stovetop with not intention of going larger.

It's entry level chiller that has the advantage that it's relatively low cost and it's better than no chiller at all. Otherwise, there would be a pretty noticeable difference if you went to something in the $70 range which I understand is nearly double the cost. That's also the point at which you might be able to DIY something for maybe $10-$15 less.
 
Let me save you some heart ache and disappointment as I just did what you're going to do.

1st I bought the Hydra chiller from JadedBrewing. I had some spare cash from my B-day and after living in HI and trying to chill wort in a pot in a cooler for 2 hours I decided go big.

Now I live just North of you in GA. Well I used it two weeks ago for the first time. Temp plummeted from 200 to 90 in a couple quick minutes. Then there at 90 it sat. For a half hour I watched it slowly tick from 90 to 87 before I finally said screw it, and put it in my ferm chamber to chill the rest of the way before pitching. The ground water is just too warm for us right now.

I'm going to buy another chiller to place in front of the Hydra. I'm going to put it in a cooler filled with ice water to really chill the water before it hits the actual wort chiller. This is what I'm going to do since I've already invested in a $150 wort chiller. You may figure out another solution, but these are the most realistic result you can expect from someone that went over the top and still got mediocre results due to the water source.

You can also buy a submersion pump and set that in ice water and recirculate ice cold water, but I didn't want to bother with a pump.

Even if you bought 2 of those and did the same set up I'm going to do, the 40-60 degree ice water that chills your 80 degree ground water will dramatically improve your results with the two small cheap guys.
 
What is your batch size?

Is this a full 5 gallons you're trying to chill?

Outside or stovetop?

--

I feel like being in Florida with warmer water ground water, this will probably not be the last chiller you own. If you think you're going to be in the hobby for a while, I would probably step up a level unless you're just doing 3 gallon partial boils on the stovetop with not intention of going larger.

It's entry level chiller that has the advantage that it's relatively low cost and it's better than no chiller at all. Otherwise, there would be a pretty noticeable difference if you went to something in the $70 range which I understand is nearly double the cost. That's also the point at which you might be able to DIY something for maybe $10-$15 less.

5 gallon all grain batches. Just stepping up from PM.

Outside brewing in a 10 gallon kettle.
 
Let me save you some heart ache and disappointment as I just did what you're going to do.

1st I bought the Hydra chiller from JadedBrewing. I had some spare cash from my B-day and after living in HI and trying to chill wort in a pot in a cooler for 2 hours I decided go big.

Now I live just North of you in GA. Well I used it two weeks ago for the first time. Temp plummeted from 200 to 90 in a couple quick minutes. Then there at 90 it sat. For a half hour I watched it slowly tick from 90 to 87 before I finally said screw it, and put it in my ferm chamber to chill the rest of the way before pitching. The ground water is just too warm for us right now.

I'm going to buy another chiller to place in front of the Hydra. I'm going to put it in a cooler filled with ice water to really chill the water before it hits the actual wort chiller. This is what I'm going to do since I've already invested in a $150 wort chiller. You may figure out another solution, but these are the most realistic result you can expect from someone that went over the top and still got mediocre results due to the water source.

You can also buy a submersion pump and set that in ice water and recirculate ice cold water, but I didn't want to bother with a pump.

Even if you bought 2 of those and did the same set up I'm going to do, the 40-60 degree ice water that chills your 80 degree ground water will dramatically improve your results with the two small cheap guys.


I am starting to think that a huge party bucket and a lot of ice for an ice bath is the better way to go since the ground water is so warm here. :) I had planned on trying the pond pump in the ice water routine, I think may work well, but now I am no so sure. So what I am gathering from all of this is, if I want to do it right, step up to a better chiller and definitely run it through a bucket of ice.
 
Except that one is 25' of 3/8" tubing for $40. This chiller would probably cost about the same as making one when you're purchasing quantities for a single chiller. DIY isn't always cheaper.

It might be when the cheapest shipping option is $13.35.

I could DIY an IC with 20 feet of 3/8" copper tube for less than $53.

EDIT: If you do have warm groundwater, an IC without a prechiller is only going to get you so far. I have 50-60F groundwater practically year round so I can get away with a 50' IC for 5 gallon batches. I added my original 20' IC to the front of it as a prechiller and I can cool 5 gallons to pitch temps in about 20 minutes (except for in August when I'm getting mostly creek water).
 
I am wondering if I attached my garden hose to a long length of vinyl tubing (maybe 10 feet or so), then loop the excess tubing in a bucket of ice water and then up to the chiller, if would this aid in cooling the ground water before entering the chiller. Not sure if the water would be in the portion of the tubing in the ice long enough for it to lower the temperature or if the tubing would insulate the water so that it wouldn't matter. Anyone ever hear of that?
 
I am wondering if I attached my garden hose to a long length of vinyl tubing (maybe 10 feet or so), then loop the excess tubing in a bucket of ice water and then up to the chiller, if would this aid in cooling the ground water before entering the chiller. Not sure if the water would be in the portion of the tubing in the ice long enough for it to lower the temperature or if the tubing would insulate the water so that it wouldn't matter. Anyone ever hear of that?

A lot of people do just that. A lot of people also use 2 chillers. They use the one in the boil kettle to get the temp down to something reasonable (say 120 F or so) then have another one in-line before the kettle that they drop into an ice chest full of ice water to prechill the cooling water to bring the temps all the way down. Or you can use one chiller in the kettle and a little pond pump in the ice chest to recirculate the cooling water.

But even a cheap IC with 80+ degree ground water beats the heck out of just an ice bath when you get to 5 gallon batches and up. When it's hot here in SoCal I knock the wort down to 85-90 F with my IC, put it in the fermenter, then put the fermenter into the swamp cooler with ice bottles to chill the rest of the way.
 
I am starting to think that a huge party bucket and a lot of ice for an ice bath is the better way to go since the ground water is so warm here. :)

Don't do it man. It's going to drive you crazy :drunk:. Trust me, I did it in Hawaii, where it's 75 all year round. Seriously I used to put my 5 gal stock pot in a cooler surrounded by ice and water and it still took anywhere from 1-2+ hours to get it down and I had two batches get infected, which I blame on that horrible exposure time.

I don't think you even need to step up the chiller, it's a good option, but not necessary. I think your results would be excellent with 2 of them. One in the ice bath and one in the wort. I am going to coil my excess hose in a cooler this weekend so if you want to wait till next week I can let you know how it goes. My plan is to coil my excess garden hose into the cooler about a half hour prior to chilling.

At the end of the day, regardless of the size of your chiller, your results are dictated by the source of water. I wish I would of used this common sense approach prior to committing to my Hydra cooler. Not that I wouldn't have bought it, I just would of thought it through a little better.
 
I use 2 chillers during the summer. I've found that cooling from 212F-90F without ice, then adding ice for the last 20F is the best way to use a pre-chiller. You'll use way less ice, and focus it on the hardest part of the cooling cycle. I have a plate chiller now, but I still use the old immersion chillers on occasion. They are much easier to use and clean.

As far as the item listed, I'd go bigger if possible. If not, buy it and you can always add more tubing to it down the road. I added an extra 20ft to mine with a few couplers,a coil of copper, and some solder. Easy to do, and no waste.

The height problem is easily fixable the same way. Either re-bend the tubing to make it taller, or add some extra tubing onto the ends. You want the vinyl as far away from heat as possible. Trust me - I'm the voice of experience. There's nothing worse than melting a hose in the middle of a cooling session. :D
 
Get a plate chiller of some kind, you'll save yourself so much time it is worth the money. Also get the economy chiller. Run your garden hose to the economy chiller in a salted ice bath, then to the plate chiller. The wort goes in the opposite direction through the plate chiller. If you have someone agitating the economy chiller in the salted ice bath you will be able to achieve temperature under 70 degrees down from near boiling temp in less time than it took to type this response.
 
Don't do it man. It's going to drive you crazy :drunk:.

I am not, just with all the issue I have with the warm ground water and finding the parts, a tub sounded so much easier. :D

I am going to coil my excess hose in a cooler this weekend so if you want to wait till next week I can let you know how it goes. My plan is to coil my excess garden hose into the cooler about a half hour prior to chilling.

Yes, please let me know how that works out if you don't mind. If this works for you, I will know more of which direction I want to go.

Thanks for all the help. I know I am making this so much more complicated than it is, but I want my beer to be the best it can.
 
So I just went to the local the home depot and priced the tubing to make a chiller and 20' of 3/8" OD tubing was $28 and 20' of 3/8" ID tubing was $48. Unbelievable prices for copper now.

So with that being so high, I am thinking it would be worth stepping up to this chiller:

http://www.homebrewing.org/25-Wort-Chiller-38-copper-tubing_p_1588.html

It has the compression fittings for better leak protection and if the info from FiddlersGreen87 and coiling the garden hose in ice works out, this may be the better way to go.

This is what I got:

Stainless steel chiller. Been using it at 100 F during summer and 30 F in winter time. In summer when the wort reaches <90F I swap the garden hose with an immersion pump sitting in a cooler in a lot of ice and just enough water to cover the pump. Recirculating the ice water gets me down to the low 60s or high 50s.

EDIT: I love AIH and ordered a lot from them. They are very responsive if you have questions or problems.
EDIT 2: I only had the hose pop off once but if you make sure you tighten (or at least check) the hose clamps you'll be fine!
 
I bought the AIH Economy chiller roughly 2 years ago. I've had no problem with it. With the high temp ground water in atlanta I use tap water for to get down to about 120 then pump from a bucket of ice water and recirculate that. Doesn't bother me at all...
 
Yes, please let me know how that works out if you don't mind. If this works for you, I will know more of which direction I want to go.

Thanks for all the help. I know I am making this so much more complicated than it is, but I want my beer to be the best it can.

No problem at all. I'm going to try it either way, so I'm happy to pass on my information if it helps someone else. Making great beer is important, but not wasting unnecessary money in the process helps to make more great beer. :mug: I'll let you know Sunday how it goes. Remember I'm not using a silicone hose, just a straight garden hose so if it works decently, it should work even better with a silicone hose.
 
Let me save you some heart ache and disappointment as I just did what you're going to do.

1st I bought the Hydra chiller from JadedBrewing. I had some spare cash from my B-day and after living in HI and trying to chill wort in a pot in a cooler for 2 hours I decided go big.

Now I live just North of you in GA. Well I used it two weeks ago for the first time. Temp plummeted from 200 to 90 in a couple quick minutes. Then there at 90 it sat. For a half hour I watched it slowly tick from 90 to 87 before I finally said screw it, and put it in my ferm chamber to chill the rest of the way before pitching. The ground water is just too warm for us right now.

I'm going to buy another chiller to place in front of the Hydra. I'm going to put it in a cooler filled with ice water to really chill the water before it hits the actual wort chiller. This is what I'm going to do since I've already invested in a $150 wort chiller. You may figure out another solution, but these are the most realistic result you can expect from someone that went over the top and still got mediocre results due to the water source.

You can also buy a submersion pump and set that in ice water and recirculate ice cold water, but I didn't want to bother with a pump.

Even if you bought 2 of those and did the same set up I'm going to do, the 40-60 degree ice water that chills your 80 degree ground water will dramatically improve your results with the two small cheap guys.

Sorry to hear that you feel disappointed in your Hydra purchase. The main issue is your high ground water temps and, as with every type of chiller, the Hydra can not chill wort below the temperature of the cooling water. The best solution is going to be a pump similar to this one used with with ice water (Pond pumps will not perform as well). You can add 12 lbs of ice to 5 gallons of tap water (should get your water in the 40 degree range) and pump the 5 gallons though the chiller, DO NOT RECIRCULATE THE WATER. The 5 gallons of ice water will drop the wort temp from 90 to 65 in about 1.5 minutes.

The pre-chillers are going to choke off the water flow rate resulting in slower chilling times. Make sure you are following our recommendations for using you IC which can be found here.

Also, we are very concerned with our customers happiness and we do not want anyone to have any level of heart ache or disappointment in our products, and no one should ever feel that they are "stuck" with a JaDeD product. We offer the industry leading money back guarantee, which includes shipping charges. We strongly urge you to try the pump first, as you will notice the wort temperature once again plummet when you switch to the ice water. We hope this helps.
 
Sorry to hear that you feel disappointed in your Hydra purchase.


No no no, this couldn't be further from the case. It was my own ignorant expectation that I was disappointed in. It's like you said, the wort chiller can only chill to the temp of the water being ran through it. I just never thought about how warm the ground water in Georgia would be. I'm actually really looking forward to brewing this winter to see the difference.

The Hydra actually does a great job going from 200+ to 90 in 3-5 minutes. With the coiled hose inside the cooler in an ice bath I was actually able to drop it to 80 much faster this time than the first run. It's also been a much cooler week this past week which I think gave me some cooler ground water.

There's nothing about the Hydra, or my experience with JadedBrewing that was a disappointment. In short... you will not be getting my Hydra back. :rockin:

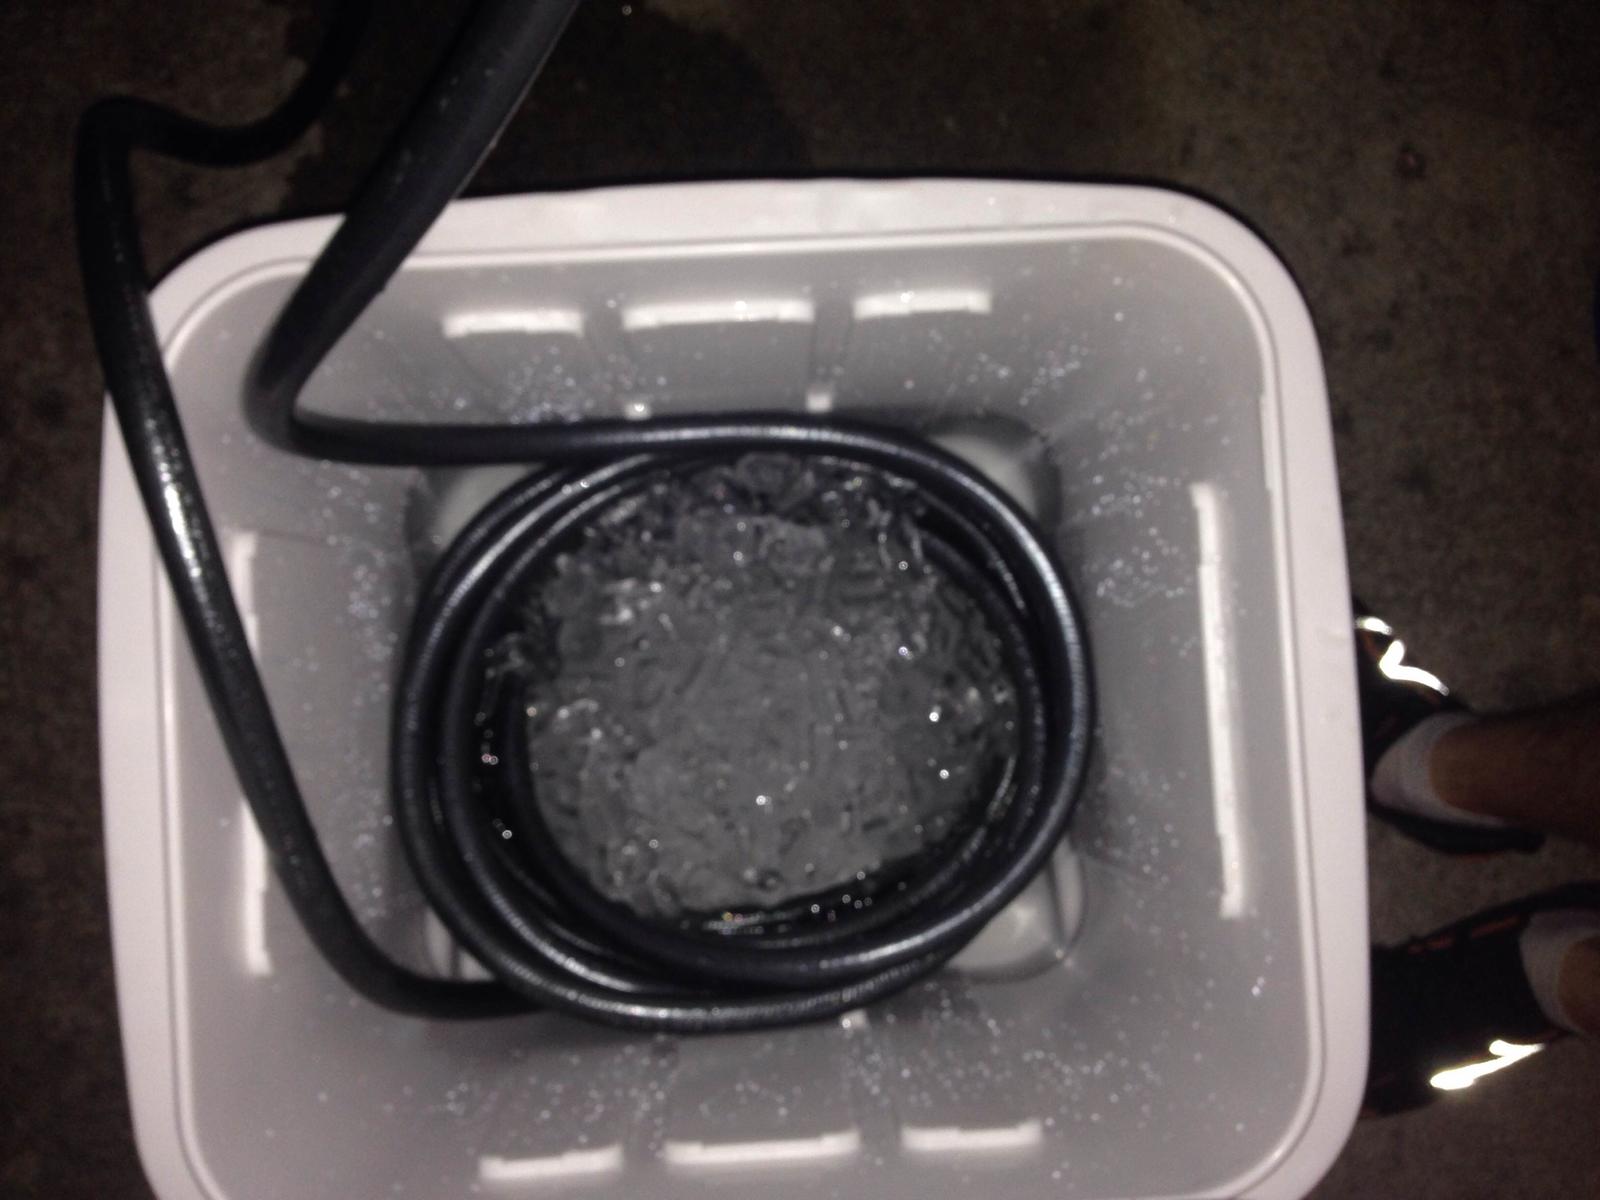
Dkeller12 to answer your question I did notice an impact by coiling my garden hose in an ice bath inside a cooler. My hose is quite thick so I think you'll have better results with a thinner silicone one, but make sure you have plenty of it coiled in there. I also did it with the Hydra, so I think it improved my results, I would say with a smaller one, I'm not confident the coiled hose would transfer enough to give you the results you're looking for. I'd say either stick a pump in ice water or grab a second one and place it in front of the chiller in an ice bath. Which ever way you go, I can tell you as one noob to another, I just did my first AG brew last night, and my chiller dropping the temp so rapidly gave me an excellent cold break and was absolutely worth it. I wish I would of taken a picture so I could show you the impact, but it looked like egg-drop soup in my fermenter as all the protein separated out. Hope this helps, let me know if I can answer anything else as I've probably crossed a similar road trying to really improve my beer this summer. :mug:

I did 2x 10lb bags of ice + the ice in my ice tray and water. I chilled 1 bag and the ice tray ice with water for about the last half of my boil and then threw in the last 10lb bag and filled with water about 5 minutes prior to flame out. The picture is how I coiled it, and with just the 1st bag chilling it at the half way point.

IMG_1486.jpg
 
Dkeller12 to answer your question I did notice an impact by coiling my garden hose in an ice bath inside a cooler. My hose is quite thick so I think you'll have better results with a thinner silicone one, but make sure you have plenty of it coiled in there. I also did it with the Hydra, so I think it improved my results, I would say with a smaller one, I'm not confident the coiled hose would transfer enough to give you the results you're looking for. I'd say either stick a pump in ice water or grab a second one and place it in front of the chiller in an ice bath. Which ever way you go, I can tell you as one noob to another, I just did my first AG brew last night, and my chiller dropping the temp so rapidly gave me an excellent cold break and was absolutely worth it. I wish I would of taken a picture so I could show you the impact, but it looked like egg-drop soup in my fermenter as all the protein separated out. Hope this helps, let me know if I can answer anything else as I've probably crossed a similar road trying to really improve my beer this summer. :mug:

I did 2x 10lb bags of ice + the ice in my ice tray and water. I chilled 1 bag and the ice tray ice with water for about the last half of my boil and then threw in the last 10lb bag and filled with water about 5 minutes prior to flame out. The picture is how I coiled it, and with just the 1st bag chilling it at the half way point.

Thanks for updating me with what you found, sounds like you had positive results overall. You are probably right about the thickness of that hose you used, it probably had an impact on the amount of cooling that could happen to the water as it passed through. I have a very think walled economy hose that I think will work out perfect. Hopefully

As for the chiller, I ended up ordering this one:

http://www.northernbrewer.com/shop/...rsion-wort-chiller-w-garden-hose-fitting.html

They had a 20% off discount code for Friday and Saturday so I sacrificed a little cooling efficiency with the stainless steel and gained durability and saved a little money at the same time. I will let you know how this all works out for me once I give it a try.

Again, thanks for the information I appreciate you taking the time to update me.

Cheers:mug:
 
Trying to prechill cooling water even with a second copper coil doesn't really do much good so I know that anything other than copper is going to be a waste of time. The best way to go is to use tap water to knock most of the heat out of the kettle, then pump icewater directly into it.

If buying a pond pump in addition to a chiller is too much, I've also had pretty good luck gravity draining the icewater from a second floor in the house. It just requires some extra vinyl tubing. I used a bottling bucket so it already had the spigot on the bottom for draining.
 
For the cost of that vinyl tubing you could get a ecoplus pump on amazon...the ne I have is like 20 bucks and has been great the past 2 years
 
I use the AIH economy chiller. For the price I couldn't build one for less, once you factor in time. It works good in north florida outside with my 10 gallon kettle doing 5 gallon BIAB. I run tap water till the temp gets down to 110 or so, then use a submersible pump in a bucket with ice water. I cool a batch down pretty quick.

I haven't had any trouble with the clamps or anything, and the height isn't much of an issue, I do have to use a potholder or something to keep the tubing from touching the side of the kettle at first, that kettle is stupid hot, not sure if it'll melt the tubing, but why risk it?
 
I made a chiller from 20' of 3/8 copper (26.00 at lowes) this week. Bought one clamp for the 3/8 ID plastic hose I already had and a 3/8 dishwasher connector with compression fitting which has hose connector on other end (5.00) It took about 10 minutes to tighten the coil around a pot I had in the kitchen that fit in my brew kettle and attach the connector. Simple and cheap and it worked well.
 
Back
Top