ChocolateMaltyBalls
Well-Known Member
I just ordered mine the other day, right after a big price drop. I'm looking forward to getting rid of my bazooka screen, and maybe start fly sparging. Thanks dude!

Hey Everyone,
I wanted to do my first all-grain brew and did a lot (A LOT) of research into to the best methods, costs involved, etc. I decided that the false bottom would give me the most flexibility, but at anywhere from $30-$100 for professionally made ones, my inner Scrooge said, "Bah, humbug!" So I did some more looking and came up with my own using only $5 worth of parts. It's for a 5 gallon Igloo beverage cooler, but the design is simple and could be modified for almost any size round mash tun. I'll admit I'm as green as one gets to brewing and would greatly appreciate any comments and suggestions about my design. It's still untested, but I'll be brewing a Scottish Heavy Ale next week and will post an update as to how it performed.
Parts List
(1) 9" 18-gauge Aluminum Pizza Pan; 0.4" depth - {I got mine from a restaurant supply store} - $2.88
(1) PEX Elbow Adapter; brass - {From Home Depot in the plumbing section} - $1.71
(2) #31 O-Rings - {Home Depot in the faucet repair section} - $0.23/ea
1/8" drill bit
1/2" or 3/8" drill bit - {Depending on your inlet size; I made my assembly out of 1/2" parts, so I used a 1/2" bit}
Variable speed drill
Ruler or T-Square
Pencil
Scotch Tape
Old cutting board or sheet of wood
Safety Glasses - {Better to look like a dork for an hour that a pirate the rest of your life}
How To
Begin by taping the pizza pan domed side up to the cutting board. This will make it easier for the rest of the steps. Use the ruler or T-Square to draw a straight line down the center of the pan. Rotate it 90 degrees and make another line so the cross marks the center of the pan. Mark the lines every 1/2" from the center out to the edges on each axis. Finally draw parallel lines at each mark to form a grid:
Put on your goggles and start drilling 1/8" holes at each point on the grid. There'll be about 250 of them so it'll take a while.
When that's done, use the 1/2" or 3/8" bit to drill the port in the center of the pan for the PEX elbow. Use a wire brush, sandpaper or the like to clean all the barbs off the underside of the pan from drilling. Wash the pencil grid of the pan and use a garden hose or high pressure water to clean off any metal flakes that may have collected in the rolled rim of the pan.
Take one of the O-Rings and push it onto the inlet side of the PEX elbow about halfway down the barb. Insert the elbow into the port in the center of the pan so it looks like this:
Holding it in place, take the other O-Ring and push it over the inlet barb on the underside of the pan. The PEX elbow should be held firmly in place, decently sealed and easily rotated:
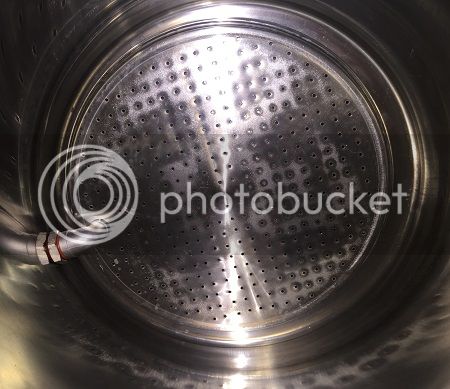
Here's mine installed in my mash tun. I used 3" of 1/2" braided tubing to hold mine in place and it is held snugly. You could also use copper tubing with compression fittings, but I find this way much easier to deal with as far as installation and cleaning are concerned.
I put 1 gallon of water into the tun to test dead space and it was only 1/4 gallon short, so not too bad. Hopefully some of you can mess around with the design and I'll post my findings when I brew next week.
NOTE
11/16/2012 -- A few people have mentioned that due to the lightness of aluminum there have some issues with the false bottoms floating while mashing, causing stuck sparges by grist getting caught in the dip-tubes and lines. One way to remedy this is to use rigid, braided food-safe tubing from the PEX elbow to the barb on the valve. This is what I use and I haven't had an issue with floating or stuck sparges.
Another would be to use compression fittings and copper/SS tubing which would keep the false bottom in place as well. This is what I'll likely use when I upgrade to a 10 gallon mash tun in the future.
Finally, adding weights to the false bottom such as SS washers above and below the PEX elbow or weights mounted along the upper edge of the rim would likely cure this issue as well.
Update
I brewed with this false bottom for the first time today and I’m honestly impressed at how well it worked! Hit 85% efficiency and had only a pinch of grain material come out while fly sparging. The tun had a fast, steady flow and didn’t even hint at a slow or stuck sparge. Had exactly 5.7 gallons of wort which was what BeerSmith predicted.
Even though this is my first all-grain brew, this false bottom worked much better than my friend’s who uses the braided S/S line method. She often has to fiddle with it and complains of stuck sparges all the time. Cheap B-Day present, perhaps?
I got the hole size and spacing parameters from a fantastic article I read by John J. Palmer and Paul Prozinski here: http://morebeer.com/brewingtechniques/library/backissues/issue3.4/palmer.html. It has some great info on improving mash efficiency and it taught me quite a bit.
UPDATE
12/3/2012 - I upgraded to a 10 gallon Igloo cooler for my mash tun to do higher gravity brews and made a new false bottom. This one is made from a 12" stainless steel pizza pan I purchased from Amazon for $13. I cannibalized the parts from my 5 gallon mash tun and they work flawlessly. Here you can see the the false bottom made with the same 1/8" drilled holes at 1/2" offsets. I set the PEX pickup end as low as possible under the false bottom as this pan is a bit deeper than the 9" in the previous build. Hopefully this will minimize the wort lost to dead space. I'm planning an Imperial IPA next and will report the new mash tun's performance once it is complete.
UPDATE
12/29/2012: Brewed an Imperial IPA with the new 10 gal mash tun and 12" pizza pan false bottom. Worked even better than the original 9" version. The addition of S/S hose clamps on the dip tube made grain material in the 8qt re-circulation almost non-existent so I highly recommend using them with this design. Hit 82% efficiency and there was no hint of a stuck sparge (very smooth, slow, steady flow). I'm very happy that a second iteration of this design has proven as effective as the original.
I am looking to move into all grain so I have been researching building a false bottom and this thread is great. I do have a question. John Palmer says this in chapter 17 of how to brew, "Another extraction efficiency problem that needs to be considered when designing your tun is preferential flow down the walls. The smooth space between the grainbed and the wall of the tun can be the path of least resistance to the drain. To minimize this short circuiting, false bottoms should fit tightly". I am curious how some of these FBs are fairing in efficiency, in light of this preferential flow. Some of the pictures shown clearly show a false bottom smaller than the mash tun itself. I am very interested especially in the plastic microwave screen because it seemed the easiest to find/make and you don't have to worry about trying to find a stainless steel one. Did anyone make that plastic one and have problems with preferential flow or even the plastic colapsing under the weight of the grain?
I am looking to move into all grain so I have been researching building a false bottom and this thread is great. I do have a question. John Palmer says this in chapter 17 of how to brew, "Another extraction efficiency problem that needs to be considered when designing your tun is preferential flow down the walls. The smooth space between the grainbed and the wall of the tun can be the path of least resistance to the drain. To minimize this short circuiting, false bottoms should fit tightly". I am curious how some of these FBs are fairing in efficiency, in light of this preferential flow. Some of the pictures shown clearly show a false bottom smaller than the mash tun itself. I am very interested especially in the plastic microwave screen because it seemed the easiest to find/make and you don't have to worry about trying to find a stainless steel one. Did anyone make that plastic one and have problems with preferential flow or even the plastic colapsing under the weight of the grain?
... Did anyone make that plastic one and have problems with preferential flow or even the plastic collapsing under the weight of the grain?


Yeah that one looks awesome and you cant beat that price. I think I paid 14 bucks for the one previously linked. Love how amazon jacks around with its prices based on page views...
The only thing I hesitant about is how flimsy the $6 is compared to the $20 one :/ still haven't pulled the trigger.
Has anyone had the problem of grain getting under the pizza pan? I had a serious stuck sparge this weekend. I had to empty the mash tun and found that my pizza pan had lifted up. Did I just stir to vigorously or what?
Has anyone had the problem of grain getting under the pizza pan? I had a serious stuck sparge this weekend. I had to empty the mash tun and found that my pizza pan had lifted up. Did I just stir to vigorously or what?


Enter your email address to join:

