W/ All due respect to Kal...what could you cut on control panel?

Homebrew Talk - Beer, Wine, Mead, & Cider Brewing Discussion Forum

Help Support Homebrew Talk - Beer, Wine, Mead, & Cider Brewing Discussion Forum:

This site may earn a commission from merchant affiliate links, including eBay, Amazon, and others.

micahwitham

Well-Known Member
Joined
Jun 3, 2011
Messages
50
Reaction score
3
Location
richfield
Looking to convert an all manual brutus10 to Electric.
IF YOU HAD TO...what could you cut from Kal's design on the control panel and still get the job done?
Not looking for FULLY automated but rather something that will read MLT and HLT temps, 2 pumps, HERMS, fly sparging.
I'm thinking I wouldn't need
Alarms
Switch for which element
Pump lights (if I have the switches with on/off, lights seem nice but not necessary)

Here's what I think I do NEED:
On/Off master
Emergency shut off
PID's for MLT/HLT/Boil
Switches for Pumps 1&2

Convince me otherwise all you who are into this already.
Also, anyone looking to buy a brutus10 stand with jet tip burners, gas plumbed to back bar with airtight welds, and a regulator? Live in Minneapolis.
Micah

2013-09-24 15.52.34.jpg
 
Others may disagree, but for starters, your master on/off switch should really do everything that an ESD switch does.

Unless your master on/off switch is key operated or otherwise somehow difficult to use, I would start with the ESD button.
 
You already know what you want and what you don't want, don't think of building a Kal panel if that's not what you're going for. Kal has an amazingly resourceful site and has done a lot of helpful work for the electric community, but just because he has the Cadillac blingmaster deluxe do you have to do the same. First decide what your brewing process will be and then build a panel to accommodate that.
 
iijakii
I guess that's part of the reason I asked...I don't know all that I want or don't want because I don't have anything to compare. Hoping to tap into the wisdom here on the sight and others who are a few steps ahead.

processhead
that's what I'm looking for...if the on/off switch does the same thing then it's a key to turn instead of a button that I hit...is that about right.
 
Curious how the switches work?
when you want the elements on in the HLT or MLT you flip the switch and when they reach your set point you turn them off or do you have an SSR (solid state relay) in there somewhere that the PID's flip when it goes below a set point.
 
iijakii
I guess that's part of the reason I asked...I don't know all that I want or don't want because I don't have anything to compare. Hoping to tap into the wisdom here on the sight and others who are a few steps ahead.

processhead
that's what I'm looking for...if the on/off switch does the same thing then it's a key to turn instead of a button that I hit...is that about right.

The point I was trying to make was that if the master on/off switch is easilly accessed and shuts down all equipment, then an ESD is not needed.
In industrial applications an ESD switch is used when the normal controls are not able to shut down the system quickly or are physically located away from the process.
 
In industrial applications an ESD switch is used when the normal controls are not able to shut down the system quickly or are physically located away from the process.

One of many points I've been trying to make in other threads :)

Mushroom Emergency Stop's on a brew panel are for bling only.

Unnecessary...

But everyone has their own opinions..

I'd add that some industrial processes cant have an emergency stop circuits due to de-energizing and disorderly shutdown of a process could be dangerous!
 
There are 2 SSR's in the box. The switches are between the PID and SSR. You still have power to the PID to change settings but have no power going to the elements. The third PID just displays the temp in the MLT.
 
Looking to convert an all manual brutus10 to Electric.
IF YOU HAD TO...what could you cut from Kal's design on the control panel and still get the job done?
Not looking for FULLY automated but rather something that will read MLT and HLT temps, 2 pumps, HERMS, fly sparging.
I'm thinking I wouldn't need
Alarms
Switch for which element
Pump lights (if I have the switches with on/off, lights seem nice but not necessary)

Here's what I think I do NEED:
On/Off master
Emergency shut off
PID's for MLT/HLT/Boil
Switches for Pumps 1&2

Convince me otherwise all you who are into this already.
Also, anyone looking to buy a brutus10 stand with jet tip burners, gas plumbed to back bar with airtight welds, and a regulator? Live in Minneapolis.
Micah
all of the stuff you mention skipping are cheap or practically free perks of the pids and this system like alarm feature.... switches are about $2 a piece for the rotary ones and if you don't want a switch to go between elements than you need to spend much more for 50a wiring and components.... with $15 in contractors and a switch you save what $50-75 in additional wiring savings?
The going like redundant indicator lights and and voltage meters and $100 metal box with hammer paint finish can be over the top but not if your brew setup is just as much about looks or impressing the brew buddies which for some it is... for others they just want the most professional setup they can build... nothing wrong with that.
Even the indicator lights were only like .50 a piece.... I have like 11 extra along with 4 switches from my build because I started out trying to be cheap and then realised it would end up costing me more later when I wasn't happy.
All that said and done my whole setup including the elements and mash tun cooler, keggle hlt,13 gallon brew pot with sight glasses and thermometers and CA, lock fittings with 3 12v pumps with the control panel cost me under. $600. To build... .my plate chiller was the biggest single item which I did not include...that was an additional $130. I used the same $30 home depot enclosure pictured above by the way.

I also added two pwm speed controllers for my 12v pumps and an additional 12/24v powersuppy to power the pumps and energize my main relay coils so WHEN my SSR fails in the closed position the relay will still cut the power to the element.... the switches in the pics above would be useless in this situation because they are 15 amp switches and are only good to kill the 30dc that switches the control side of the ssr so the hot leads are still hot until the main is killed. Unfortunataly when the SSR overheats and fails they almost always fail stuck in the "on" closed position. If I didn't have the additional switch and relays in this case as well as indicator lights to show then the heating element is actually on I could potentially turn both elements on at the same time not knowing it and burn up an element or overload my wiring and cause a fire and burn the house down like the house across the street from me from an improperly wired air conditioner...
 
What are you putting inside your panel? Are you using contactors/mechanical relays?

I think that the element selector switch is cheap insurance that you don't have two elements going at once which is an issue if you (like me) only have 30A service.

Kal doesn't have an emergency shut off, and I didn't use one either. It depends on what your comfortable with, some have a switch on the line into the panel. If there were an emergency with my panel that didn't trip the GFCI breaker then I would walk the 5 ft to the breaker box. I probably wouldn't want to touch the panel.

As for alarms, I know the Aubrin PIDs have an alarm indicator on them, but a flashing buzzer is like $8, plus another $3 or so for a shutoff switch. For me it seemed inexpensive for the convenience. The element indicator is also a cheap convenience that could be very helpful for trouble shooting.

I would think minimum: master switch, two PIDs (BK/HLT), two probe inputs, two element indicators, two pump on/off switches ( I only have one as I'm making a housing for the two pumps that will have switches).

The biggest thing you want to have figured out first is where in your system the GCFI goes i.e. Spa panel, GCFI power cord, breaker.
 
I think the 3 PIDs are overkill (one should be sufficient). Most of the buttons and lights too. Make sure you have a button for the pump(s) tho. AMP/Volt meters are mostly useless, too.

But all these things do make the panel look awfully pretty and have their (limited) uses.
 
What are you putting inside your panel? Are you using contactors/mechanical relays?

I think that the element selector switch is cheap insurance that you don't have two elements going at once which is an issue if you (like me) only have 30A service.

Kal doesn't have an emergency shut off, and I didn't use one either. It depends on what your comfortable with, some have a switch on the line into the panel. If there were an emergency with my panel that didn't trip the GFCI breaker then I would walk the 5 ft to the breaker box. I probably wouldn't want to touch the panel.
U
As for alarms, I know the Aubrin PIDs have an alarm indicator on them, but a flashing buzzer is like $8, plus another $3 or so for a shutoff switch. For me it seemed inexpensive for the convenience. The element indicator is also a cheap convenience that could be very helpful for trouble shooting.

I would think minimum: master switch, two PIDs (BK/HLT), two probe inputs, two element indicators, two pump on/off switches ( I only have one as I'm making a housing for the two pumps that will have switches).

The biggest thing you want to have figured out first is where in your system the GCFI goes i.e. Spa panel, GCFI power cord, breaker.
Actually a two pack of 220v flashing buzzers is 4 dollars and change including shipping.... and if you but a 3 position switch for 2.50 you can use one switch for two pid alarms.... just saying we are talking under $5-10 bucks for the additional convieniences...
 
I think the 3 PIDs are overkill (one should be sufficient). Most of the buttons and lights too. Make sure you have a button for the pump(s) tho. AMP/Volt meters are mostly useless, too.

But all these things do make the panel look awfully pretty and have their (limited) uses.
And many of my friends think brewing my own beer is overkill when I can buy it at the store and save all that time and money.... but to each him own :tank: just like gas vs electric of all grain vs extract.

Some people here brew on a budget some brew as a passion some brew to impress and some brew to feed an addiction .... What one man might consider ghetto or down right dangerous might be another pride and joy.
My setup is not what would be considered pretty by any means but its what my budget allows and it has the best combination of reasonably prices features I thought I could use to make brewing more enjoyable
 
OP was talking about minimizing components and I was merely responding to that...

As for the added convenience, I can agree to that, but there's also the balance of convenience vs wiring mess and control panel size. F.e. with fewer components your box can be quite a bit smaller than with all the bells and whistles, while maintaining the same functionality.
 
I think the 3 PIDs are overkill (one should be sufficient). <<SNIP>>

AMP/Volt meters are mostly useless, too.

On my RIMS system, its faster to have the 2nd PID controlling the HLT. I can mash and heat sparge water at the same time.

Before I had the VA meter, the flickering of the overhead lights was the only indication that my RIMS element was working. I think I spent $9 dollars on the VA Meter on Ebay. Money well spent in my opinion.
True but again two elements running at the same time requires a 50 amp service and more money for 8/3 wiring and outlets/ and in many cases not needed...

As far as the volt meter a simple 120v or 220v indicator light wired at the load side of the ssr would actually be much cheaper at 50 cents and be easier to use as an indicator than a volt meter....
I added a volt meter because I'm actually just curious of the power draw on my system... I'm running the 220 line today so have yet to power it up.
 
One thing Kal has said many times which I agree with is you really need to figure out your processes first. If you are already doing AG brewing and kind of know what your brew day looks like and your processes it makes it easier. For me it is a bigger change. I am going from partial boil extract brews and jumping into all grain with an electric panel system. Since not only the process going to be new, it is hard to plan things out without time on a system. So to make up for this I have drawn out the plan. Then through research came up with a plan. Next I went to some other brewers in my area from our local club who use electric HERMS breweries and bounced my plan off them, also watched their brew days and asked lots of questions. Then went back to the drawing board and made changes and repeated the process. Of course they each do things their way and their way may not be the way I want to do things in the end but where I have seen differences I really asked questions on. Sometimes this identified issues in what I was planning.

I also started with KAL's design going over the diagrams and directions which are really well put together. Initially my plan was to try and go with a limited implementation of his design and tried to look for ways to cut back leaving room for upgrades and eventually get to something like his design. I was looking at cutting out things like the alarm and going with one PID, SSR, Contactor then move the plug. Later adding the second circuit later. My goal was to keep cost lower and built it over time. In the end I found that I wasn't saving that much. Like others said, many of the things were not that much. It would mean having to go back and rewire things which would be more of a PITA.

So this gets back to what is your intention? Are you doing this to get into electric brewing and minimize cost. Is your plan to later upgrade or just a simpler system to run?

While you could eliminate the Emergency Stop, depending on wiring plan this may or may not be a good idea. I don't recall what they cost but I don't think it is a huge expense. While I say it depends on wiring plan, I think some people go the other way and pretty much use an emergency stop as a master switch, which is an option. Another design is used is to cause the emergency stop to trip the GFCI breaker eliminating power getting to the panel. This wouldn't be ideal as a means to use a emergency stop as a master power switch.

So from Kal's design. I wouldn't eliminate the element switch unless you go with a 50A feed. You could eliminate the BK PID and go with a rheostat. This tied into a SSR will let you use a knob to control the BK rather than the PID. Pretty much everyone uses the PID in manual mode anyhow on the PID. Eliminate the Omega Timer. Sure it is nice but costly and you can do this function with a stop watch or kitchen timer. You can go down to a single PID and use temp gauges for other readings. Dial gauges or digital. Use the single PID for the HLT as you are going to be heating there. As the wort passes through the coil it is going to be heated to that temp. Kal is really only using the PID in the MT for a display for temp. This can be done through other means.

So lots of options, not best answer as what works for one person isn't the best for the next. That is why there are so many panel designs out there.
 
120v or 220v indicator light wired at the load side of the ssr would actually be much cheaper at 50 cents and be easier to use as an indicator than a volt meter....

I must not have done my shopping very well - cheapest I could find indicator lights was $3 bucks. Not trying to be argumentative here, but where have you found 50 cent indicators? Ebay?

Indicator lights only show the presence of voltage - Current draw shows that the elements are working.
 
Sennister makes the key point (echoing Kal): you need to understand the process you intend to use before you can specify the functional requirements of your control panel. Once you know the process you can determine the minimum functionality to safely support it (there will be multiple means to achieve this, e.g., PWM vs. PID, heavy duty switches vs. switches with contactors, etc.). Then you will be able to evaluate each additional feature that Kal and others have incorporated, to understand whether you value it sufficiently to warrant the cost.

Different processes have different control panel requirements.
 
I would cut the volt and amp meter, that's it. I love my kal clone and the way it works. You could skip the timer and use a watch. Alarms are not required, but nice and don't cost much. The pid for the mash does not control anything, it is just a temp gauge. You could remove it if you wanted.
 
I used a setos timer that I picked up for 28 bucks shipped from ebay... I figure in the grand scheme of things its well worth it.
I spend the greater part of the day today doing some more placement and mounting my control panel... I have my setup in from of a window in a spare room and plan to use an old range hood mounted at the top of the window so when I pull down the top window panel a bit the blower will blow the steam out the top opening... in theory anyway.. got to do what I can to keep costs down and splurge where I think its best.
 
A lot of great points have been made already. I for one didn't use the volt/amp meters or timer either, but would also highly recommend all the switches, lights, and buzzer. Just got mine done right before christmas and wouldn't dream of not having those features. To save money I only got one pid to start with, but wired in the ssrs and outlets on the panel. I got the other ones for christmas and they weren't too hard to wire in after. You definitely want to make all your holes at the same time though. The other big saver for me was I scoured ebay and amazon for a couple months looking for the best deals. I bet that saved me $200-$300 easy over the course of my build. I decided to go 50a because I thought "why wouldn't I? Just a little more cost in the wire to the panel." Then I realized how much more expensive that cable was, then the cost of the breakers in the box. In the end that upgrade was probably about another $100 more for me due to the diligent shopping, and I am glad I did it. If you look around and shop for the best deals, you can have your beer and drink it too! :ban:
 
Thanks for all the great thoughts and discussion here.
My process is pretty streamlined at this point.
HLT has a copper coil (old immersion chiller) and wort is recirced during mash from MLT, through HLT heated to mash temp, and back to MLT over the top.
Sparge/MashOut is accomplished by heating HLT to Mash Out Temps, Wort is moved to Boil kettle and remaining water in HLT becomes sparge water for batch sparge.

I've purchased a second pump and am working on adding Fly Sparge option to MLT.
Wondering if anybody who posted is from Twin Cities and is using automated HERMS system? Would be really grateful to sit in on a brew day and learn a few things about your panel and processes.
 
One thing you could use to minimize initial outlay is get away from the PT100 RTD's and use K thermocouples, it'll save about $100 still be functional and allow you to upgrade to RTD's in the future
 
Some other things to consider - do you really need an on / off switch? Plug it in when you want it on, unplug it when you want it off.

Do you really need a power-on LED? Are the PIDs (assuming you go PID) illuminated - it's on. Are they not? It's off.

Do you really need a volt / amp meter? What are you going to do with that information?

Do you really need an LED that lights up when the element is being fired? The PID has a little integrated LED that lights up when it's firing.

Do you really need a logo or handles?

Heck, you could get by with 1 PID for both the HERMS / HLT and the boil kettle, and just write down what the P/I/D values are for each tank and manually reprogram the PID every time you use it, then you'd only need to switch the wire over to the temp probe from one kettle to the other and plug in the appropriate heating element.

Do you really need switches for pumps? You could just plug them in and unplug them.

Do you really need the ability to disconnect your temp probe from the panel with the fancy XLR connectors, or could you hard wire them in?

Do you really need an emergency stop button, or are you comfortable saying that you'll never need to quickly stop whatever's going wrong, faster than you can unplug the panel?

Do you really need a safe-start interlock that prevents your panel from firing up unless all the elements / pumps are turned off?

Do you really need switches to turn on / off the elements via a contactor or high-amperage switch, or are you comfortable saying that you will ALWAYS unplug the element and set the PID to 0% output when not in use?

That's about the limit of what I can think of for 'optional', though I will point out 2 things. 1 - I have all that junk on my panel and I absoloutely love it... except for the volt / amp meter. 2 - Cutting some things, like the element on / off switches, is cutting out a fairly simple and inexpensive safety redundancy and I would not recommend it.

-Kevin
 
One thing you could use to minimize initial outlay is get away from the PT100 RTD's and use K thermocouples, it'll save about $100 still be functional and allow you to upgrade to RTD's in the future


Huh!

Where are you buying them marked up that much? I paid $5.50 a piece including shipping for mine... I Bought three..... one came in a combo pack with the "my pin" pid, a heat sink and 40a SSR for 39 bucks shipped....but for some reason the demand had gone up and many sellers have tripled the price to 139.00... there's still other options
http://www.eebay.com/itm/111179002321?ssPageName=STRK:MEWNX:IT&_trksid=p3984.m1497.l2649


http://www.ebay.com/itm/Digital-PID...906?pt=LH_DefaultDomain_0&hash=item4ab5b97432

http://www.ebay.com/itm/Digital-PID...946?pt=LH_DefaultDomain_0&hash=item4165b3ced2

As for hard wiring I thought about it and I'm very glad I didn't... my wiring would be destroyed trying to move things around and to clean after brewing...
I used switch craft connectors which are rated at 30 amps and only cost about $4 a piece ( got the idea here) got the rtds and pumps I used the following connectors for a few dollars. They come in two and three pin configurations.
http://www.ebay.com/itm/271040730925?ssPageName=STRK:MEWNX:IT&_trksid=p3984.m1497.l2649
 
After looking just now, I noticed that a lot of the pids on eBay have doubled or tripled in the last 2 weeks... I guess there's a lot of home brewery builds going on around Christmas... the eBay sellers did the same thing with the 12v food grade solar pumps when the demand went up. They went from 20 bucks to over $100 then back down again.... accept the black topsflo ones that still range in price from $30 to $130 depending on whom you purchase from. I bought mine on amazon for $30 after seeing the cheapest eBay had them for was $59.95
 
Our buyer orders a lot of parts direct from China. I asked him this morning and he says prices from China are going up. This may be why.
 
Micah, maybe this will help...

BreweryControlPanel.jpg


I have some control panel templates available too. Go the the DIY section of the forum to my post yesterday for more info.

By the way, the 3-way switch is a good idea. You can get one from Automation Direct for $13.50. The lights are certainly optional for the pumps, but if you take a look at my schematic, they are easy to omit. Just don't install them. Again, though, they are very cheap, $3.45 each from Auber -- plus, you get that cool 1960s "Bridge of the Starship Enterprise" look when you use them.

View attachment Visio-Brewery Control Panel.pdf
 
"Mushroom Emergency Stop's on a brew panel are for bling only."

Maybe, but it's pretty handy to reach over and hit when wort is shooting across the room because a hose came loose or burst, or a boilover is happening and you don't have time the adjust the tiny PID buttons.

Plus, if you have kids in the house and in the neighborhood (I think I have around 150 of them in my cul de sac), a key start is almost a must to keep the curious little fingers from creating an angry parent and hospital visit.
 
iijakii
I guess that's part of the reason I asked...I don't know all that I want or don't want because I don't have anything to compare. Hoping to tap into the wisdom here on the sight and others who are a few steps ahead.

processhead
that's what I'm looking for...if the on/off switch does the same thing then it's a key to turn instead of a button that I hit...is that about right.

I like Kal's design and it was responsible for inspiring me to get my control panel done. The manual he wrote was really helpful and demystified the whole thing.

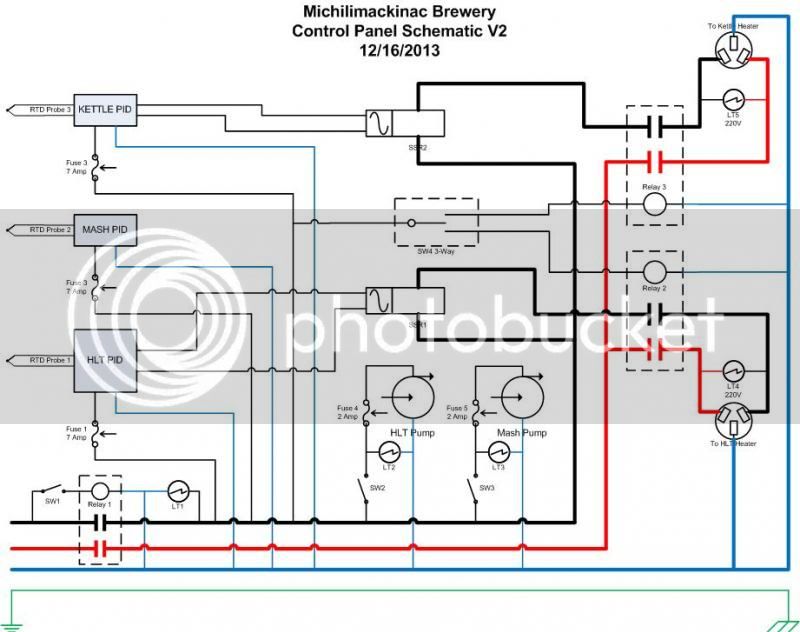
Here's what I would recommend, if you're wanting to get rid of some functions that don't get used all that much, and maybe adding some that really do get used a lot:

Key switch can be dumped. No real need for it. But I would recommend replacing it with a mushroom button to act as your main power switch.

The amp meter / volt meter can be dumped as well.
If you get rid of those two meters, then you can get rid of some internal parts:
* (2) adjustable DC power supplies
* (2) AC/DC transformers
* 50A shunt

That saves a lot of internal space.

The timer can be dumped. Who doesn't have access to a lot of different timers these days? My smart phone has a few different brewing apps on there and they all have timers that let me know when to add the next round of hops.

Yes, all of the alarm switches and the alarm itself can be dropped. I have an alarm system set up on mine, but I rarely use it.

The mash tun PID can be dumped, since its only function is to display the temp of the mash tun. I replaced the mash tun PID with a simple temp display unit. One third the price. Does the same thing. Or you can just dump the display altogether and you could use a stick thermometer to check your recirculating mash temp periodically.

One thing that Kal's box doesn't do that I added to mine is to have a temp display unit for the chiller. If you're going all electric, why depend on an analog dial for your chiller under your table?

The main control panel plug can be hard-wired into the box, so you won't need the extra set of plug / outlet. Those things are pricey.

Speaking of which...all of the probe wires can be hard-wired into the box as well, saving you time and money on the disconnects. Honestly, I have not used those disconnects since making my control panel.

Locking outlets and plugs for the pumps is way overkill. Unless you have some serious vibration problems on your wall, your pumps are not going to be accidentally unplugged just by using some standard plugs.

Kal made disconnects at the control panel for the heating elements but no quick disconnects near the pots. From a functional standpoint I think it should be reversed. Hard-wired into the box, and quick disconnects near the pots.

You can get rid of the top / bottom / front SS rounded handles as well. They're pretty pricey and they really don't do a whole lot other than make it look cool.

If you drop the volt and amp meter and the timer and the alarms, then you definitely could get away with a considerably smaller box, which could also save you some money.

Do NOT skimp on the heat sink(s) for the SSR's. You want to keep those things cool, so they last you a long time. Even so, they may wear out, so it may be a good idea to buy a backup in case one fails on you. Maybe buy an extra contactor as well.

I'd also recommend spending the money on the wiring to allow your system to run with both heating elements on at the same time. Not for doing back-to-back batches of beer, but for heating up your strike water in your BK while you also heat up your sparge water in your HLT. You heat up both, you dump your strike water into the MLT, and then BAM! Your sparge water is already at the right temps to keep your recirculating mash through the HERMS to where it needs to be.

I'd also recommend adding some SS float switches to the HLT and BK that are hooked into the wire between the PID and the SSR, so if the liquid levels on either vessel get too low then they'll stop the element from firing. It's a cheap insurance policy.

Good luck!
 
In my setup, my $8 volt and amp meter runs on 90-300v AC.... my DC 12/24v power supply is only there to run my 12v $20 and $30 wort pumps vs using a march pump. I purchased a couple 12-30v motor speed control boards to adjust flow rather than use the ball valves which seem to damage the smaller pumps.
I also use 24vdc to energize the coils on my main relays for the elements. And 12v for the cooling fan on the ssr heat sinks.
 
Maybe, but it's pretty handy to reach over and hit when wort is shooting across the room because a hose came loose or burst, or a boilover is happening and you don't have time the adjust the tiny PID buttons.

Plus, if you have kids in the house and in the neighborhood (I think I have around 150 of them in my cul de sac), a key start is almost a must to keep the curious little fingers from creating an angry parent and hospital visit.

I wont have a PID on my BK if I electrify it - SSVR only

If a Mushroom E-Stop makes you feel safe - by all means go for it.

No key switch on mine - I just un-unplug it.
 
My setup is about as simple as you can get. One PID, two pump swithes, element toggle, and an on switch. The e-stop was free, or i would not have one. I run a 3 vessel hERMS and have never had an issue. $5 dryer outlets are mounted through the bottom.

The unit will be for sale soon as i am currently building a second controller.

IMG_20131231_210954.jpg
 
Back
Top