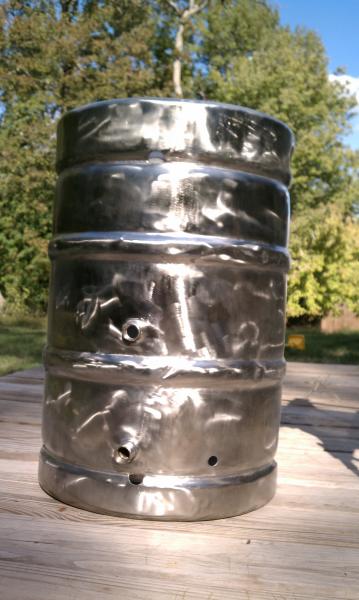
"polishing your keg" is more than a clever euphemism

Homebrew Talk - Beer, Wine, Mead, & Cider Brewing Discussion Forum

Help Support Homebrew Talk - Beer, Wine, Mead, & Cider Brewing Discussion Forum:

This site may earn a commission from merchant affiliate links, including eBay, Amazon, and others.
Also I found the RYOBI "E" Stainless steel buffing compound worked the best for Me. I tried the Jewelers rouge but it would leave it cloudy.
 
So, Started polishing my kegs last week, just now getting back to finishing the polishing. I have fresh pads and am using a ryobi compound H. I am getting this black residual residue left on my kegs that is just a @#%@#% to get off. Anybody have any ideas other than Rubbing alcohol, as I'm out...and lazy.
 
Back off the pressure a bit. I had that problem and was pushing too hard, creating too much heat and some of the rubber backing was sticking to the metal. A light application with a course pad would take it off
 
Bobby, Thanks a million for sharing your polishing tips and also damn you for sharing. I polished two kegs this weekend and I thought that was going to kill me. Two down and one to go. Thanks again :)

kegh3.jpg

Beautiful work Lars. Is that a Corvair in the background?
 
I just bought all my supplies today, I wanted to get all my kegs nice n' shiny in preparation for Bobby getting stocked up on those lookin' glasses again. Well, some jack@ss stole the nut out of the backing plate, unless of course it doesn't come with one. Either way, I spent the latter part of the evening trying to fit the backing plate on my DeWalt grinder, with no luck...

I guess I'll just have to finish on another day...I mean start.
 
Sorry to bring up this thread from the dead, but I had a relevant question..

I have a friend that can loan me his 7"/8" angle grinder. Would there be any reason to avoid getting the larger pads? Are there any areas that a 7" pad simply could not get to?
 
I don't see any reason why that would be a problem.
As long as there are GATORGRIT pads of the same type in that size and the grinder is rated the same-or close, I guess- RPM.
My cheap HF grinder runs at 11,000 rpm and I've tried other tools that run at a lower speed, but they don't work as well as that one for the application.
 
So will this process work for the inside? I will need to clean up some concave surfaces...

im sure it will, but a little green scrubby pad and some "Bar Keepers Friend" works wonders. I don't think I'd go through the trouble of polishing up the inside of my keggles.

-=Jason=-
 
I am not looking to polish the inside of a keggle. My plan is to use the method to clean up the welds and some corrosion pits on the inside of a stainless steel vessel (repurposed pool filter) and is about 17 3/4 inches inner diameter. Just wondering if the angle grinder method can be used on some spots as I've done about all I can do with the green scrubbie and BKF.

I can see how this can work on the outer (convex) surface) but not sure if it can be used on the inner (concave) surface.

For gross clean-up, try a flap disk.
 
Bobby, I followed your directions and things went great. Needless to say I will not be polishing the other keg since its my brother in laws. Please note, this is nothing but hard work (even with an angle grinder). I have about 5 hours logged on the one you see here. Patience with the fine grit pad will payoff when it comes time to use the compounds. Any ding, scratch, or pit you miss will only be magnified during the final 2 steps of polishing.

KEG_POLISHING_MED.jpg
 
I agree that the finished product looks really cool. this is my first attempt at polishing my kegs.
ForumRunner_20111019_181229.jpg
 
so its been forever since I did my Boil Keggle and I am doing my HLT. I have two polishing compounds one blue and one gray. I can't recall which is which... I am thinking the blue compound goes with the blue pad and the gray goes with the soft polishing pads.

-=Jason=-
 
well here is my HLT half done..

went over the entire thing with a flapper disk and even removed the raised faced lettering on the keggle. then I used the Blue Gater Disk with the Blue compound. I'll go buy some soft polishing pads tomorrow and see what color the polishing compound is. to make sure I have the right stuff already.

for some odd reason I decided to touch the inside of the keggle after grinding away at the AB lettering, lets just say I no longer have a finder print on my middle finger on my left hand....

-=Jason=-

IMG_20111022_115009.jpg


IMG_20111022_160005.jpg
 
so I used my "BLUE" compound with the blue disk... turns out the gray compound was the one I should have used. oh well... it still got the job done.

im about to go tackle this HLT with the soft pad and the "Green" mirror finish polish from lowes made by "Porter Cable"

-=Jason=-
 
well here is the HLT finished sitting next to the Boil keggle I did about 8 months ago.. yeah it took me that long to finally Get'R Dun.

-=Jason=-

Edit: I think I like the look of the ground down seam and removal of the AB lettering much better, now do I want to do the same to the boil keggle or just say Fug it, its good enough.

297056_309397452409298_100000171382742_1559956_987477834_n.jpg
 
Thanks for the write-up Bobby! I polished up the Sanke I am going to use in the no-sparge rig I am putting together and it turned out great. I would take a picture of it but am too sore to go grab my camera. Nothing a couple of ibupfrofen and a few homebrews won't fix!

Props to you guys who have polished 3 keggles...it was a lot of work and took me about 4 hours. I used two of the fine grit gator pads followed by #2 and #5 polish. :mug:
 
Jason, that looks money. I didn't think you could remove the embossing because it looked to me like you'd end up with holes. I guess the stainless is thicker than the embossing depth. I'm sure it got pretty thin but it looks good to me.
 
I am also doing this inbetween building my Brutus 10 clone. I can't wait. I got through about 1/3 of a keggle with the medium pad before it was toast. I think I will lighten my touch. Thanks Bobby!
 
Bobby the embossing was pretty easy to remove via a flapper disk. I didn't even think twice about grinding through the keggle as it is pretty thick. But I guess some spots might be a little thin.

-=Jason=-
Sent from my HTC Incredible using Home Brew Talk
 
I tried my hand at polishing and here are the results.

Before:
IMG_0766.jpg


After:
NewImage.jpg


Overall I am pleased with the results although I was hoping for more shine. It was definitely a lot of work.
 
Didn't see it in the previous 40 pages, so I have to ask... Does anyone have any tips for evenly polishing the two ridges that the some of these kegs have? I can get a nice smooth band along the center of the raised ridges but trying to polish the rest of it usually leaves me with black marks or over scored areas.

Thanks!
 
The more you remove before applying the pad will extend the life and effectiveness of it. You CAN, but it's better if you remove beforehand.
YMMV
:mug:
 
Is it ok to use the pad to take the stickers off the keg? Or should we remove before we start?

You'll load up the pad if you do and then you'll be glazing the keg. I use a heat gun to remove stickers, then wipe the keg down with mineral spirits and a rag to get the residual goo off...

Cheers!
 
Once the sticker is off, if there is any sticker residue on there. Dip a toothbrush in paint thinner and wipe it clean. It'll blow your mind how quick it comes off. In big black boogers!
 
Back
Top