Native ESP8266 BrewPi Firmware - WiFi BrewPi, no Arduino needed!

Homebrew Talk - Beer, Wine, Mead, & Cider Brewing Discussion Forum

Help Support Homebrew Talk - Beer, Wine, Mead, & Cider Brewing Discussion Forum:

This site may earn a commission from merchant affiliate links, including eBay, Amazon, and others.
The only way this would work is if you onewired the heating and cooling relays, therefore creating 'spare' pins. Making this adjustment with this or pocketmon's project is possible and onewire SSR hardware is out there (brewpi shop). You'd have to do some editing in config, and I'm not sure if other libraries would need editing/adding/including.

Cheers

As I recall, @pocketmon attempted to implement the rotary encoder using the 2 free pins + the buzzer pin, but ran into some kind of issue and decided to abandon it in favor of using an I2C expander. That said, I don't know what the issue was, or if it could be fixed by freeing up pin D5 by using onewire cooling.

I'll admit - I'm contemplating adding support for a momentary pushbutton switch to toggle the backlight, but I don't see full rotary encoder support in the future.
 
I think more of a tabular display. No need to emulate the small LCD display layouts. That way you would have an easier at-a-glance of all the chambers .

Hmm. I like the idea, just not sure how to implement it. I figure I can have it so you can toggle between the LCD screen view and a "dashboard" view but have no idea how to actually make the dashboard look good.

Screen Shot 2017-01-26 at 12.56.34 AM.jpg
 
As I recall, @pocketmon attempted to implement the rotary encoder using the 2 free pins + the buzzer pin, but ran into some kind of issue and decided to abandon it in favor of using an I2C expander. That said, I don't know what the issue was, or if it could be fixed by freeing up pin D5 by using onewire cooling.

I'll admit - I'm contemplating adding support for a momentary pushbutton switch to toggle the backlight, but I don't see full rotary encoder support in the future.

Allow me to explain in detail.
1. GPIO0(D3), 2(D4), 15(D8) must be HIGH, HIGH, and LOW to enable normal booting (boot from flash).
2. The connection to PA and PB of rotary encoder(or that I have) are HIGH or LOW depending on the position. Push Down is just like a button and needs pull-high. My rotary encoder module, KY-040, seems to have pull-ups.
3.For example,
D3 - PA
D4 - PB
if the rotary encoder outputs both PA and PB HIGH, the system can boot up successfully. Otherwise, it will stuck at bootloader waiting to boot from UART or searching SD card for booting.

I thought that the rotary encoder "generates" signal to PA and PB when rotated, and I was lucky(?) to have the rotary encoder at "right" positions that don't output "wrong" signal. After a while, I found that sometimes the system didn't start-up unless the rotary encoder was disconnected. I switched and tested every combination. Finally, I used my multimeter to find out that my rotary encoder connects PA and PB to GND/5V depending on the positions. I am not sure if all rotary encoder follow the same principle. This just doesn't work for me.

If other PINs are used for the rotary encoder, it's totally fine. (but Thorrax commented some lines for menu.)
 
Hi guys,

I've been following this project for a while and decided it's time to create an account and tackle it. First of all, A big THANK YOU to Thorrak et. al. for the hard work in making this so simple to get loaded and installed.

I have a hang-up with the v0.8 firmware, however, and I'm not sure if it's a bug, or user-error.

I have successfully flashed it to my ESP8266 board (Using this Board), and it's showing a WiFi network of "ESP104250". When I connect to it, I cannot get anything to come up in my web browser in order to configure the WiFi. I'm using OSX and trying to pull up the ESP through Chrome.

Any ideas on how I can get to the WiFi config? Is there a different approach I can try to get it set up?

Thanks!
 
Last edited by a moderator:
Hi guys,

I've been following this project for a while and decided it's time to create an account and tackle it. First of all, A big THANK YOU to Thorrak et. al. for the hard work in making this so simple to get loaded and installed.

I have a hang-up with the v0.8 firmware, however, and I'm not sure if it's a bug, or user-error.

I have successfully flashed it to my ESP8266 board (Using this Board), and it's showing a WiFi network of "ESP104250". When I connect to it, I cannot get anything to come up in my web browser in order to configure the WiFi. I'm using OSX and trying to pull up the ESP through Chrome.

Any ideas on how I can get to the WiFi config? Is there a different approach I can try to get it set up?

Thanks!


Hey there, and thanks for trying this project out!

That's a really odd issue - honestly, if something was to fail, I would expect it to have happened well before the point you're reaching during setup. Using recent versions of OSX (and, for that matter, iPhones/iPads/etc.), the operating system should detect that your internet connection is being redirected to a captive portal when you connect to the ESP8266 WiFi network and pop up a window for you to configure the device. That said - This should happen long before you launch Chrome.

Given that this isn't working for you, what are you doing after you launch chrome? Do you attempt to visit a website? Do you manage to reach that website?

If you don't mind me asking, what version of OSX are you using?
 
Last edited by a moderator:
Hey there, and thanks for trying this project out!

That's a really odd issue - honestly, if something was to fail, I would expect it to have happened well before the point you're reaching during setup. Using recent versions of OSX (and, for that matter, iPhones/iPads/etc.), the operating system should detect that your internet connection is being redirected to a captive portal when you connect to the ESP8266 WiFi network and pop up a window for you to configure the device. That said - This should happen long before you launch Chrome.

Given that this isn't working for you, what are you doing after you launch chrome? Do you attempt to visit a website? Do you manage to reach that website?

If you don't mind me asking, what version of OSX are you using?

Thanks for the followup! I definitely didn't expect this step to be the holdup. I'm pretty new to a lot of this, so the auto-install scripts were really helpful and worked like a charm once I found the right directories.

I'm running the latest update of OSX (Sierra).

When I originally tried I still had my windows open with your instructables site and other references. I connected to the wifi and it showed it was searching for a very long time until the "!" came up over the WiFi icon. I attempted to load a website, and chrome gave me the "no internet connection" warning. I tried re-launching chrome, and tried again in Safari, all with the same outcome.

Is there a specific IP for the active portal I can try and enter? I'm not sure exactly how you have it set up, but maybe if I can pull up the IP then we know there's an issue with the DNS re-direct. (forgive me if I'm way off-base with this idea)

I've had some worries that maybe I didn't get the right NodeMCU ESP8266, I have two D1 Mini's on the way to try out Thursday night as well. I'll probably go with that in the end as I like the smaller form factor and don't need 30 pins.

Thanks for your help! I'm excited to get this up and running!
 
Thanks for the followup! I definitely didn't expect this step to be the holdup. I'm pretty new to a lot of this, so the auto-install scripts were really helpful and worked like a charm once I found the right directories.

I'm running the latest update of OSX (Sierra).

When I originally tried I still had my windows open with your instructables site and other references. I connected to the wifi and it showed it was searching for a very long time until the "!" came up over the WiFi icon. I attempted to load a website, and chrome gave me the "no internet connection" warning. I tried re-launching chrome, and tried again in Safari, all with the same outcome.

Is there a specific IP for the active portal I can try and enter? I'm not sure exactly how you have it set up, but maybe if I can pull up the IP then we know there's an issue with the DNS re-direct. (forgive me if I'm way off-base with this idea)

Ack! I apologize - I need to go back and update the Instructables site (as well as the documentation overall). Soon - I promise.

You're not off base at all. Once you connect to the AP the device creates you should be able to pull up the page at http://192.168.4.1/ .

If that doesn't work, my other suggestion would be to try using another device (a phone, tablet, etc. should work if available). Especially given that you're using Sierra I would expect everything to work well. I'm sorry you're running into so much trouble!


I've had some worries that maybe I didn't get the right NodeMCU ESP8266, I have two D1 Mini's on the way to try out Thursday night as well. I'll probably go with that in the end as I like the smaller form factor and don't need 30 pins.

Thanks for your help! I'm excited to get this up and running!

You did choose a different NodeMCU from the one I've tested with, but honestly it shouldn't matter. Part of the reason I was attracted to the NodeMCU boards is that while the form factor may differ, the sketches you flash to them should pretty much operate the same.

One thing I will note - part of my personal attraction to the D1 Mini is the fact that it breaks out all the pins that you can reasonably use - and leaves off the rest. The pins you lose between the two aren't pins you're likely to use due to the fact that generally they're busy running the USB interface, etc.
 
Just as an update for the brewpi-django v1 release, @rocket4x4 has been helping immensely with getting some of the items that have been out there awhile tackled. The issues list keeps getting shorter by the day, with the majority of the remaining items being deployment-related:

Screen Shot 2017-02-02 at 12.04.38 AM.jpg

Things still don't look quite right, but I'm firmly on the "f*** it, ship it" bandwagon. That is - get it functionally complete, and solicit feedback after release for UI fixes.
 
Ack! I apologize - I need to go back and update the Instructables site (as well as the documentation overall). Soon - I promise.

You're not off base at all. Once you connect to the AP the device creates you should be able to pull up the page at http://192.168.4.1/ .

If that doesn't work, my other suggestion would be to try using another device (a phone, tablet, etc. should work if available). Especially given that you're using Sierra I would expect everything to work well. I'm sorry you're running into so much trouble!

I went back and tried with my girlfriends laptop, worked just like it should have. I wonder if I wasn't getting it because of my network settings on my computer, or the "HTTPS Everywhere" add-on. It's strange, however, that it still didn't work when I entered the IP address directly either.

You did choose a different NodeMCU from the one I've tested with, but honestly it shouldn't matter. Part of the reason I was attracted to the NodeMCU boards is that while the form factor may differ, the sketches you flash to them should pretty much operate the same.

One thing I will note - part of my personal attraction to the D1 Mini is the fact that it breaks out all the pins that you can reasonably use - and leaves off the rest. The pins you lose between the two aren't pins you're likely to use due to the fact that generally they're busy running the USB interface, etc.

Good info on the D1 Mini, I had wondered what the difference in pin count was and what they were used for. Unfortunately my package was delayed, but as soon as they get in I'm going to move to the D1.

I have a Coworker who is getting rid of one of these, and it's going to become a fermentation chamber/showpiece (Once I remove the middle shelf). My plan is to mount the LCD just behind the glass in the top corner by the hinge, and I think I can fit that and the D1 right there.

I'll post updates/pictures of my progress as I go.

Thanks again for your work on this. My one gripe with the standard BrewPi was that the controller didn't communicate over WiFi, and I didn't want to use Bluetooth due to the limited range and larger components.
 
Last edited by a moderator:
I have had a very productive weekend on this project.

Got my D1 Mini in the mail and re-configured to use that. Set up my prototype and managed to get the software side working.
00y7Qkb.jpg


Then I spent the entirety of my Saturday night building a circuit board for everything. I split the board into two sides, one for 3.3v, one for 5v and went form there. Originally I was only seeing 1.5v on the 5v side, but I re-flowed some of my connections and got the full 5v. Everything fired up and now it's on to making an enclosure for all of this.
5IBNkZC.jpg


I'm hoping to put the LCD in the same box as the controller, I designed the board layout so that if it makes sense I can just plug the screen into it.
qQLAw5F.jpg


I'm pretty happy with this, especially considering it's my first attempt anything like this.
4Jwxt99.jpg


Let me know what you guys think, I'm trying to find a good looking enclosure with a cutout for the LCD screen. I may have to resort to getting it 3d printed via a service.

If anyone would Like I can post the circuit diagram and a little more detail on the hardware build.
 
I have had a very productive weekend on this project.

Got my D1 Mini in the mail and re-configured to use that. Set up my prototype and managed to get the software side working.


Then I spent the entirety of my Saturday night building a circuit board for everything. I split the board into two sides, one for 3.3v, one for 5v and went form there. Originally I was only seeing 1.5v on the 5v side, but I re-flowed some of my connections and got the full 5v. Everything fired up and now it's on to making an enclosure for all of this.


I'm hoping to put the LCD in the same box as the controller, I designed the board layout so that if it makes sense I can just plug the screen into it.


I'm pretty happy with this, especially considering it's my first attempt anything like this.


Let me know what you guys think, I'm trying to find a good looking enclosure with a cutout for the LCD screen. I may have to resort to getting it 3d printed via a service.

If anyone would Like I can post the circuit diagram and a little more detail on the hardware build.

If this is really your first attempt at something like this, this is looking amazing. Even if it's not, it looks pretty damn fantastic if I may say so myself.

For enclosures, I'm solidly in the "3D Print It" camp, but I also basically only use my 3D printer for printing enclosures for projects like this. That said - Some people have recommended using "rework" junction boxes that you can acquire at most hardware stores. I don't have any experience with them personally, but I've heard they can do the job.

Regardless, awesome job on this! This looks great!

Thanks! I'm flattered.

I should clarify that I do have mild experience with the Pi (played around with them off and on for a few years, but haven't actually done anything with them until I built a RetroPie 3 weeks ago), and I have soldered before, but never this amount.

This is definitely my first time trying anything with "arduino" or prototyping circuit layouts. Having an engineering background helps, but I still have to say thanks again for writing this version and making it so straight forward.

As for the case, I think the only thing I'm going to be happy with is 3d-printed. Thankfully I do have a lot of experience with Sketchup and even ran a 3D printer at my last job (Wanhao D5). I might see if I can come up with a good .stl file I can send off to have printed.

I'll post updates next time I make any major progress. I'm extremely pleased with how it's all looking so far!
 
So, hopefully this is not too off-topic, but I wanted to post this here as I'm using this version of the BrewPi script.

My plan was to set up Pi-Hole on the same Pi that I use for my BrewPi Server. When I installed Pi-Hole, the web server for BrewPi will no longer load.

Pi-Hole was configured at 192.168.1.200/24, and the BrewPi page pulls up at 192.168.1.200.

Is it foolish to try to run these simultaneously, or is there a way I can configure these two programs to run concurrently?
 
On any network every device has it's own IP address, if you set 2 devices to the same static address one or the other will not be able to connect. You should change the pie hole IP to something like 192.168.1.201.
There are things that need to be the same, but beyond the scope of this thread. Change one of the IP addresses as above and both will connect to the network and be able to see each other.
 
So, hopefully this is not too off-topic, but I wanted to post this here as I'm using this version of the BrewPi script.

My plan was to set up Pi-Hole on the same Pi that I use for my BrewPi Server. When I installed Pi-Hole, the web server for BrewPi will no longer load.

Pi-Hole was configured at 192.168.1.200/24, and the BrewPi page pulls up at 192.168.1.200.

Is it foolish to try to run these simultaneously, or is there a way I can configure these two programs to run concurrently?

Unfortunately, I am not an expert on Pi-Hole, but it appears that by default it comes with a web interface. I'm guessing that the web interface runs on the same port that BrewPi does which would explain why BrewPi stops working.

In theory, it should be possible to get both products working together seamlessly - so long as you can move the web interface of one either to another port, or to another directory. Without having experience with Pi-Hole, however, I can't help with that, unfortunately. :(
 
It's not that they are on the same IP address. This is perfectly fine. What is the problem is Pi-Hole uses lighttpd instead of Apache to serve web pages. You'd need to uninstall lighttpd and re-start Apache. Here's one guy that did it:

https://discourse.pi-hole.net/t/migrating-pi-hole-from-lighttpd-to-apache/152/4

Pi-Hole also blocks .js by default. Now, I can't remember offhand if BrewPi uses .js files but I'm betting there is some use. You'd have to remove the .js blocker, or come up with a whitelist.

Yeah if you can get 2 devices to use the same IP on the same subnet, I'll give you a beer (personally).


Note: I live on the other side of the planet.
 
Pi-hole isn't a device, it's a service that responds to DNS inquiries on port 53 (usually).
As such one should be able to configure the host so that service doesn't conflict with the web server handling BrewPi pages (usually on port 80)...

Cheers!
 
Pi-hole isn't a device, it's a service that responds to DNS inquiries on port 53 (usually).
Right ... and because people like colorful dashboards it now includes a web server/site on port 80 to view/control the daemon.

As such one should be able to configure the host so that service doesn't conflict with the web server handling BrewPi pages (usually on port 80)...
You can. You can actually have two separate daemons and serve both on port 80 using a sub-site*. In this configuration it seems that just forcing the whole Pi to use Apache is the easier way to go however. Pi--Hole by default uses a sub-directory.

* I am using OctoPi for my 3D printer and it uses HAProxy to serve it's web pages as well as mjpg-streamer on port 80 as a sub-site. I am thinking I can use a similar setup with BrewPi to add a camera without having to expose multiple ports to the Internet.
 
Just to check in with an update, development on brewpi-django has been progressing over the past few weeks at a fairly decent pace. Important, missing features such as the streamlined brewpi-script manager and faster fermentation graphing support have been added, and new features such as mDNS device discovery have come along with them.

In addition to the issues list below, key things that need to be completed before the initial code release are:

  • Refactor the device dashboard to make it not ugly
  • Write documentation
  • Refactor the setup script

@rocket4x4 has helped out immensely with development - both in helping to work down the issue list and filling in some of my skill deficits. A big part of why the below issues list is shrinking is due to his efforts.

Screen Shot 2017-02-13 at 12.37.37 AM.png
 
This is the sort of thing that drives our writers crazy: "Refactor the device dashboard to make it not ugly" :D

Cool to see it coming along! I've been working on my regular BrewPi case. Once that's done I'm back to this to finish it up. Looks like my timing will be about perfect.
 
This is the sort of thing that drives our writers crazy: "Refactor the device dashboard to make it not ugly" :D

Cool to see it coming along! I've been working on my regular BrewPi case. Once that's done I'm back to this to finish it up. Looks like my timing will be about perfect.

To be fair, it uh... was pretty ugly.

It's still being refactored, but here's what it looks like right now:

b5k6oUv.png


Next in line to fix is the actual graph.
 
Updates!

It's been a fairly productive week -- 3 day weekends help immensely. That said, I'll jump straight into it.

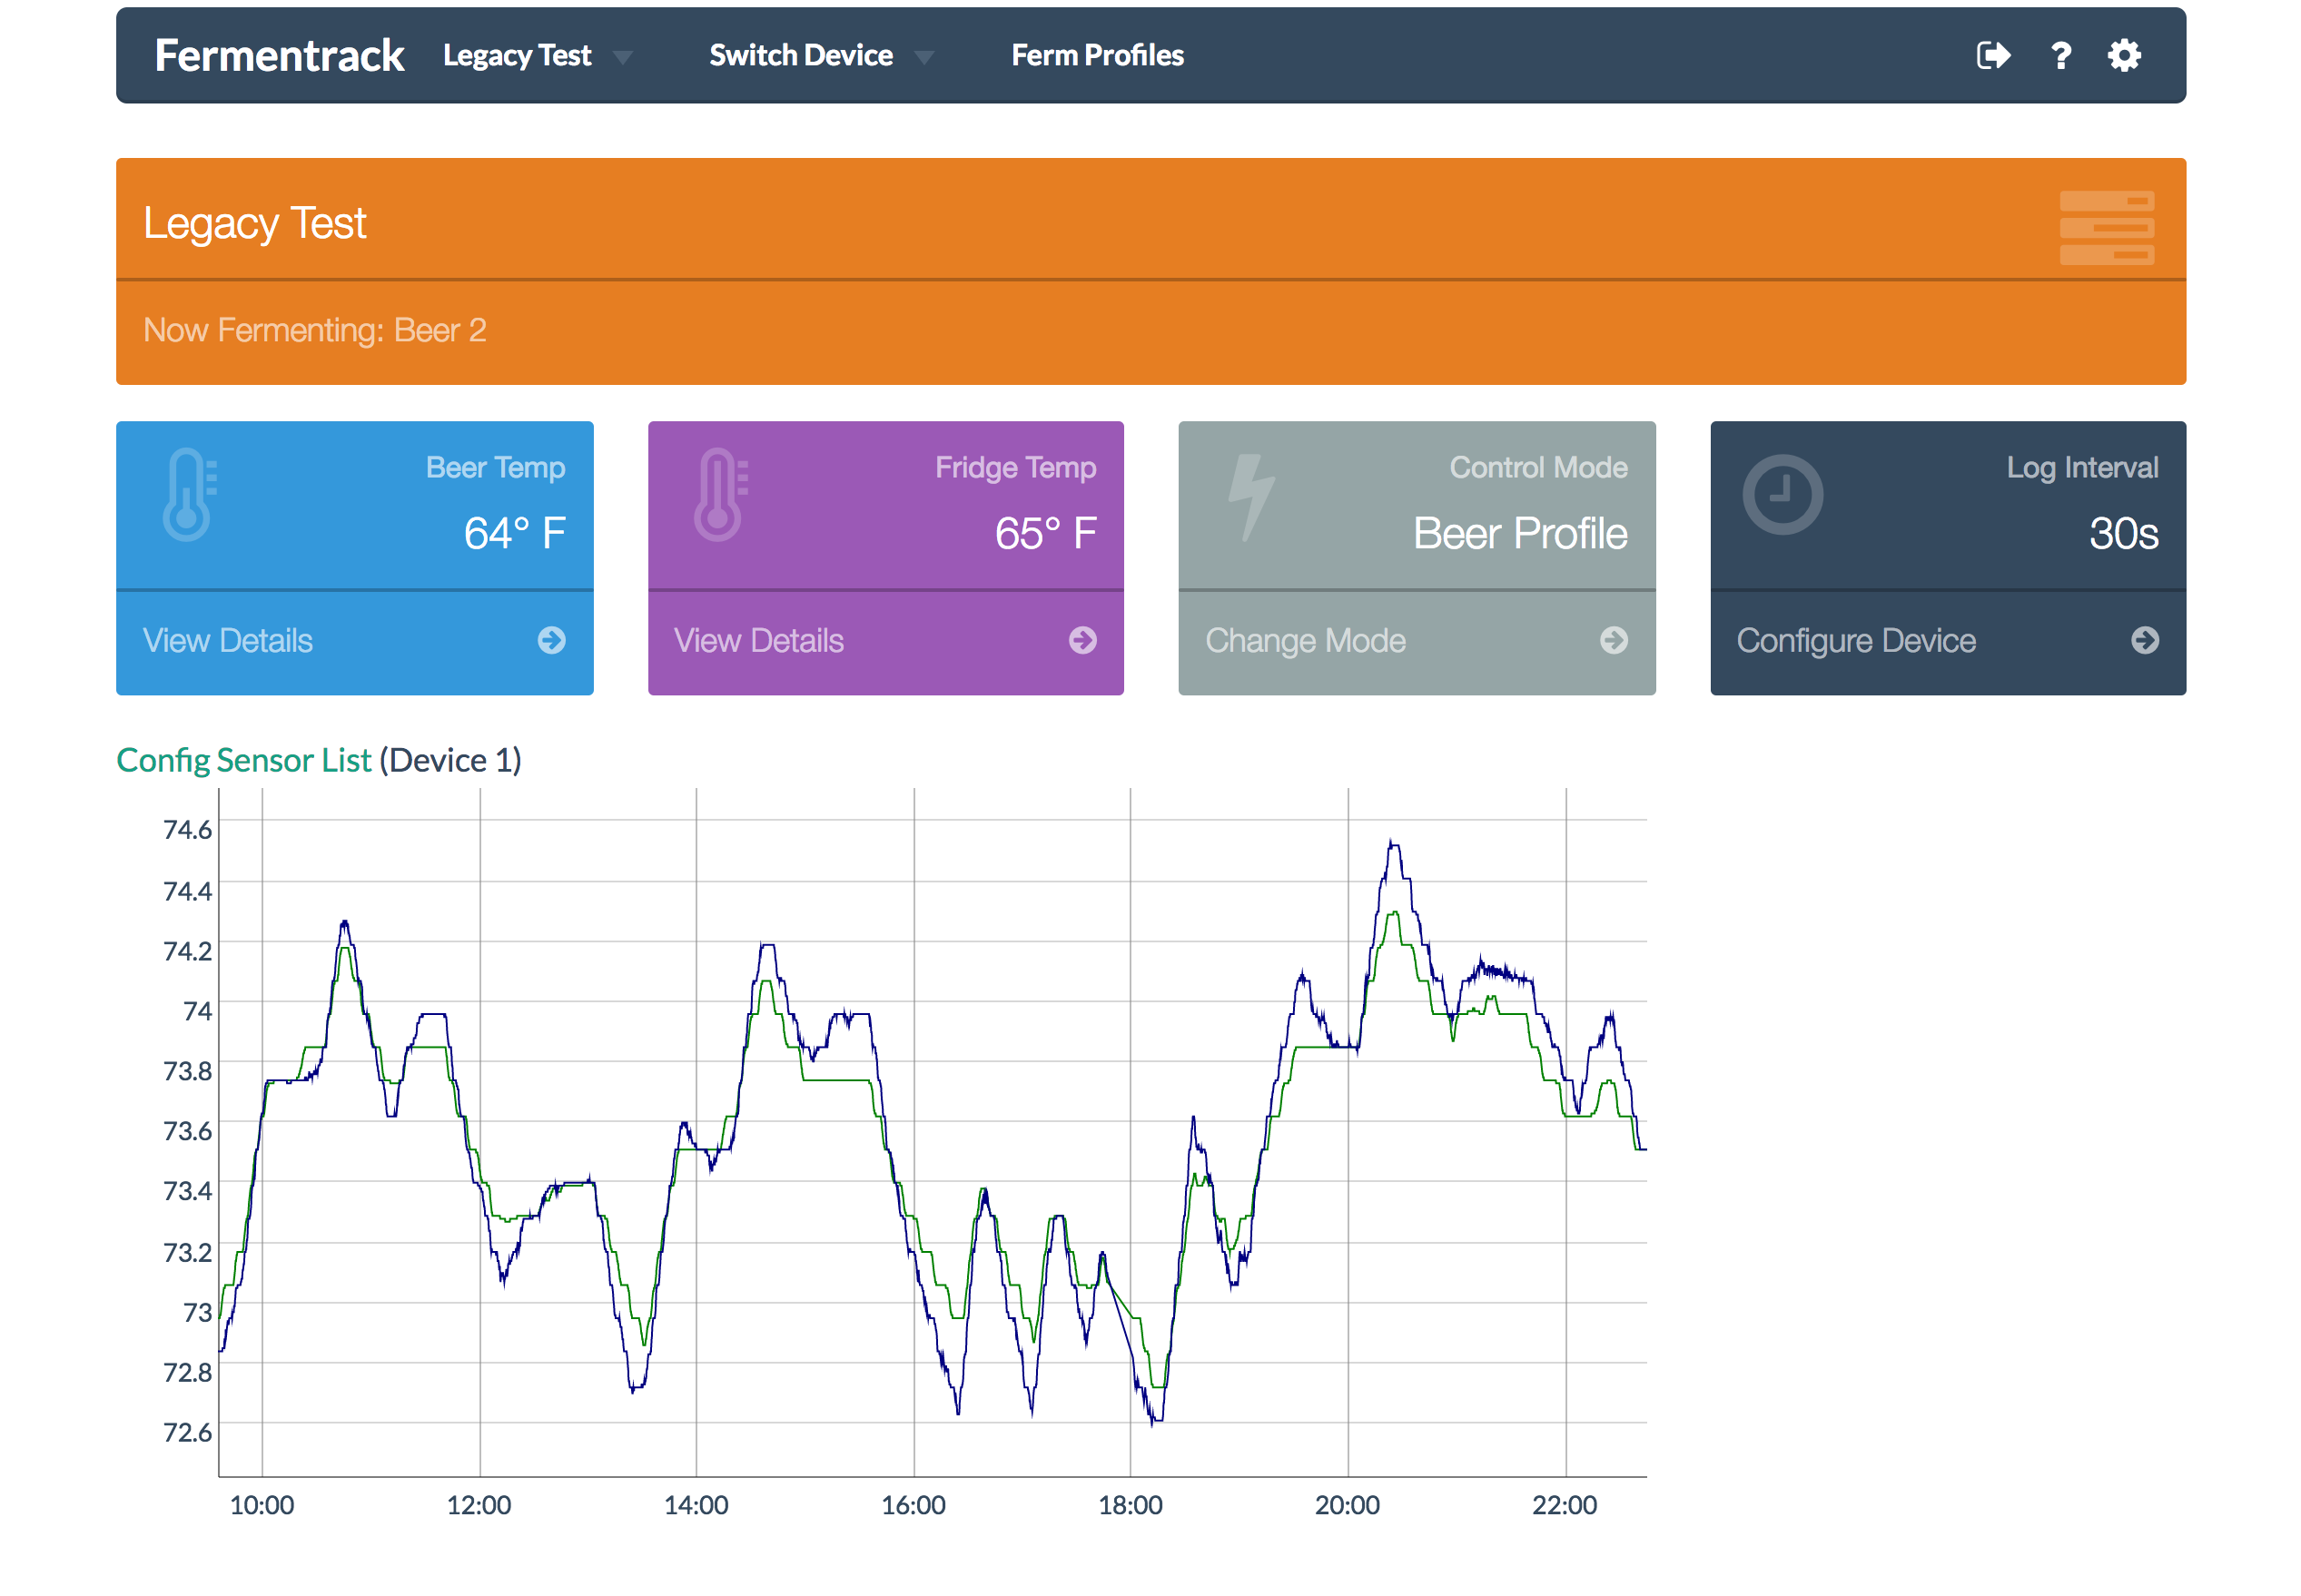
There's a couple of big announcements with regards to the brewpi-www replacement.

First, the project has officially been renamed! If you looked closely at the screenshot I posted above, you'll notice that the project is no longer named "brewpi-django" -- The official name for the project is now Fermentrack.

While the official team is pushing BrewPi towards becoming a one stop brewery controller, the goal of this project is entirely to help manage BrewPi-based fermentation temperature control & logging. Given the potential divergence of the two it makes sense to remove "brewpi" from the name and focus on what this project does best.


Second, we have a target release date! After much effort from @rocket4x4 and myself, we're nearing the point where the software generally can replace all the functions of the main brewpi web interface. There are still a few key features that could be cleaned up, but the main thing still outstanding is documentation. That said, the target release date for v1 of Fermentrack is Saturday, March 18th.

This version will only support ESP8266-based fermentation controllers connected via WiFi, but Arduino controllers and serial support will be close behind in version 2.

For those of you interested in seeing the list of what is outstanding to work on, a link is below:
http://imgur.com/w6AsJJb


On a separate note, as part of working on the deployment scripts for Fermentrack I went ahead and re-recorded the general "Preparing a RasPi for BrewPi with Mac" video I made six months ago. This version includes the streamlined WiFi configuration process as well as the required change to enable SSH on the latest version of Raspbian.

The YouTube link is https://youtu.be/TdSnJOUgS3k

I also went through and updated the ESP8266 installation notes to reference these changes as well. I still need to go through and review all of the BrewPi-ESP8266 documentation, but as none of the instructions for my software have changed, it should all still be accurate.
 
Great job!

Just curious, but will your later version (Arduino controller) support, er, other BrewPi compatible devices?
 
Great job!

Just curious, but will your later version (Arduino controller) support, er, other BrewPi compatible devices?

By other I assume you mean the Spark. Unfortunately, that will probably have to wait until v3. (along with other modern controller support) ;)

Of course, if you mean a certain native python implementation, then yeah - absolutely. It probably won't be "Fuscus-aware" and will require everything to be set up via the command line, but there is nothing that will prevent "serial" connected devices from being used in the same fashion.

Honestly though - My longer term goal is to get it so that you can manage Fuscus setup & configuration from within the app itself. Perhaps this is ambitious - Fermentrack doesn't have sudo, after all - but I'd love to get to a point where you can do a one-click install if you want a native python implementation of the firmware on your Raspberry Pi.
 
Looking great! Finally got my hands on an RPi Zero, and both my keezer and ferm chamber are now running ESP8266 temp controllers.

Once Fermentrack is released I plan to install on the RPi Zero along with RPints. The old Pi Model B will keep running the brewery. :mug:
 
By other I assume you mean the Spark. Unfortunately, that will probably have to wait until v3. (along with other modern controller support) ;)

Of course, if you mean a certain native python implementation, then yeah - absolutely. It probably won't be "Fuscus-aware" and will require everything to be set up via the command line, but there is nothing that will prevent "serial" connected devices from being used in the same fashion.

Honestly though - My longer term goal is to get it so that you can manage Fuscus setup & configuration from within the app itself. Perhaps this is ambitious - Fermentrack doesn't have sudo, after all - but I'd love to get to a point where you can do a one-click install if you want a native python implementation of the firmware on your Raspberry Pi.

Yes, Fuscus is but one example, but it serves to illustrate the situation quite well. :)

I am not sure that sudo is needed for GPIO access these days. Once I am done with my current travels I'll check it out.
 
Looking great! Finally got my hands on an RPi Zero, and both my keezer and ferm chamber are now running ESP8266 temp controllers.

Once Fermentrack is released I plan to install on the RPi Zero along with RPints. The old Pi Model B will keep running the brewery. :mug:

I'll be curious to see how they coexist. I'm not familiar enough with RPints to know how the web components of it run - Fermentrack is designed to run on top of nginx which may compete.

EDIT - I just took a quick look, and it appears that RPints is a PHP-based application. I'm pretty sure that an nginx config file could be whipped up to support it -- you just might need to access it on another port than 80.
 
To be fair, it uh... was pretty ugly.


It's still being refactored, but here's what it looks like right now:


b5k6oUv.png


Next in line to fix is the actual graph.


When I upgrade will I still be able to use it as a sousvide between brews? Basically at the moment that means fridge constant at 60c or similar to heat the water in a crockpot.
 
When I upgrade will I still be able to use it as a sousvide between brews? Basically at the moment that means fridge constant at 60c or similar to heat the water in a crockpot.

I'm not sure if you are currently tweaking your control constants when switching between sousvide and fermenting, but one of the features currently in the works is the ability to save/reload control constants from a preset or memory.

The idea was (if someone was willing to contribute their control constants) to provide "example" control constants for things such as glycol where tweaks are recommended due to the control algorithm. No reason it couldn't be used for sous vide as well, though!
 
Thorrack... i can't wait to see how Fermtrack turns out!!!. few quick questions... will it allow for ability to pair temp sensors together... i usually use two carboys and it would be nice to get an avg of the two as my beer temp. also...i would love to cut a large hole in the side of ferm chamber and have fan kick on if could cool/heat based on the outside temp instead of the using power for cool/heat... is the new version going to easy to us to code against? Thanks!!!


--- EDIT ---
i was also thinking it would be nice to have up to six relay controls... heat, cool, fan, light... and Outside air fan and extra (light alarm, second heat/cool, etc)
also if we could add a ton of temp pickups like (outside (house), inside, fridge box, ferm vessel 1,2,3,4,5,6,etc )
and lastly... if we could sign up for a alert that it would check in with your site ever 5 mins and report time/temp/target temp and we could get an email/text if it got stuck and not reporting or outside the target temp by x degrees...
 
I'm not sure if you are currently tweaking your control constants when switching between sousvide and fermenting, but one of the features currently in the works is the ability to save/reload control constants from a preset or memory.


The idea was (if someone was willing to contribute their control constants) to provide "example" control constants for things such as glycol where tweaks are recommended due to the control algorithm. No reason it couldn't be used for sous vide as well, though!


I've only used it a couple of times as a sousvide and it's a different unit as well but yeah once I've got it dialled in I'm more than happy to share my settings.

Somewhat embarrassed to say for my main fermenter I'm still using an arduino. That will change though come release day.
 
Somewhat embarrassed to say for my main fermenter I'm still using an arduino. That will change though come release day.

Naah - no reason to change, unless you want to. Arduino support is the main missing feature in Fermentrack in my opinion. Once Arduino support is in, there will be a separate forum thread created for Fermentrack, separate discussions on Reddit, etc.

It's probably the key feature that would prevent people from trying Fermentrack in my opinion.
 
Thorrack... i can't wait to see how Fermtrack turns out!!!. few quick questions... will it allow for ability to pair temp sensors together... i usually use two carboys and it would be nice to get an avg of the two as my beer temp. also...i would love to cut a large hole in the side of ferm chamber and have fan kick on if could cool/heat based on the outside temp instead of the using power for cool/heat... is the new version going to easy to us to code against? Thanks!!!


--- EDIT ---
i was also thinking it would be nice to have up to six relay controls... heat, cool, fan, light... and Outside air fan and extra (light alarm, second heat/cool, etc)
also if we could add a ton of temp pickups like (outside (house), inside, fridge box, ferm vessel 1,2,3,4,5,6,etc )
and lastly... if we could sign up for a alert that it would check in with your site ever 5 mins and report time/temp/target temp and we could get an email/text if it got stuck and not reporting or outside the target temp by x degrees...


Hey there! If I read this correctly, you're suggesting a number of things - I'll try to divide them into two groups:

  • Temp sensor pairing/averaging
  • "Cooling source" logic - Outside air vs. heater/fridge
  • Additional relay controls (beyond just heat/cool)
  • Additional temp sensors - Outside (room), vessel 1, 2, 3, etc.

These four would all would need to be implemented on the controller itself, and unfortunately would be largely incompatible with the base BrewPi implementation so it is unlikely that they would get released as part of this project.

That said - The source code is open & available on GitHub if you want to take a stab at it.


  • Emailed/text notifications if controller isn't reporting in
  • Emailed/text notifications if temperature exceeds some specific band

These could be implemented either in the script or in the web interface, and are both possibilities for a future release. These would take some careful planning to prevent things like spamming end users, not reporting when the site wasn't being accessed, etc. but are certainly possible with a later Fermentrack release.
 
Thorrak, thanks for the reply... i was thinking that the first four would be harder... but maybe something that would benefit others.
on my arduino setup i currently there is a chamber fan pin.. is this going to be available on the FremTrack? and could we use a four relay board to support it? looks like there is another pin off the ESP8266 .

Thanks
 
Naah - no reason to change, unless you want to. Arduino support is the main missing feature in Fermentrack in my opinion. Once Arduino support is in, there will be a separate forum thread created for Fermentrack, separate discussions on Reddit, etc.


It's probably the key feature that would prevent people from trying Fermentrack in my opinion.


It's more a case of getting the right moment to shift. I have everything set up and tend to brew back to back so haven't disconnected my arduino fridge for about 2 years.

I'm brewing a Shilling Ale soon for Ron Pattinsons Macbeth tour which will free rise so I hope that'll give me the opportunity to take a deep breath and make the move.
 
Back
Top