Winemaker2
New Member
- Joined
- Aug 14, 2008
- Messages
- 2
- Reaction score
- 5
The internet has many articles about how to remove the Sankey valve retained by a spiral ring on a 15.5 gallon beer keg, but I found nothing that told how to remove the similar valve threaded into the keg as used by the Miller Brewing Company. To make a fermentation vessel I cut open the keg and reverse engineered a simple tool for removing the valve.
The first step is to depress the center ball to release any pressure inside the keg. Turn the keg sideways to avoid a beer shower if a little beer is left. The valve is loosened by placing a piece of steel 1 3/4" wide x 1/4" thick x 2" long between the turning lugs of the valve and turning counterclockwise using an adjustable or pipe wrench. I used a "Wonderbar" type prybar that just happened to fit.
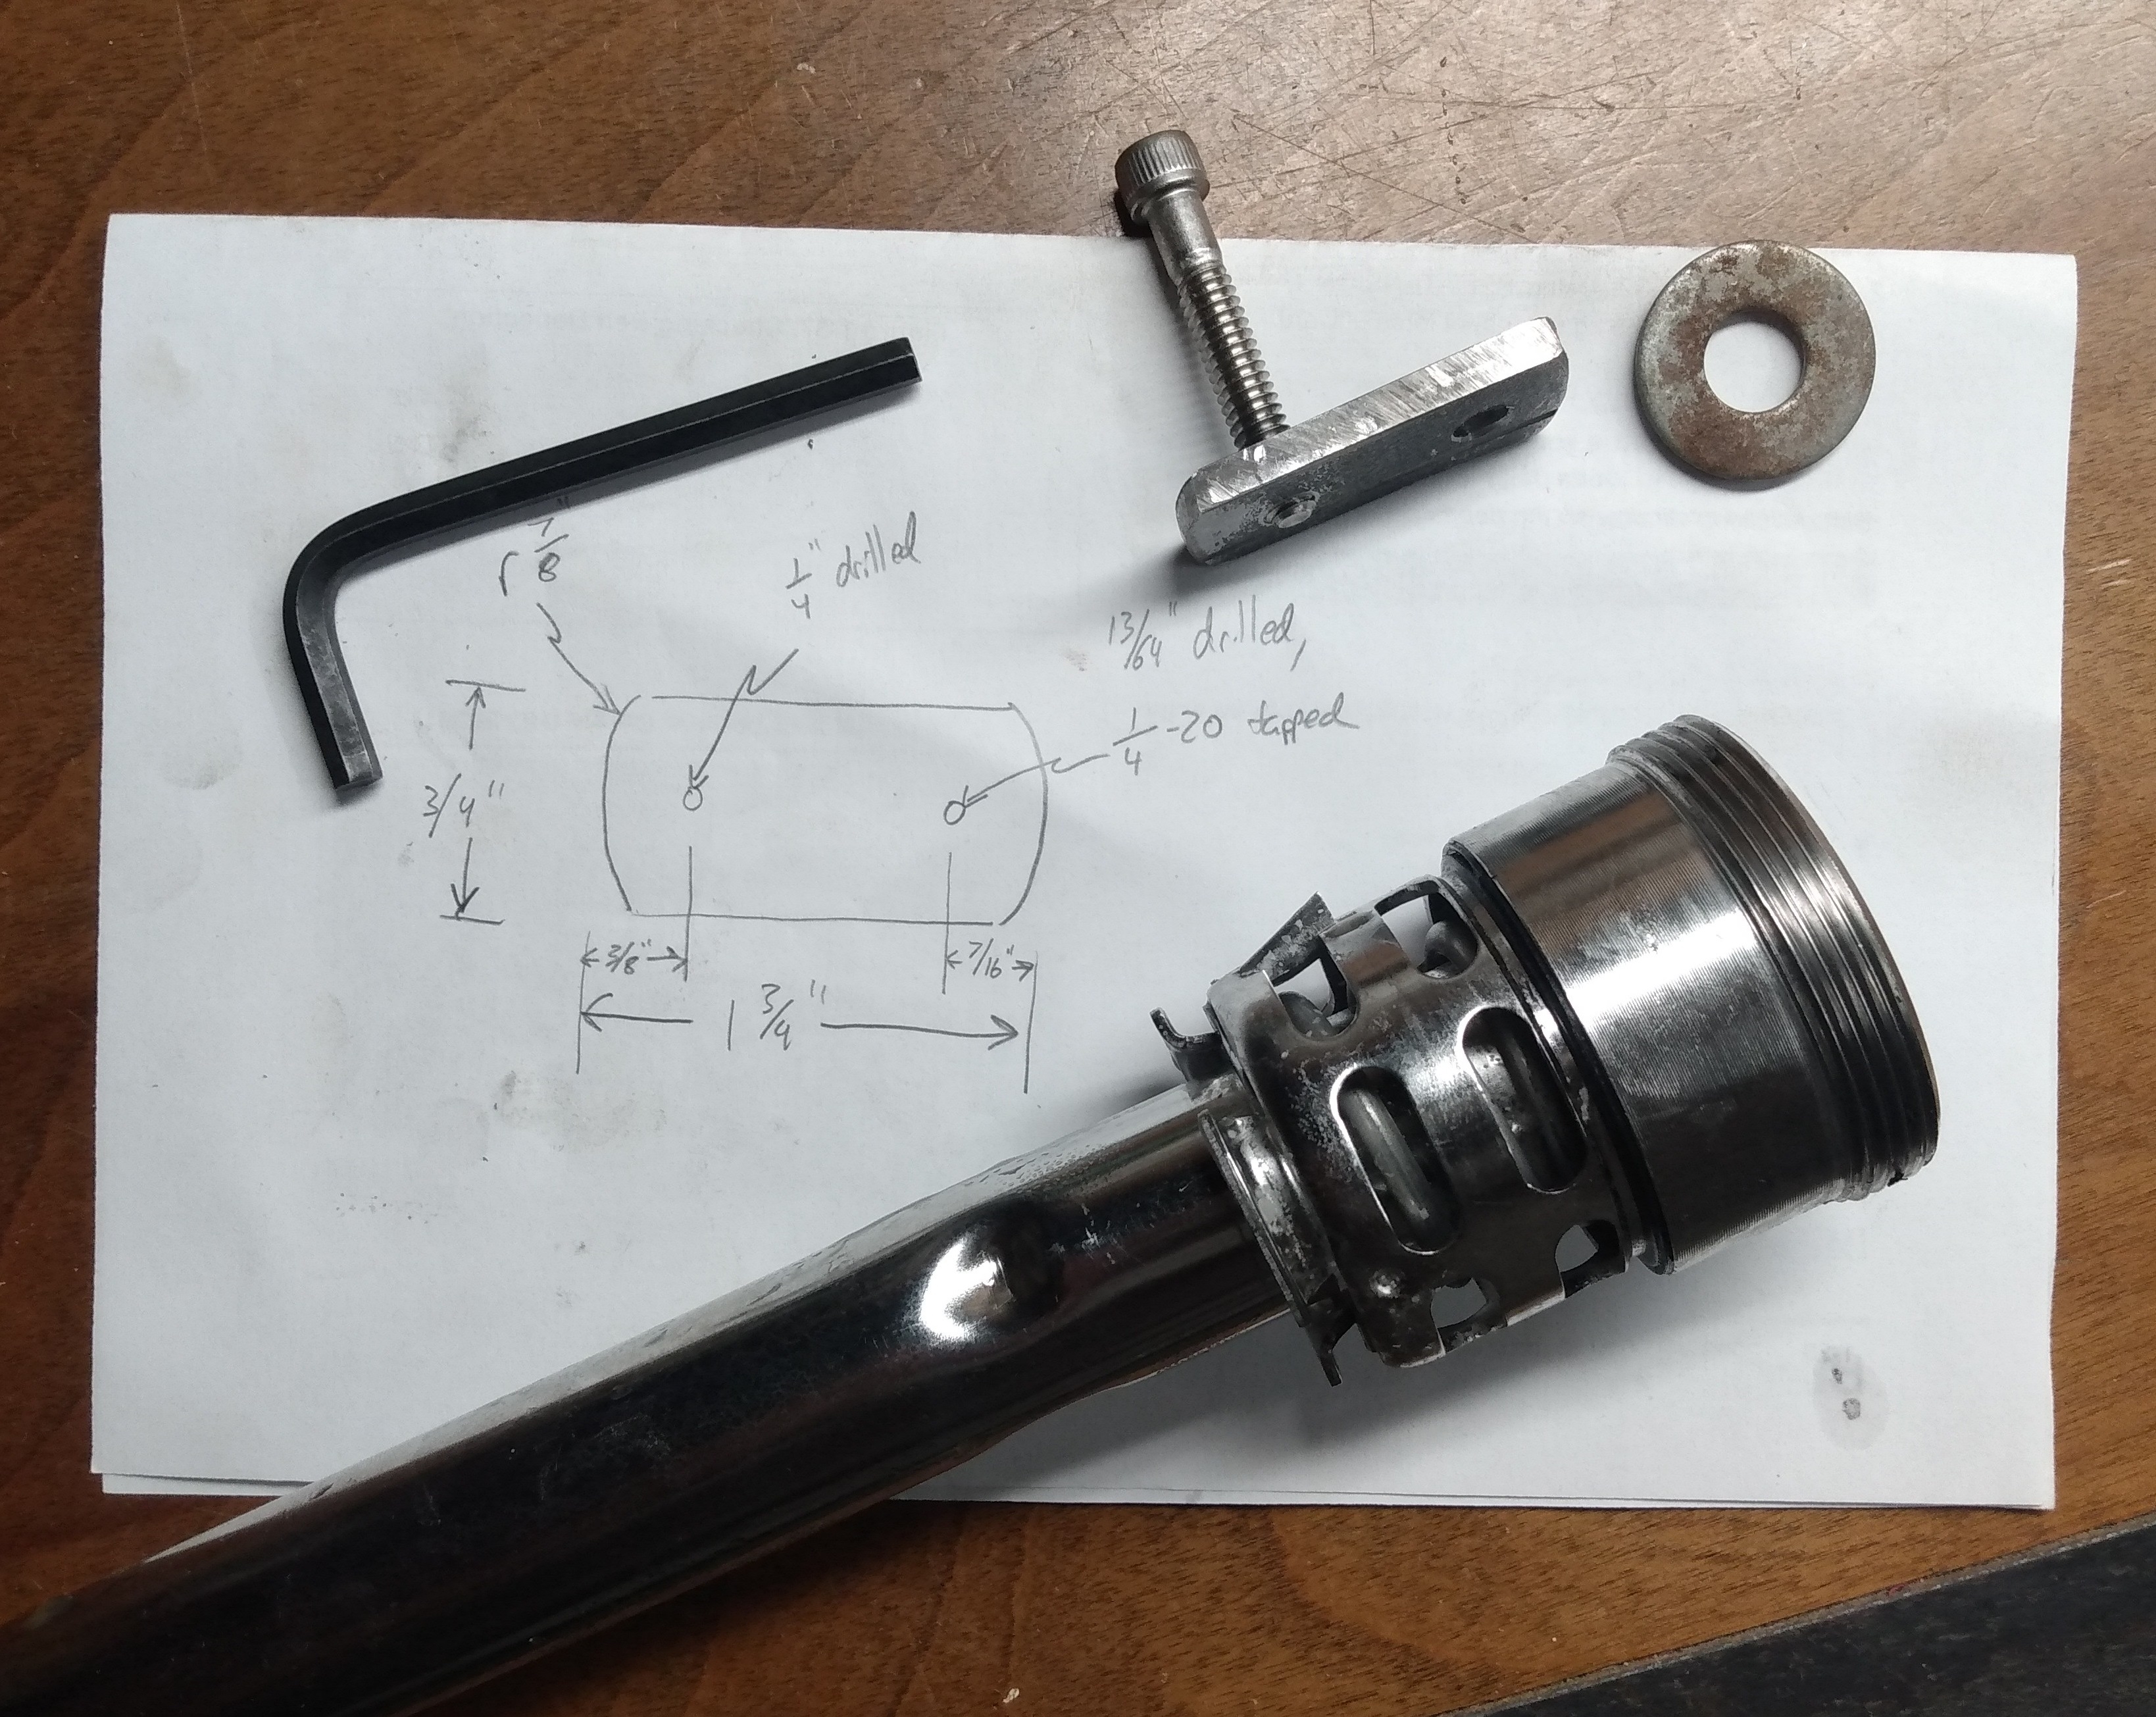
After the valve is loose it is still retained by a safety catch to prevent pressure in the keg from blowing the valve out like a rocket. One of the two lugs on the valve is marked "S". About 2" directly below that lug is the safety catch release lever (SCRL) that must be pried inward to release the valve. To get to the SCRL make a simple steel tool 3/4" wide x 3/16" thick x 1 3/4" long. Grind or file a 7/8" radius on each end of the tool to just fit inside the top of the valve. 3/8" from one end of the tool drill a 1/4" hole. 7/16" from the other end of the tool drill a #7 (0.201) hole tapped for a 1/4"-20 screw. Put a 1" long screw in the tapped hole to depress the rubber seal in the top of the valve. Protect the seal with a 1" diameter washer between the seal and the screw. The screw is not centered over the seal and bears on the solid portion of the washer. Place the tool in the top of the valve under the lugs. Position the untapped hole radially next to the "S" lug. Tighten the screw 5 turns after play is removed. It takes 60 pounds of force to depress the seal 1/4". The seal will back away from the "S" lug as the seal is depressed providing access to the SCRL, visible with a well-focused light. Insert a 1/8" diameter screwdriver shaft through the hole in the tool down toward the inside wall of the valve keeping the blade flat against the wall. At 1 1/2" depth you should start to engage the SCRL but probably won't feel it. Tap the end of the screwdriver lightly if necessary until you reach about 2" depth where the screwdriver should bottom out solidly. Be sure no threads of the valve have reengaged, and lift the valve out of the keg. If the valve will not come out, pry the safety lever inward by pushing outward on the screwdriver handle or rotating the screwdriver 90 degrees while lifting. If the valve will still not come out pull the screwdriver out and try again because you missed the SCRL, it is only 1/4" wide. Once the valve is out of the keg, all parts can be disassembled for cleaning. You can easily remove the safety catch before reinstalling the valve so next time you won't need the tool.

1. Safety Catch Extended

2. Safety Catch Retracted, Tool in Place

3. Top View of Tool, Spear Removed

4. Sketch of Tool
The first step is to depress the center ball to release any pressure inside the keg. Turn the keg sideways to avoid a beer shower if a little beer is left. The valve is loosened by placing a piece of steel 1 3/4" wide x 1/4" thick x 2" long between the turning lugs of the valve and turning counterclockwise using an adjustable or pipe wrench. I used a "Wonderbar" type prybar that just happened to fit.
After the valve is loose it is still retained by a safety catch to prevent pressure in the keg from blowing the valve out like a rocket. One of the two lugs on the valve is marked "S". About 2" directly below that lug is the safety catch release lever (SCRL) that must be pried inward to release the valve. To get to the SCRL make a simple steel tool 3/4" wide x 3/16" thick x 1 3/4" long. Grind or file a 7/8" radius on each end of the tool to just fit inside the top of the valve. 3/8" from one end of the tool drill a 1/4" hole. 7/16" from the other end of the tool drill a #7 (0.201) hole tapped for a 1/4"-20 screw. Put a 1" long screw in the tapped hole to depress the rubber seal in the top of the valve. Protect the seal with a 1" diameter washer between the seal and the screw. The screw is not centered over the seal and bears on the solid portion of the washer. Place the tool in the top of the valve under the lugs. Position the untapped hole radially next to the "S" lug. Tighten the screw 5 turns after play is removed. It takes 60 pounds of force to depress the seal 1/4". The seal will back away from the "S" lug as the seal is depressed providing access to the SCRL, visible with a well-focused light. Insert a 1/8" diameter screwdriver shaft through the hole in the tool down toward the inside wall of the valve keeping the blade flat against the wall. At 1 1/2" depth you should start to engage the SCRL but probably won't feel it. Tap the end of the screwdriver lightly if necessary until you reach about 2" depth where the screwdriver should bottom out solidly. Be sure no threads of the valve have reengaged, and lift the valve out of the keg. If the valve will not come out, pry the safety lever inward by pushing outward on the screwdriver handle or rotating the screwdriver 90 degrees while lifting. If the valve will still not come out pull the screwdriver out and try again because you missed the SCRL, it is only 1/4" wide. Once the valve is out of the keg, all parts can be disassembled for cleaning. You can easily remove the safety catch before reinstalling the valve so next time you won't need the tool.
1. Safety Catch Extended
2. Safety Catch Retracted, Tool in Place
3. Top View of Tool, Spear Removed
4. Sketch of Tool