Another HERMS is born...

Homebrew Talk - Beer, Wine, Mead, & Cider Brewing Discussion Forum

Help Support Homebrew Talk - Beer, Wine, Mead, & Cider Brewing Discussion Forum:

This site may earn a commission from merchant affiliate links, including eBay, Amazon, and others.

NWAleDad

Well-Known Member
Joined
Feb 26, 2011
Messages
319
Reaction score
16
Location
Seattle
I have been reading the DIY forum and digesting the plethora of information contained in the forum for a few months. I feel I need to give the obligatory "Thank You" to everyone on this forum. If it was not for the generosity and wealth of knowledge shared on the forum I would not of been able to start this project.

After jealously watching and reading thread after thread of "Check out my HERMS" In November I finally decided to build my own. I created some plans using SketchUp and started a parts lists.

screen-shot-2012-11-23-at-44307-pm-57354.png


brewstand-58005.png


An old friend from school is a metal fabricator and after a few home brews he agreed to do most of the metal fab work. As long as I pay for materials and kep him supply of good home brew.

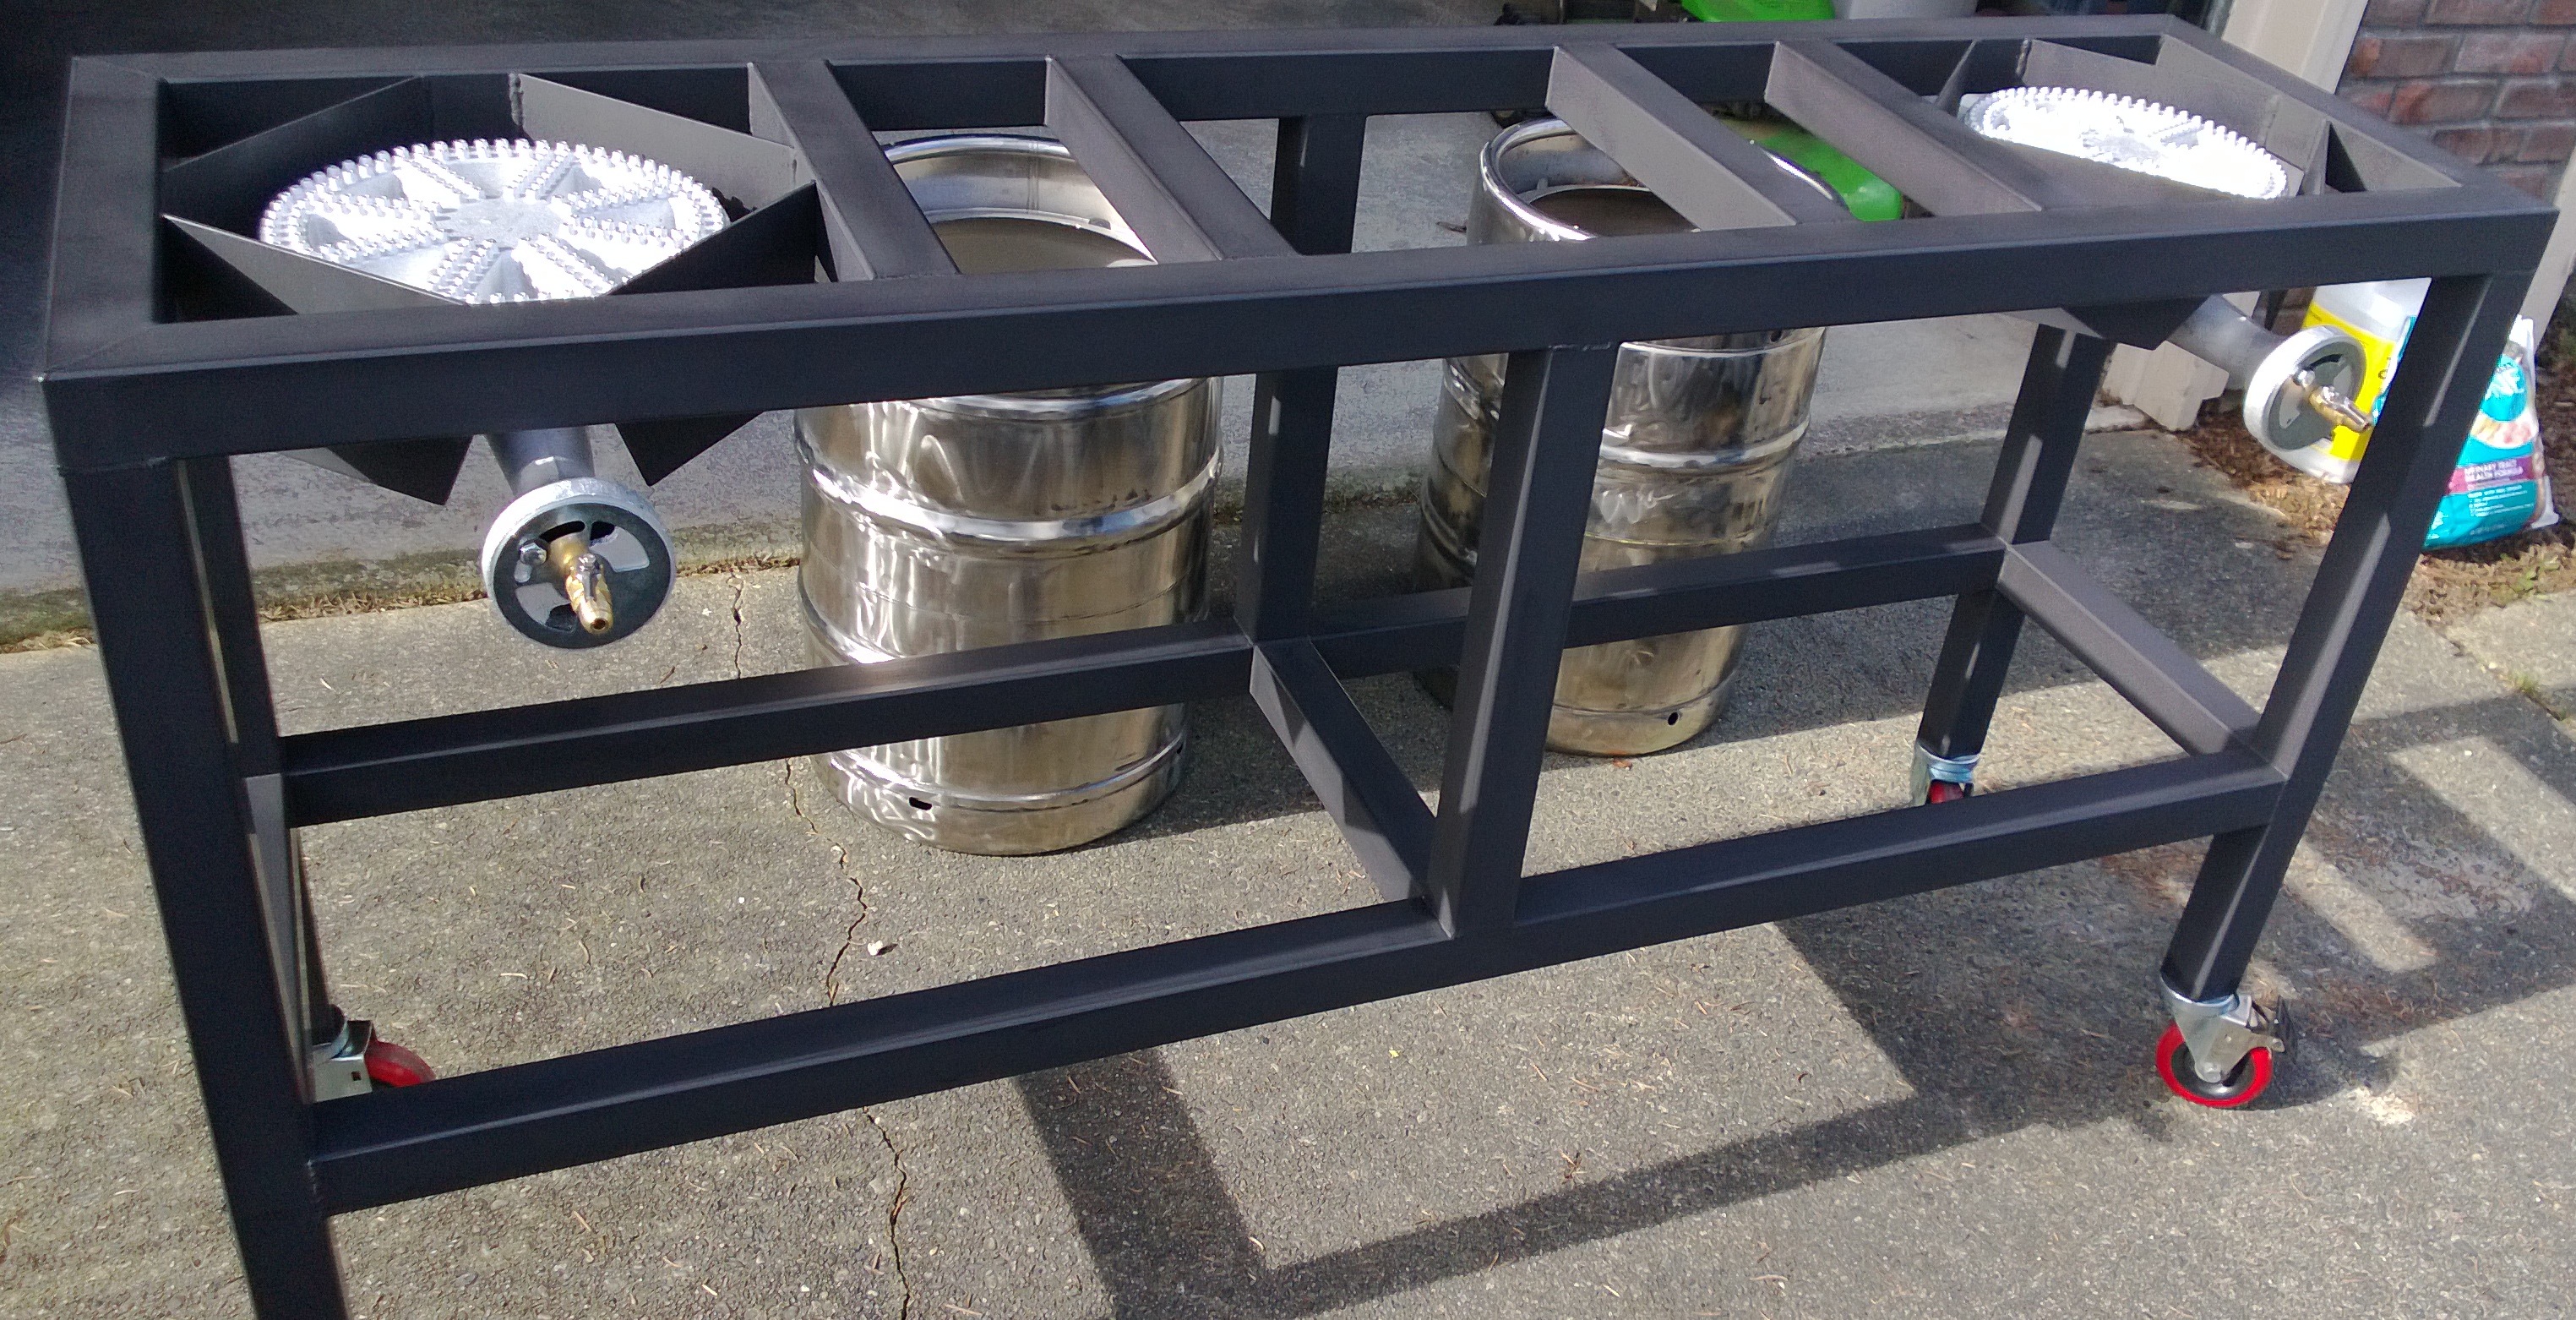
We completed the base on Thursday
wp_20130131_001-58413.jpg

wp_20130131_011-58414.jpg


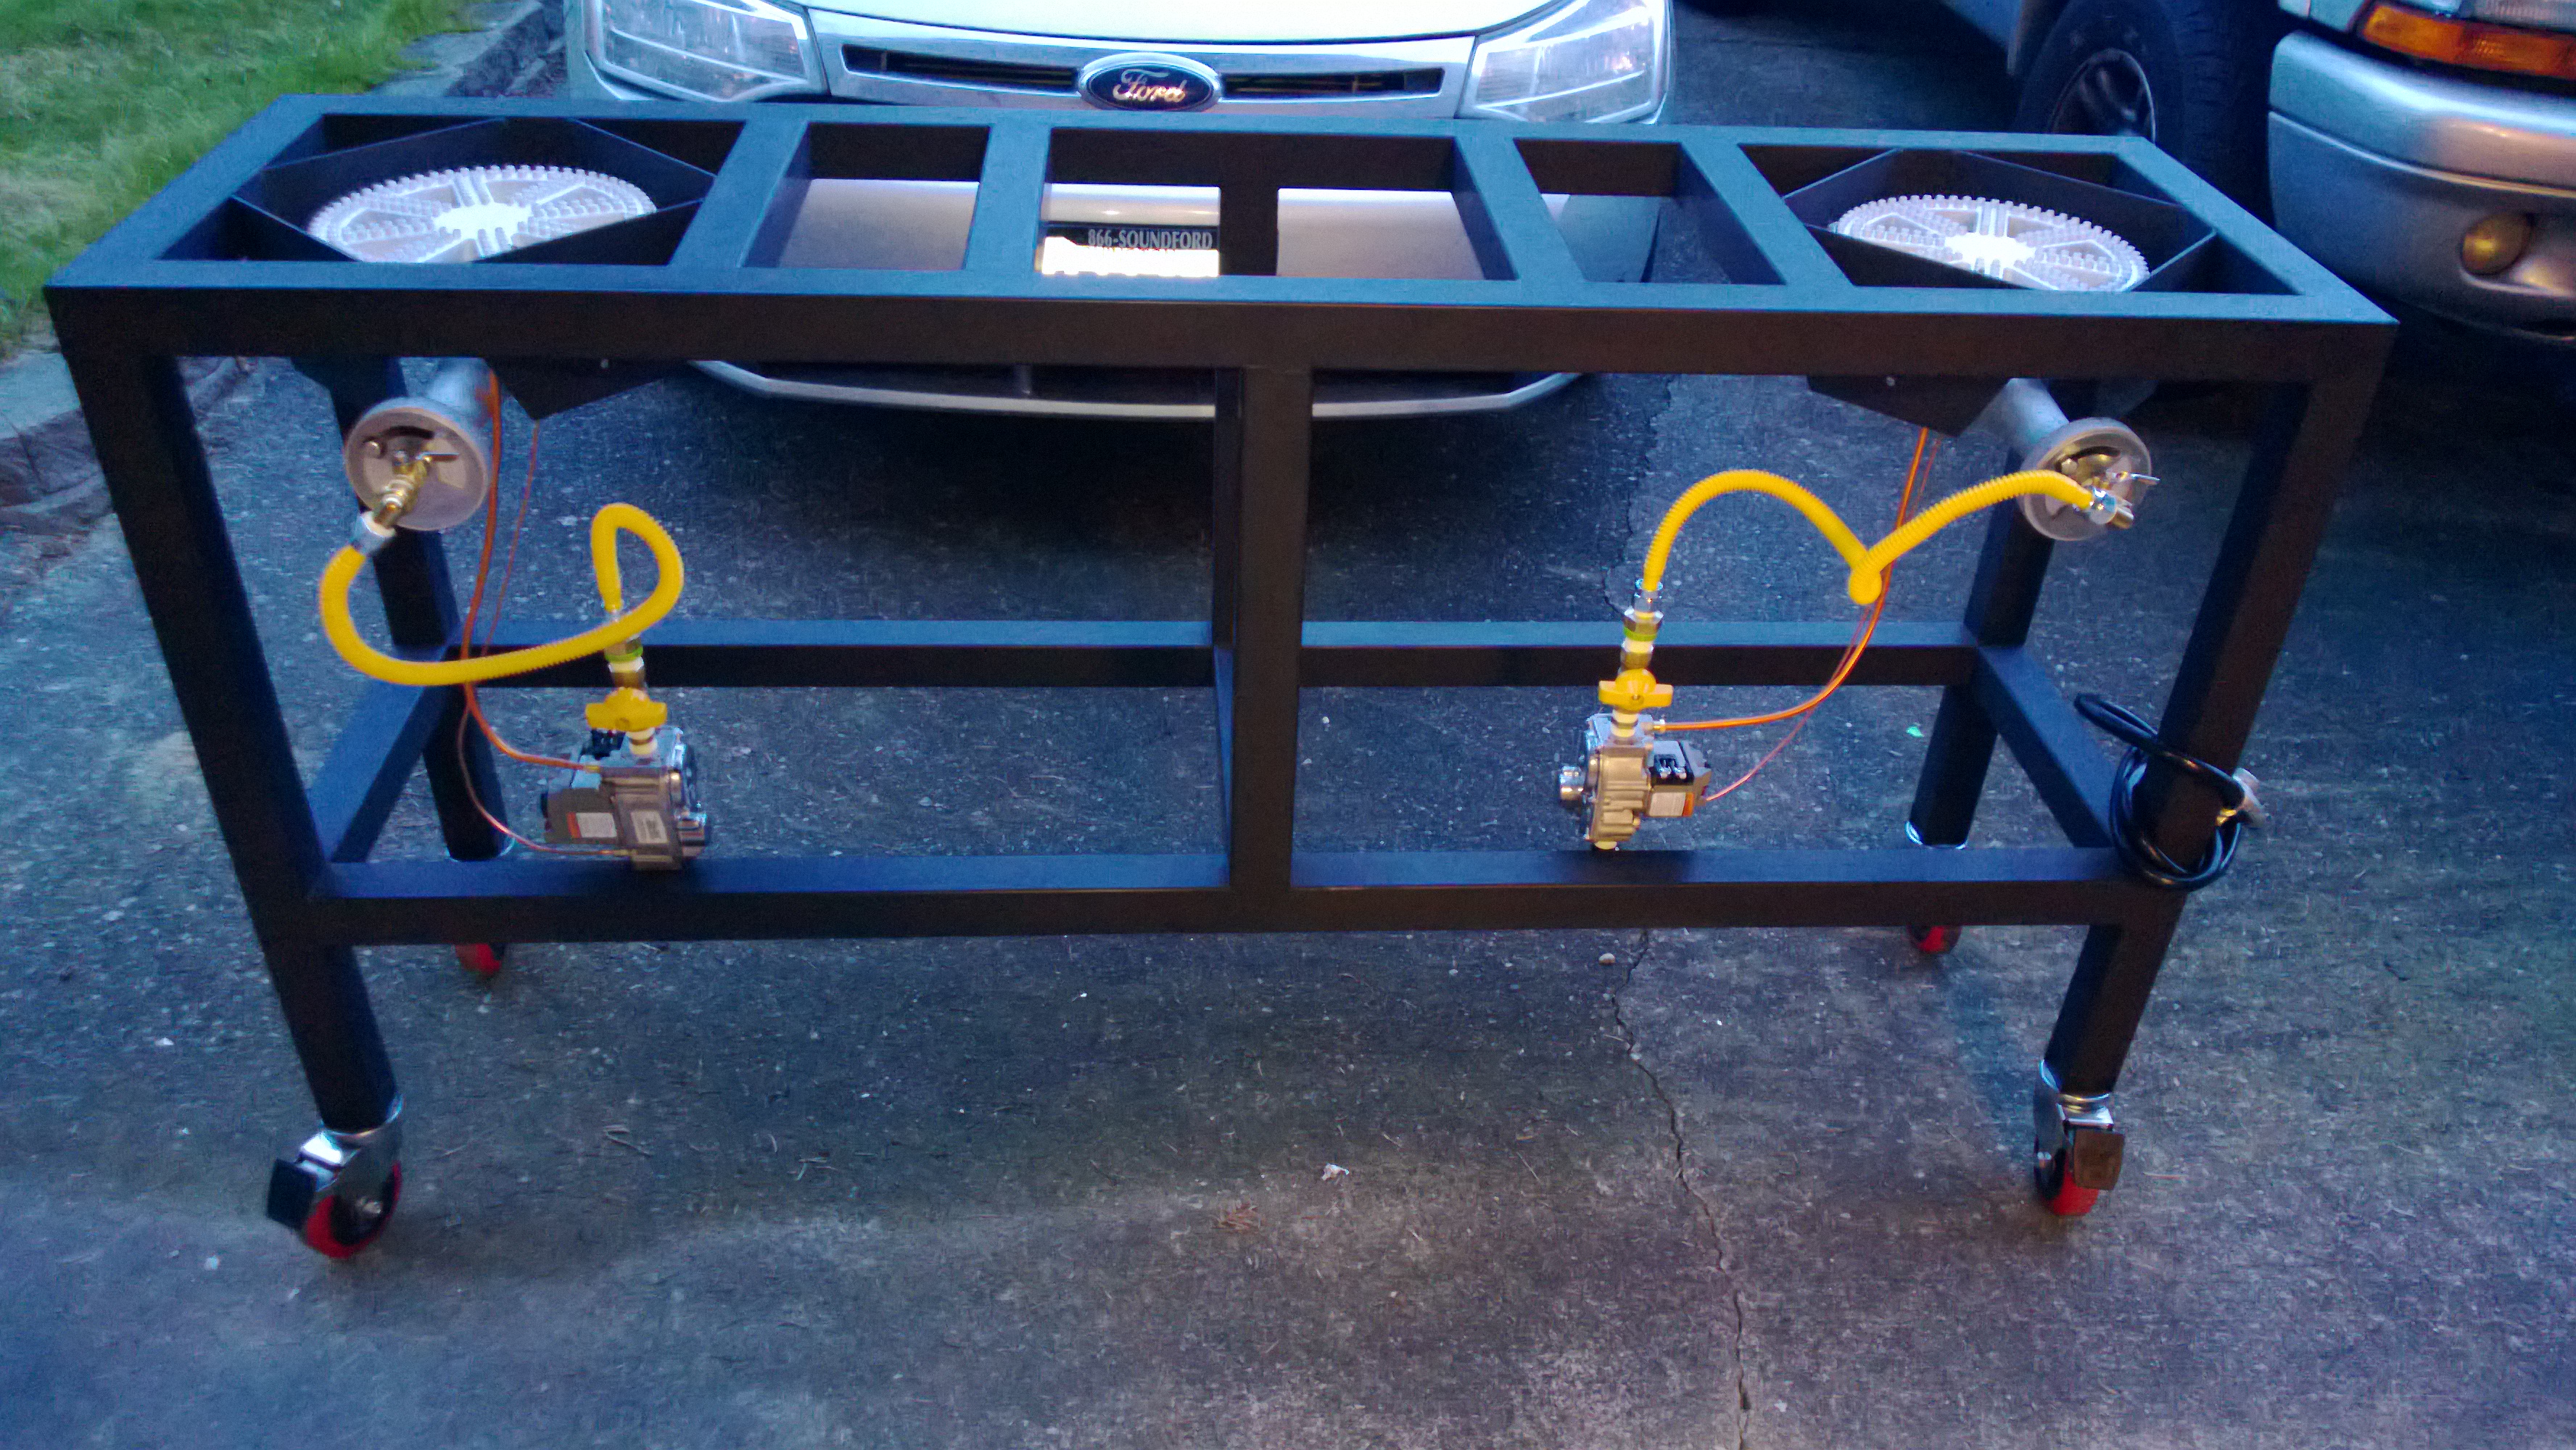
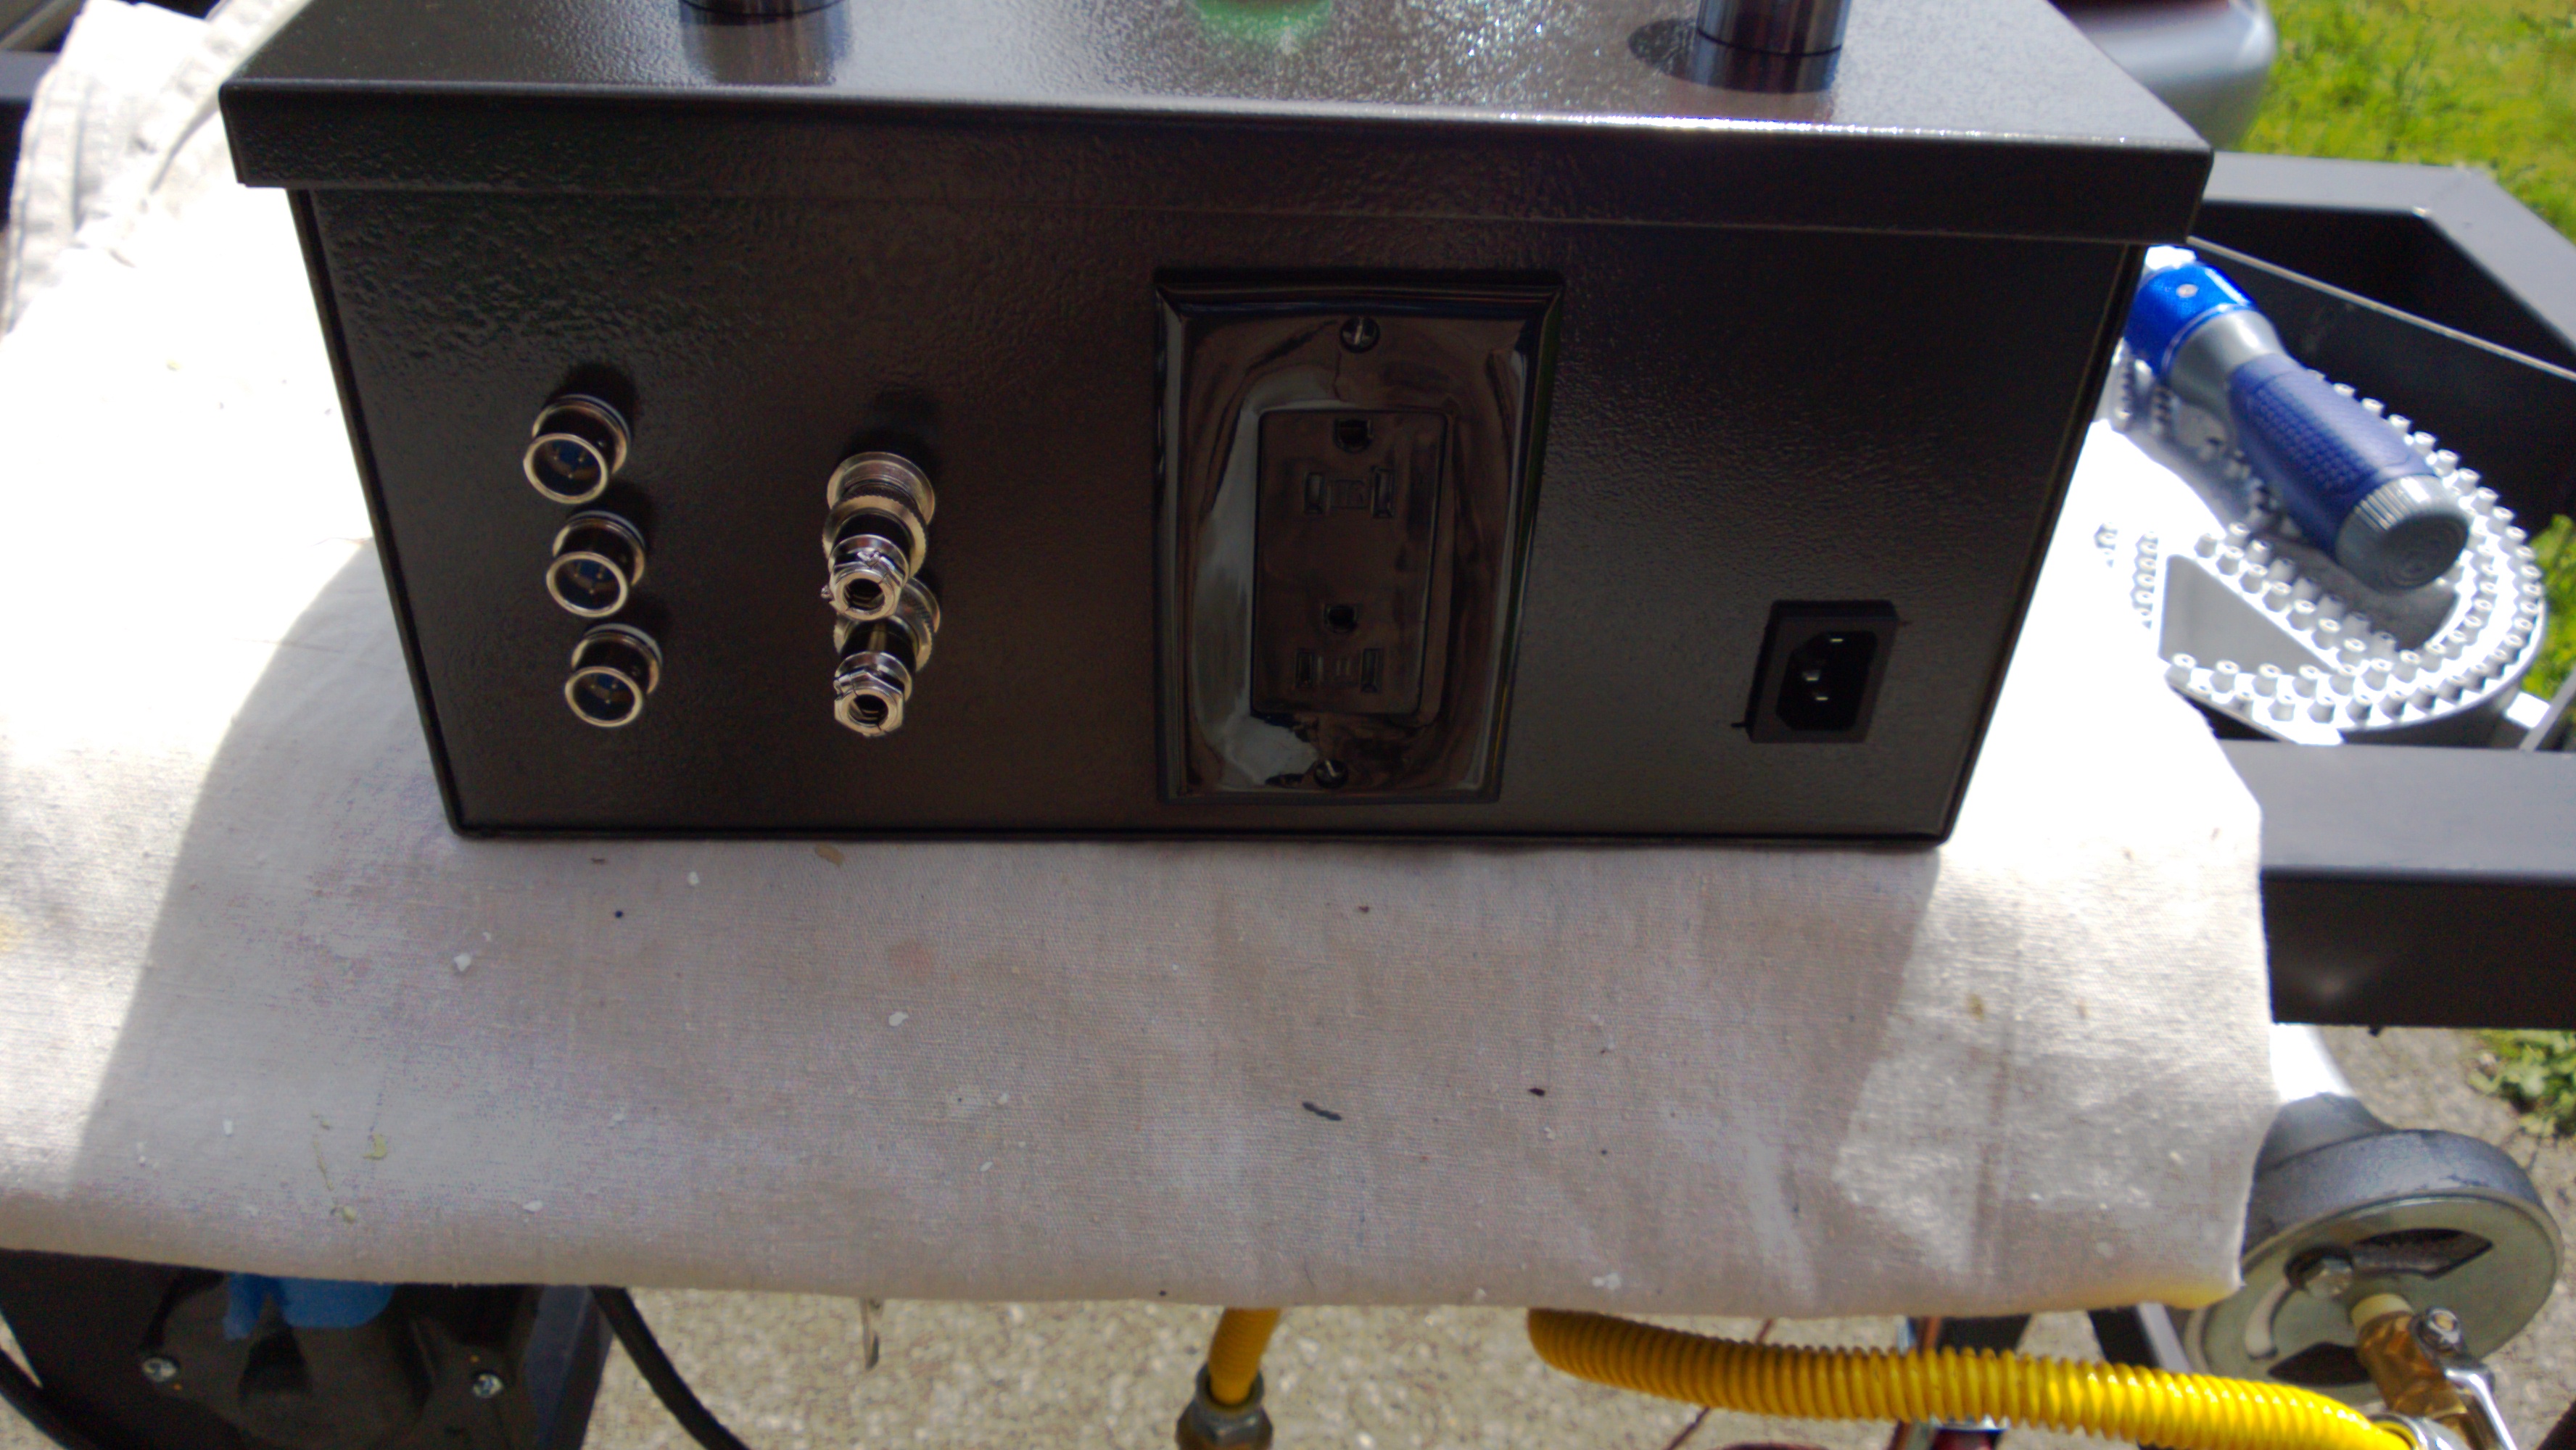
Brought it to my house on Friday for painting and installing the gas system.

wp_20130201_009-58410.jpg


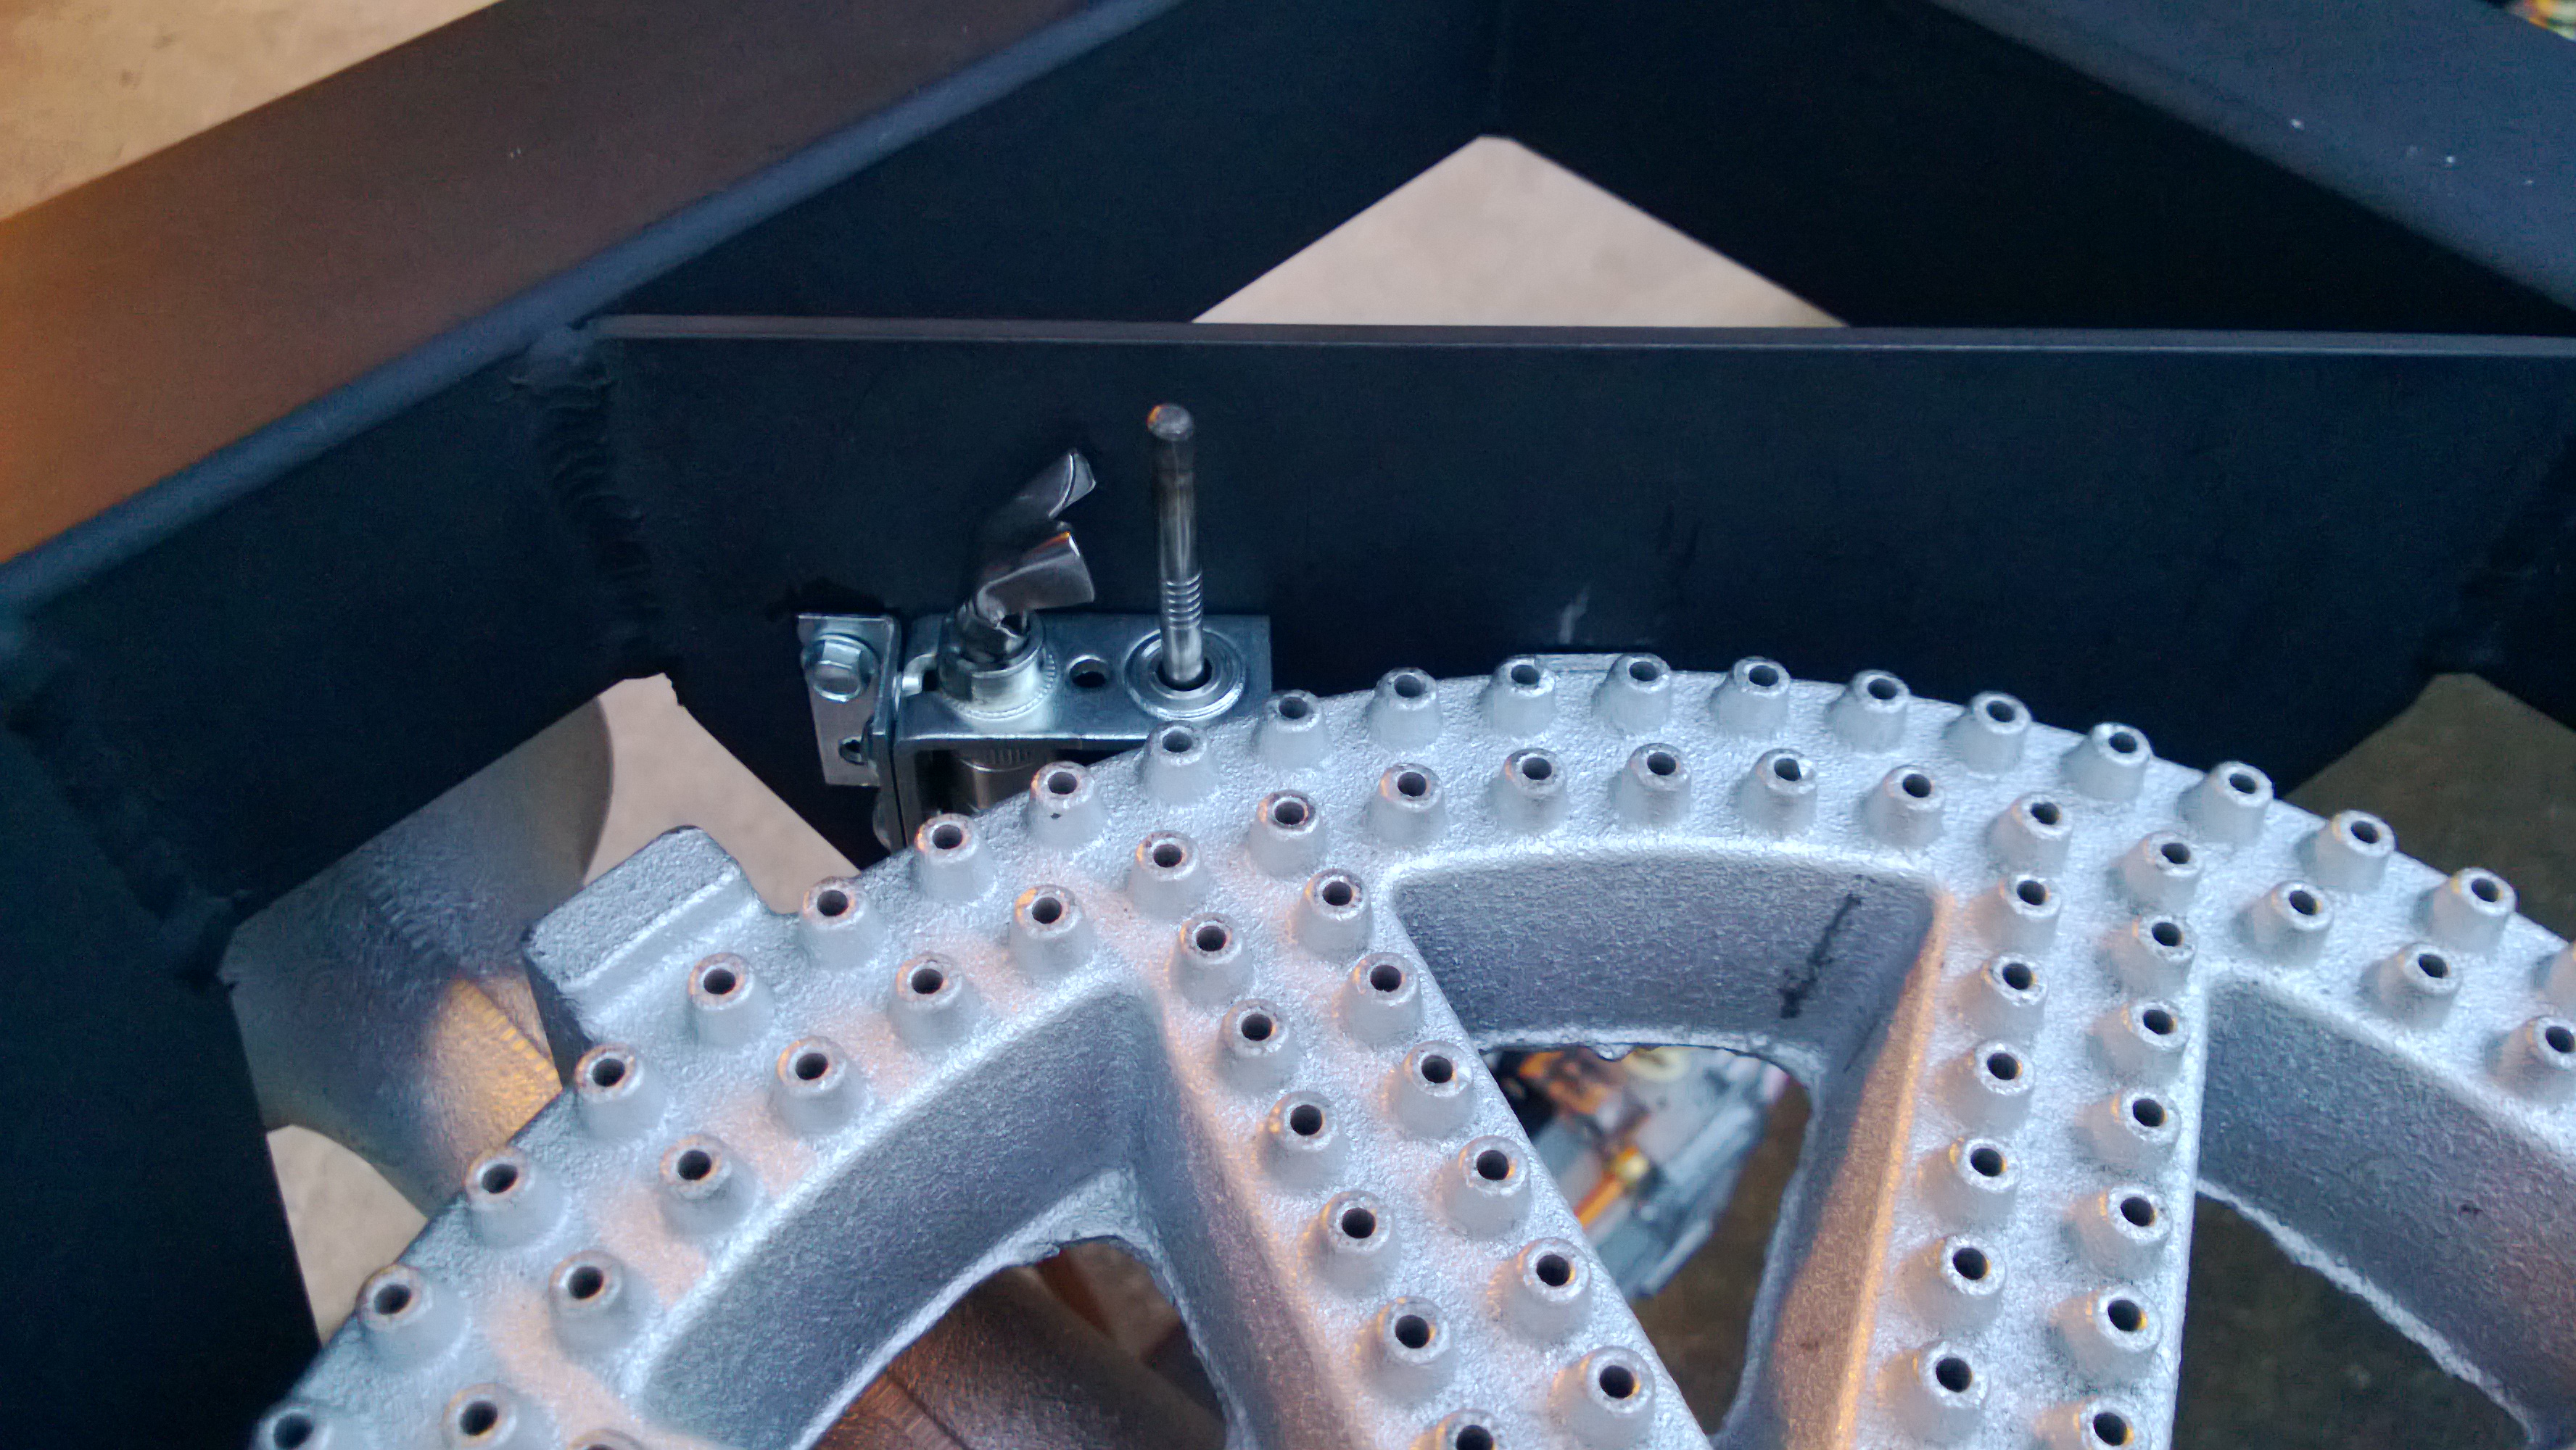
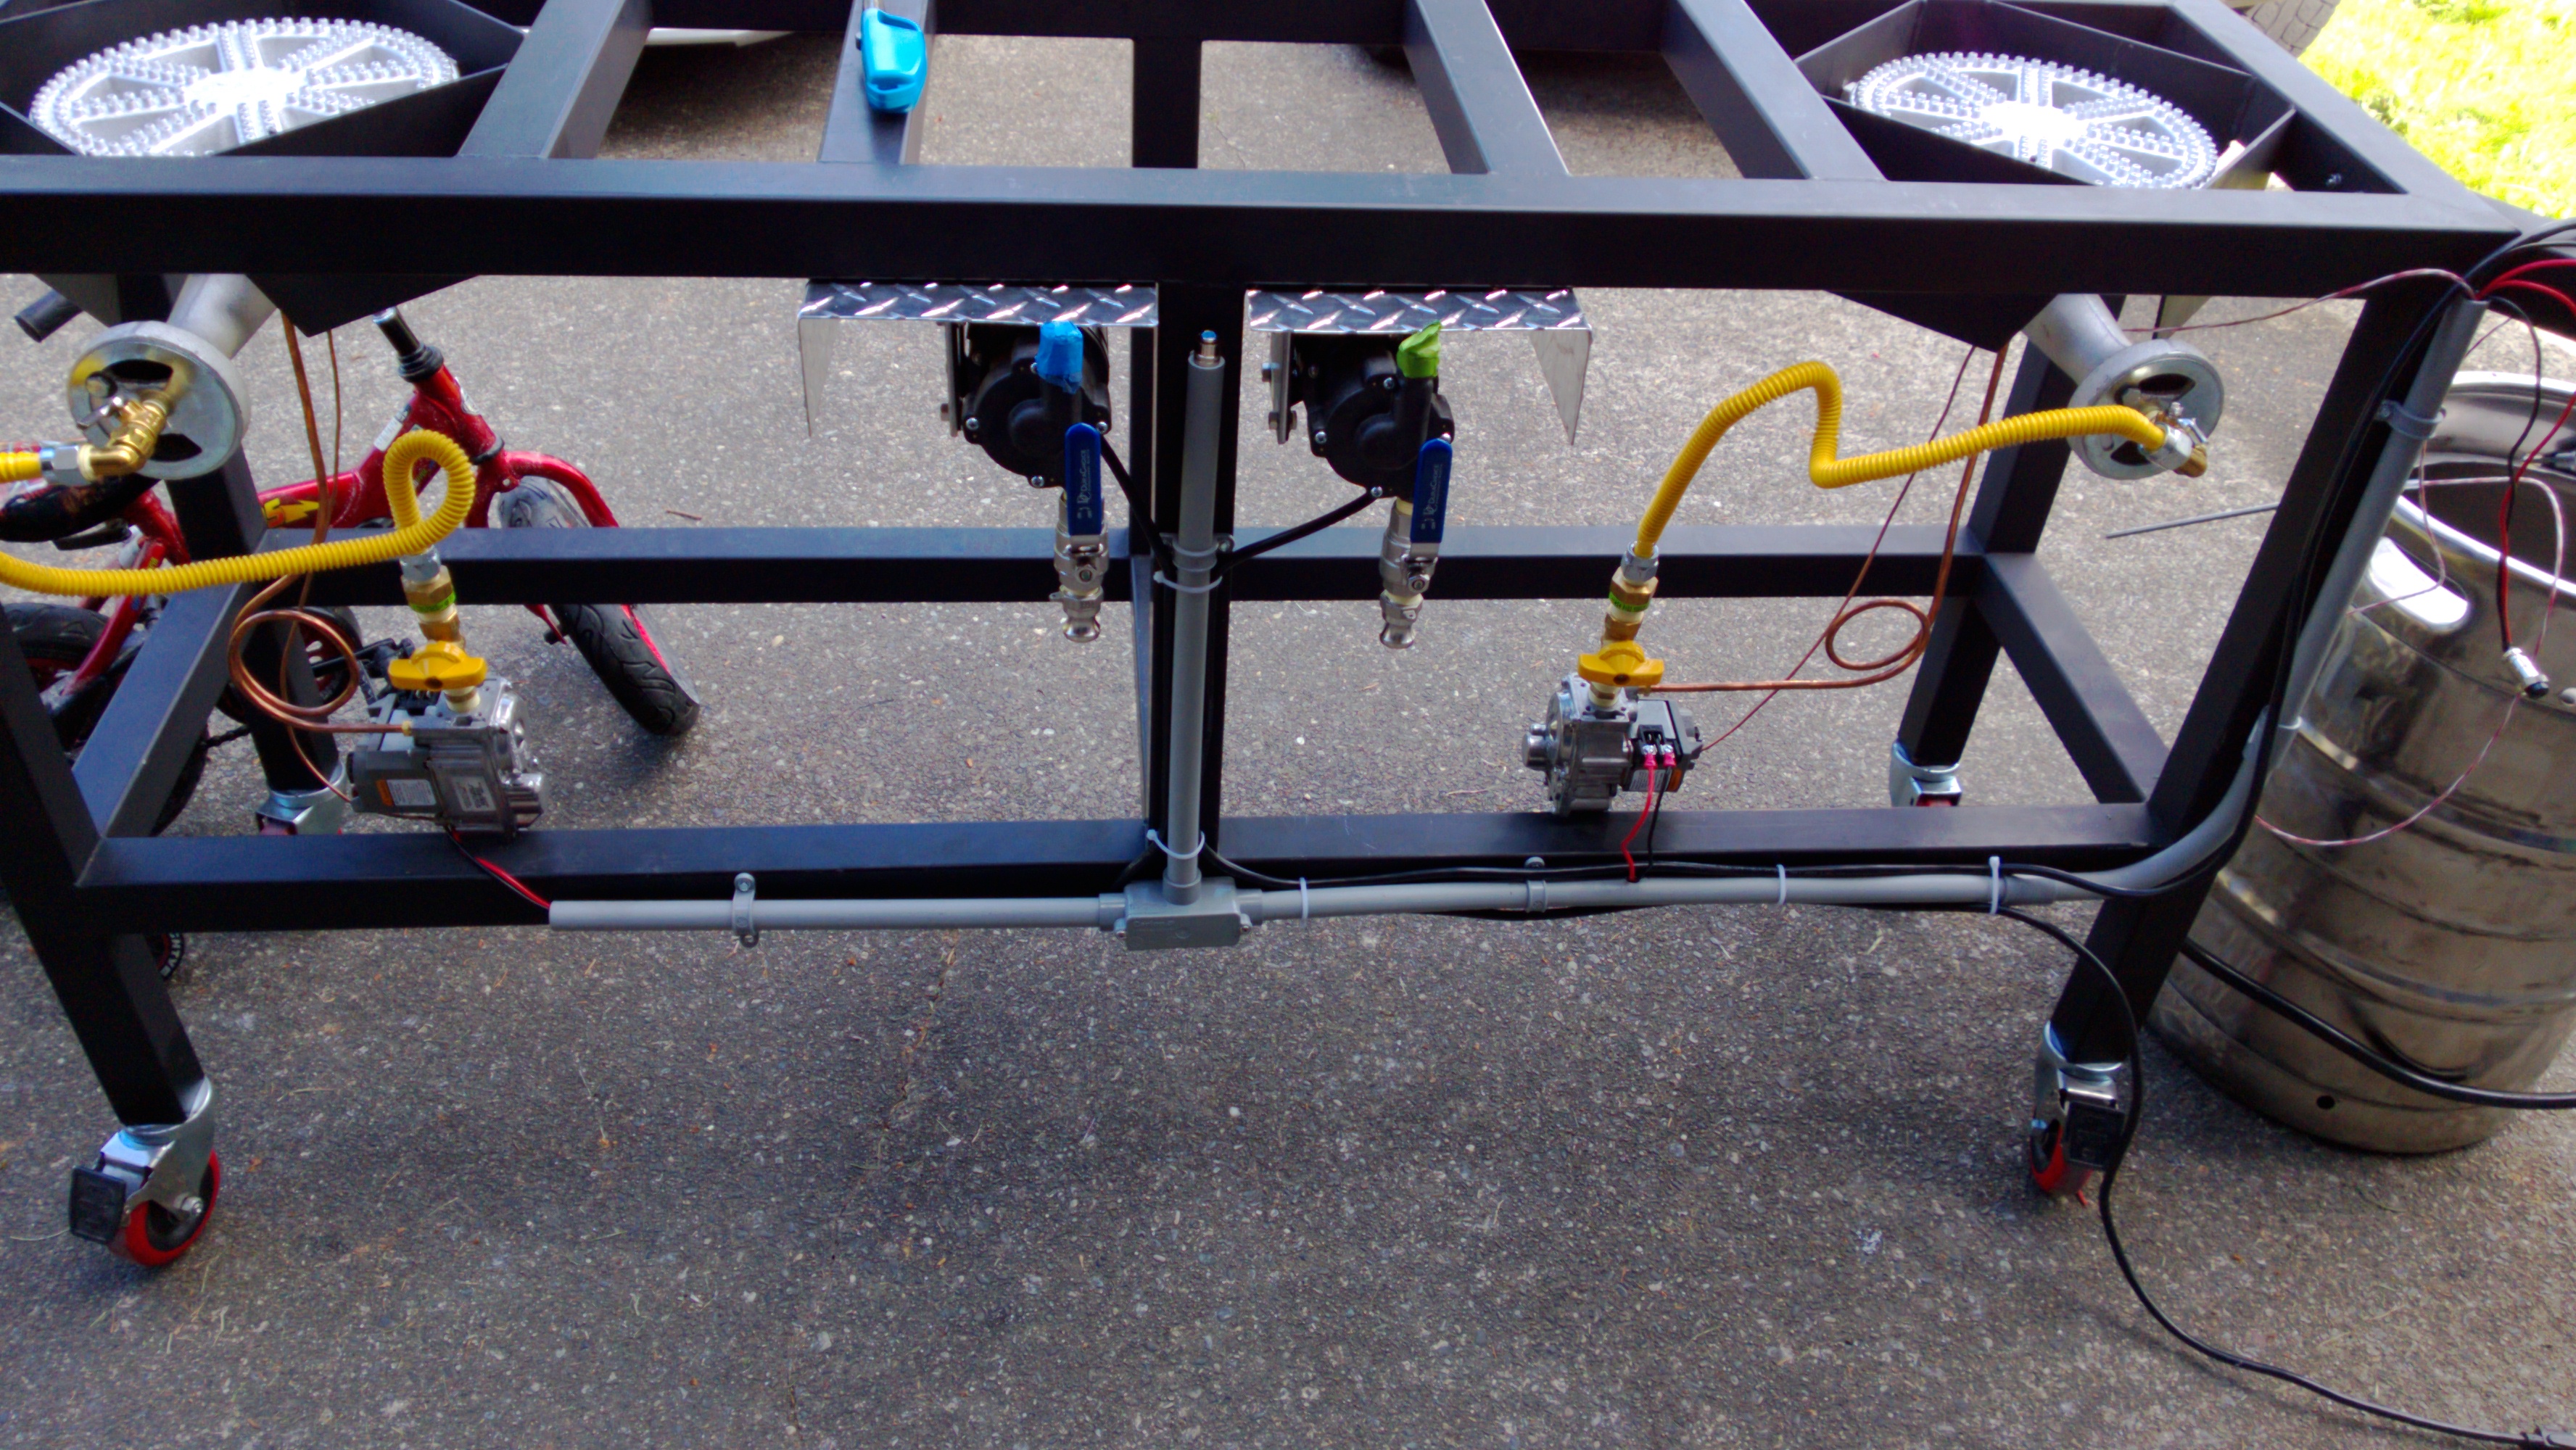
needed to adjust the burner mounts a little.
wp_20130131_004-58412.jpg


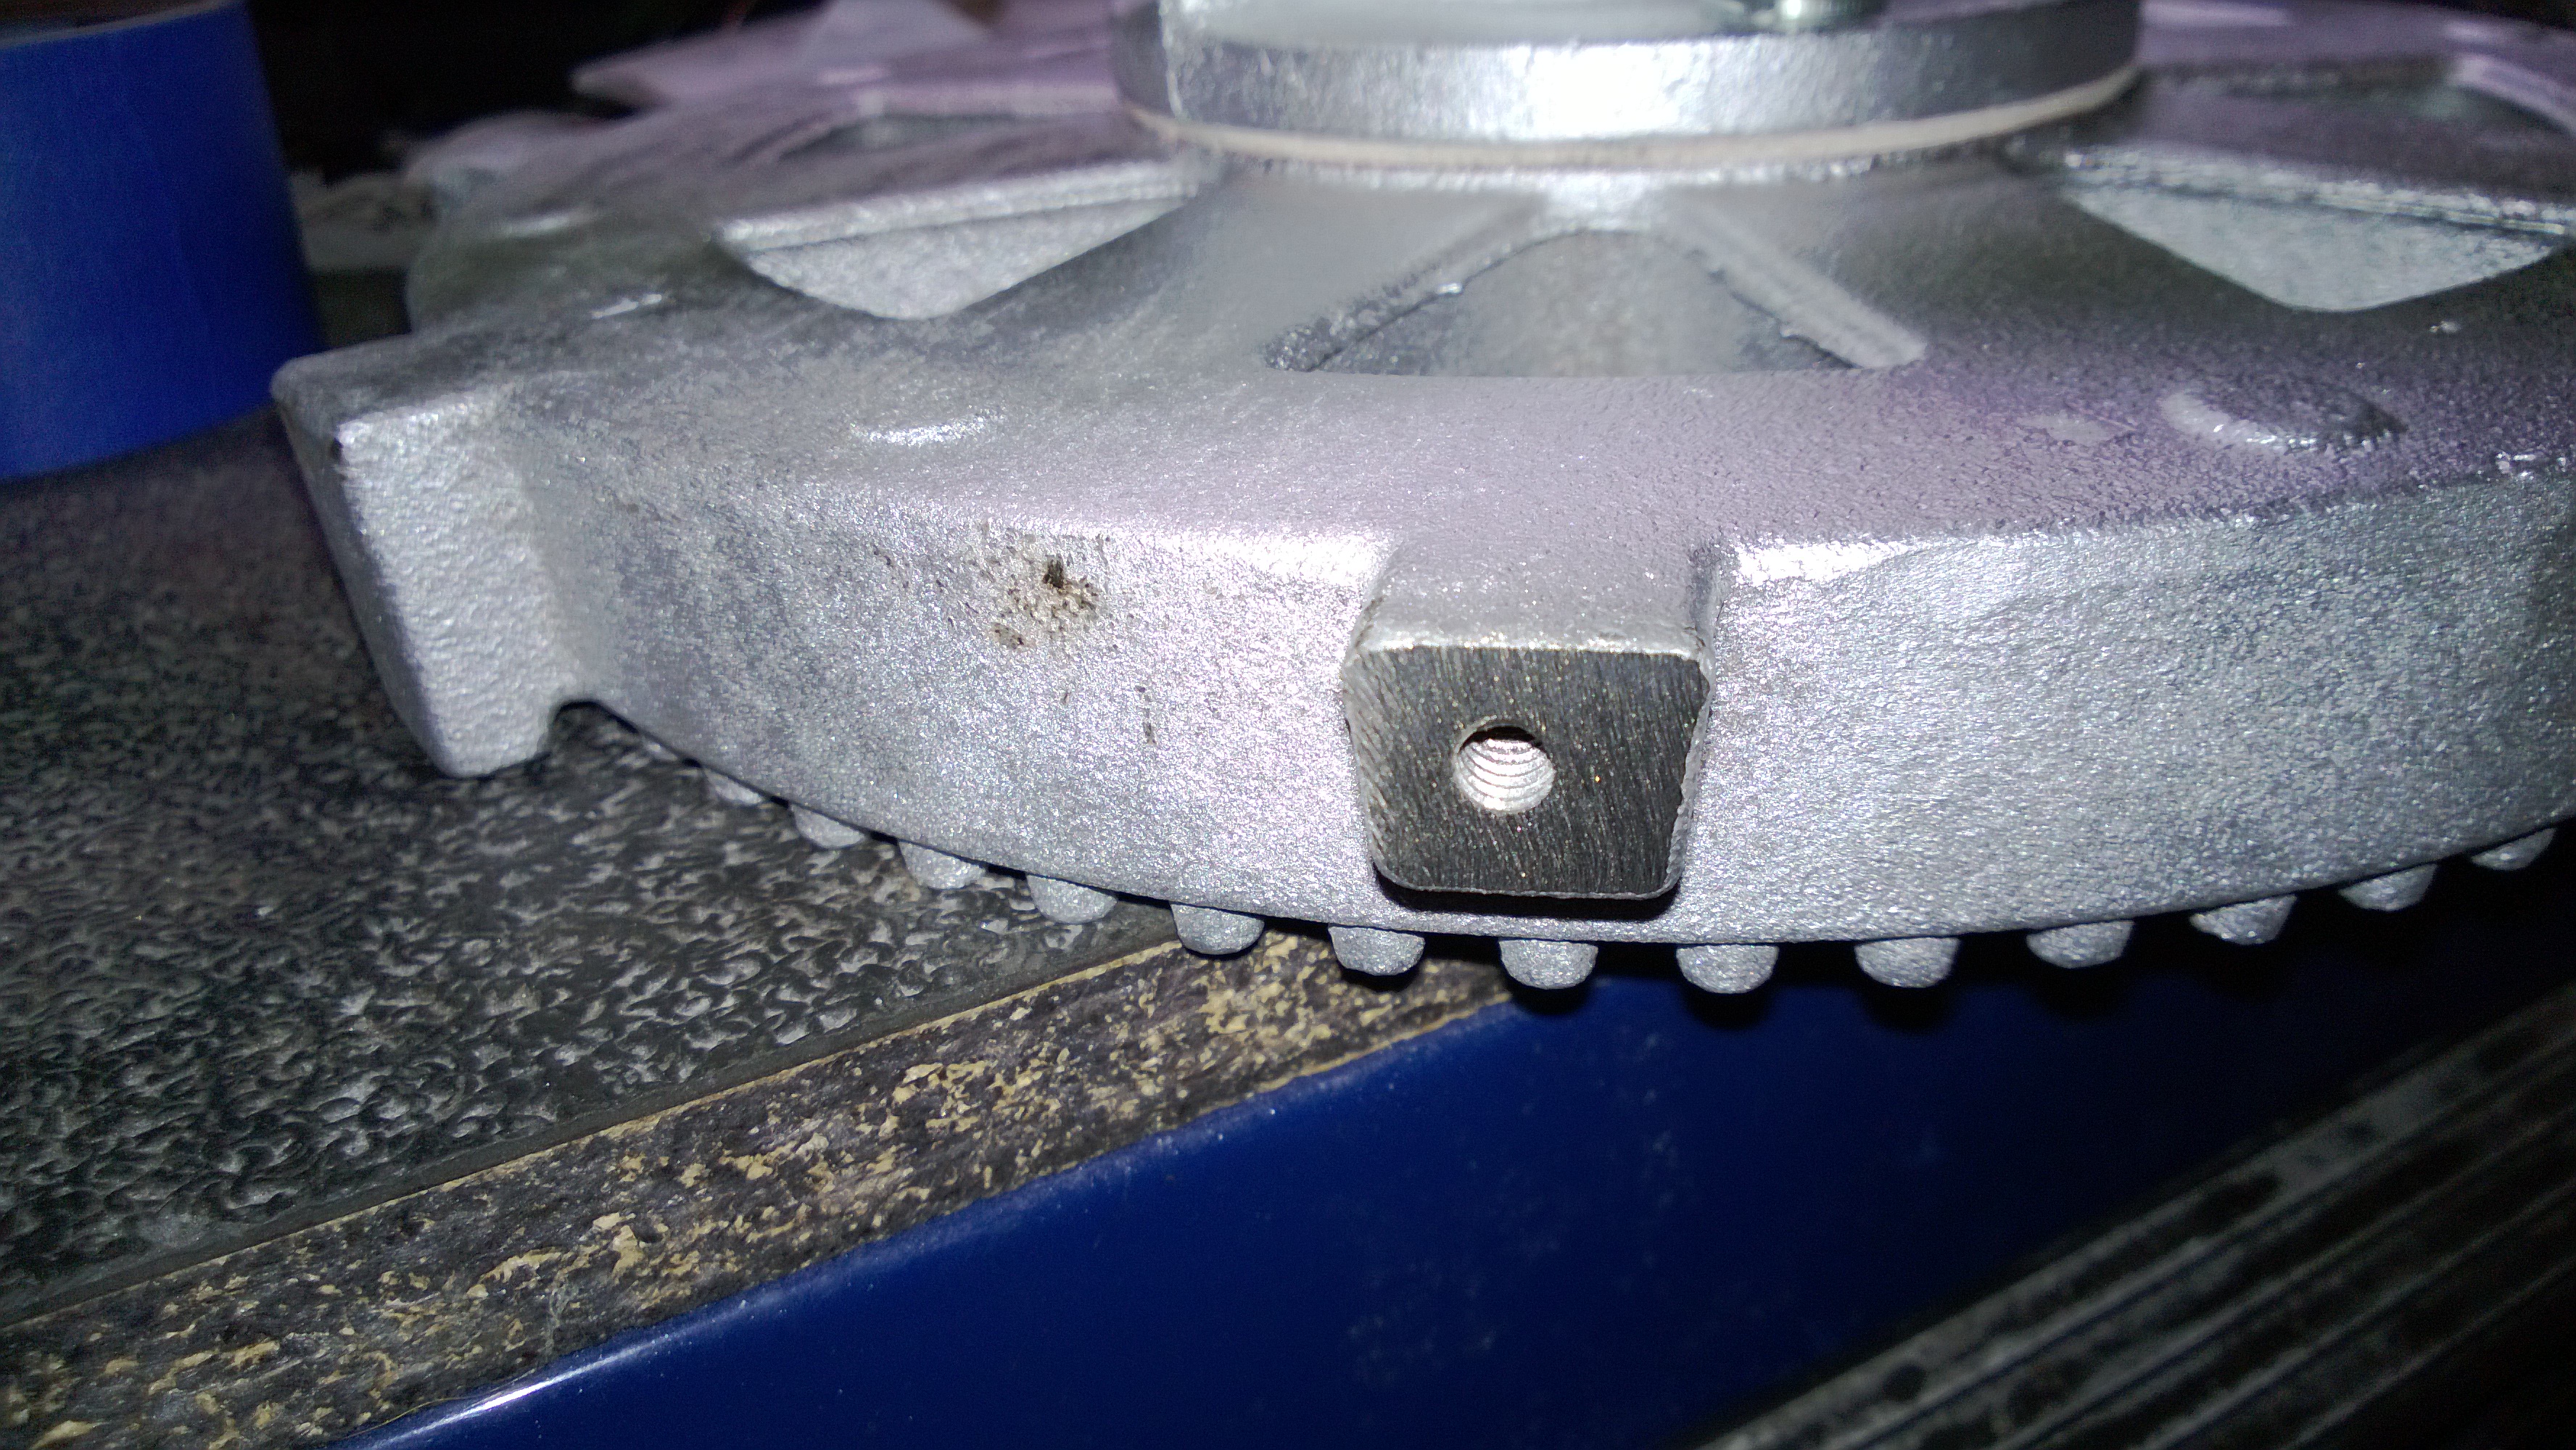
I would suggest anyone building a stand similar with the BG-14 bruners. Give yourself about 11 1/8 cleaners for the burners.

EDIT: Another tip - if you can make the holes for the burners mounts rectangles. not all of the screw holes line up.

Next up...
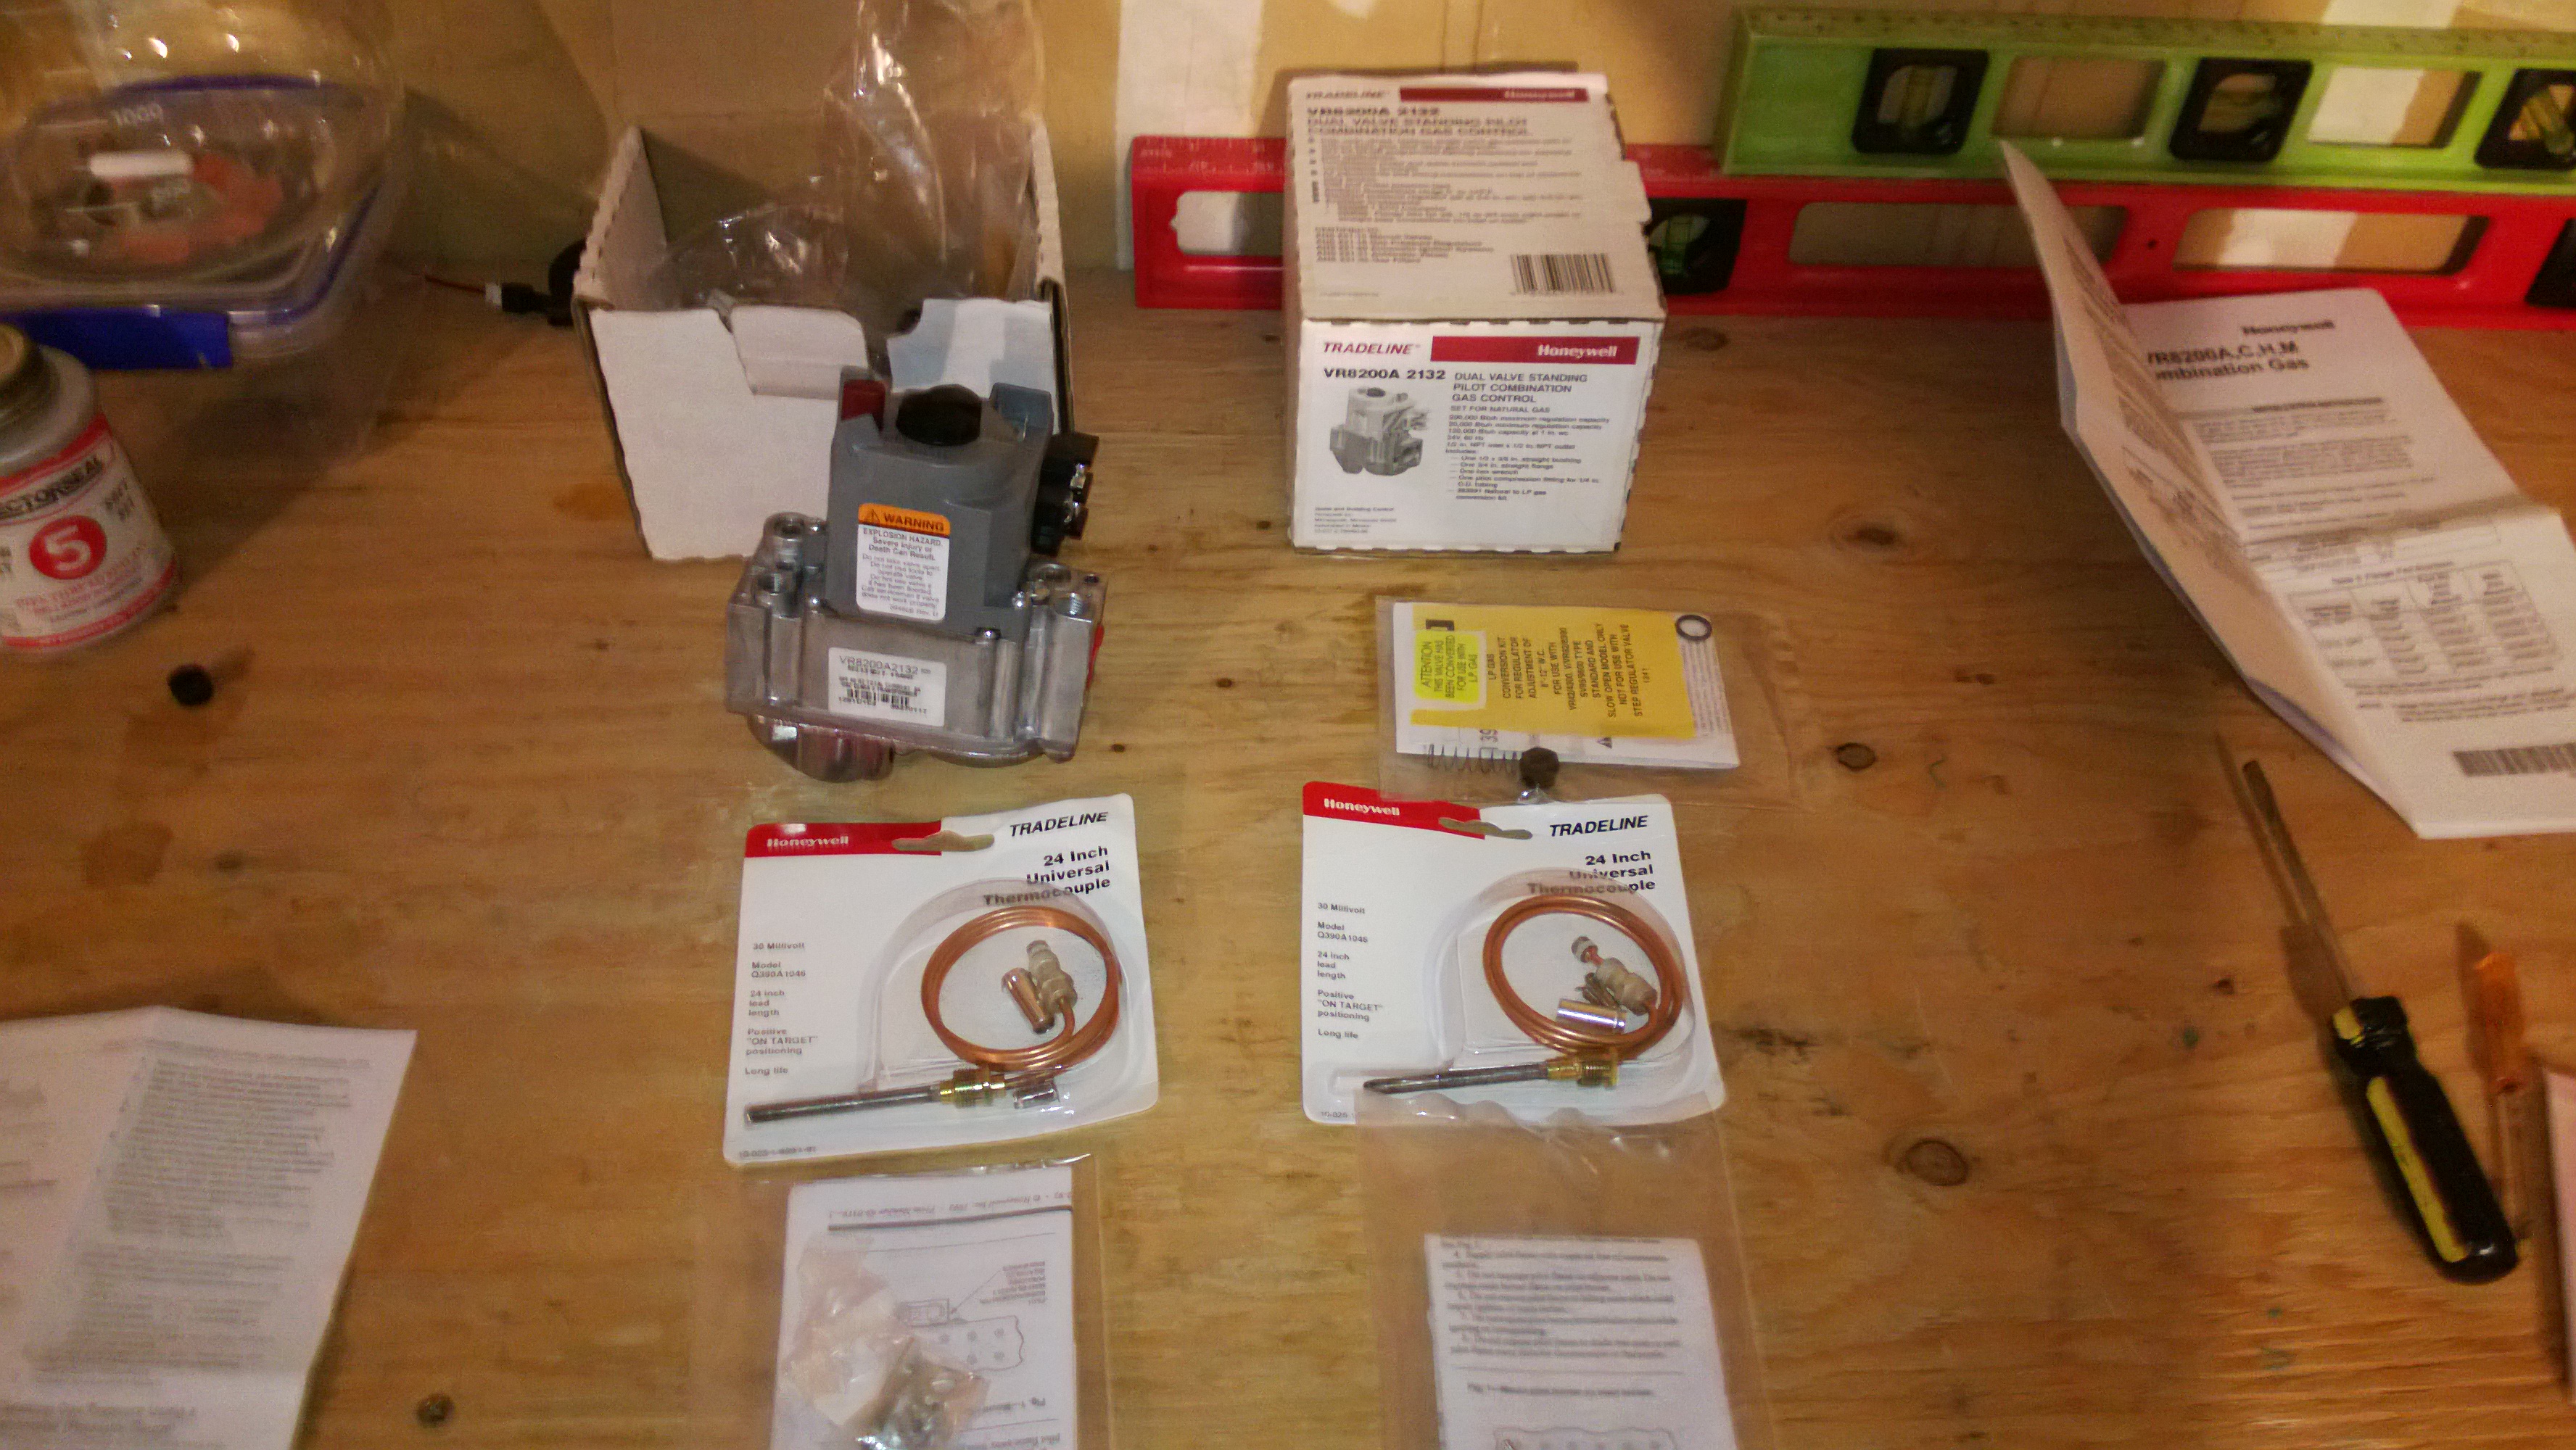
Gas parts are on order from PEX Supply and will be here next thursday.

The stand will be painted on Wednesday.

The control arm will be completed and bolted on next Saturday.

Can't wait to get this bad boy up and running!
 
Finally got a nice day here in the Pacific Northwest. I was able to get the stand painted.
wp_20130216_002-58658.jpg

wp_20130216_004-58657.jpg


Also, my order from PEX Supply showed up today! Planning to get the gas system installed tomorrow.
wp_20130216_005-58659.jpg
 
The wife took the kids to a friends today so i got a chance to complete the gas system. I do not have any parts for the control box (yet) so i can't test it. I can't wait to brew on this thing! :ban:

wp_20130217_001-58673.jpg


Pilot light and Thermocouple

wp_20130217_003-58672.jpg


From the backside
wp_20130217_004-58671.jpg
 
Looks good NWaledad which model Honeywell are the valves? I'm guessing vr8200 series, I hope to automate mine down the road.
 
hunterlab said:
Looks good NWaledad which model Honeywell are the valves? I'm guessing vr8200 series, I hope to automate mine down the road.

Thanks! Yeah these are the Vr800 from pex supply. I converted them to LPG. I have been really busy lately. I hope next weekend I can get the HLT polished and start ordering parts for the control panel. Still need to get the control arm mounted to the side. That should not take too long.
 
Looks great. Have you test fired it yet? The reason I ask is it looks like you may have some issues venting combustion gases resulting in a yellow flame and a lot of soot. If it happens to might want to add some 3/8 or 1/2 spacers to lift the keggles up off the frame. Or you can also drill some holes in the keggle skirt.
 
microbusbrewery said:
Looks great. Have you test fired it yet? The reason I ask is it looks like you may have some issues venting combustion gases resulting in a yellow flame and a lot of soot. If it happens to might want to add some 3/8 or 1/2 spacers to lift the keggles up off the frame. Or you can also drill some holes in the keggle skirt.

I have not tested yet. I need the parts for the control panel. Thanks for the heads up. Adding spacers to the top of the stand would be best IMO. I will let you know when I get it up and running.
 
It has been a while since i posted an update. Two kids and a busy career have kept me away from my passion and this project. I got the pumps in the mail today and should be able to get them and the control arm mounted this weekend. I will post picks when i get to it.
 
Finally got a chance to work on the stand today. My metal fab friend dropped off the pump cover and mount last night. Installed and painted the control arm. Re-did the pilot lines and did some touch up painting.

This week i received all the switches, buttons, and PIDs for the control panel from Auber. I still need to pick out the enclosure for the panel.

Getting closer to being able to brew on this beast! I still need to locate the third keg. I have a friend that works at Elysian looking into it for me.

Pumps
wp_20130504_003-59711.jpg


Control Arm
wp_20130504_004-59710.jpg


Complete Stand
wp_20130504_005-59709.jpg
 
Congrats, it's really a very clean build!

I find unusual just the pumps position, usually they are lower on the brewstand.
Btw, soon I have to build a brewstand and yours is right what I have in mind, awesome!

Now waiting for your control panel! :D

gm
 
Congrats, it's really a very clean build!

I find unusual just the pumps position, usually they are lower on the brewstand.
Btw, soon I have to build a brewstand and yours is right what I have in mind, awesome!

Now waiting for your control panel! :D

gm

Thanks! I wanted the pumps higher for easy switching of lines and want to maximize the GPM capability of the pumps for whirlpool action in the BK.
 
Getting some work done today on the system. Cutting the holes out and mounting everything to the front of the control panel.
wp_20130512_0041-59792.jpg
 
Almost complet with the control panel. Not long from now I will be able to test everything and start brewing on the new system.:rockin:
wp_20130519_001-59865.jpg
 
Completed the enclosure this weekend. everything mounted and got a few coats of paint on it.
wp_001012-60049.jpg

wp_001013-60050.jpg

wp_001018-60051.jpg

wp_20130601_001-60129.jpg

wp_20130601_002-60130.jpg

wp_20130601_003-60131.jpg


Was able to spend sometime this weekend working on the wiring. I have most of it completed. The PIDs are configured and I'm working through some troubleshooting at the moment. When the temp rang drops the PIDs light indicates that current is going out but when I measure it with a multi-meter I get nothing. I know it is something in how it is wired, just need a good hour or two to sit down and go over the wiring diagram in the manual.
wp_20130601_009-60132.jpg
 
Good looking electrical panel.

NEAT, wish I had one.. Only thing I'd suggest would be to powder coat the frame, that polyester powder resists all, cooks on and the heat conversion makes it so hard it is very difficult to scratch. (better than a pro stand)

An old friend from school is a metal fabricator and after a few home brews he agreed to do most of the metal fab work. As long as I pay for materials and kep him supply of good home brew.
See there, I knew I had all these tools for a reason, now just need another brew buddy down this way. (actually I got a 57GMC truck in the main bay to finish)

Damascene polishing them kegs-pots?, takes rouge, and makes a "mirror half moons" like they used to do aircraft. It'll be so pretty that everyone here will hate you. I did a dash for a old truck, had to wear sunglasses till I shot flat Clear on it to kill the reflected sunshine.
 
got the PIDs working in On/Off mode. Thanks to Dawai for the assistance. it turns out the PID I was using is faulty. when I switched it out with another everything worked. I need to wire up the transformer this weekend and should finally be able to test the gas system.
 
Whoo hoo.. I cooked a brew today. The Kettle was flawless, kept it all on brew schedule within a degree or two.

I'm wanting a "twist" or "count down" timer for my rig, also I need to redo the old PID box I slammed together. YOU still got room to stick one in your panel too. I used my Google nexus 7 as a batch cycle timer today. It was kinda aggravating, thou it got the job done.

I'm a old electrician, your electrical fab job looks so good it makes me "feel bad".
(that's a old stop sign where my lid is supposed to be on mine)
 
Both burners are working and the stand is functioning :ban:
Just a few issues that I need to dig into. If anyone has helpful suggestions i'm all ears. :mug:

from time to time the pilot light on the BK will go out when i intiate the vale.

the HLT burner has orange tips and the flames are a little high and bounce.

I'm going to turn the BK burner gas flow up on the valve so it ignites a little faster. Additionally, i'm going to turn the gas flow for the HLT down. and see if this helps the orange tips and "bouncing" flames. If this does not fix the issue on the HLT i'm going to check the spring I replaced to convert the valve to LPG.


Burner using the PIDs to initiate the valve
you can see that when I set the temp on the PID the burner indicator LED turns on, the valve opens and the burner ignites.
[ame]http://youtu.be/mWhGXhsgios[/ame]

HLT Flames
This video shows the HLT burner issues i'm having.
[ame]http://youtu.be/1fMFA9tuC3M[/ame]


Pilot Issue
From time to time the pilot on the BK burner will go out when I initiate the valve. I noticed that there are flames around the base of the pilot light. I think the gas line into the pilot light is a little loose and might be causing the issue.
[ame]http://youtu.be/VIU20nbjRqA[/ame]

I started to clean up the wires and run everything through conduit to keep it out of the way. Still needs a little more work but looks much better.
wp_20130608_002-60211.jpg


I'm going on vacation for the next week. When I get back I need to complete the control panel. Wiring the RTDs to the panel mount connectors is the final step.
 
Hi.

Pilot light stub, make sure it is not too far into the flame ring, it might be getting more gas and not enough oxygen to continue to burn when the gas rushes in-around it. (blows it out) Too far back out and it "makes a heck of a poof" and makes you wet yourself as it ignites. Of course check the line for tightness or kinks, or a surge-drop in pressure as the main valve opens.

A "pot" on top of the burners may change the way the flame behaves by air flow, (tune like you are using it) thou I like to tune the "silver plate carburetor for air flow" when you get the "flame size and heat right", that will change the color on the tips somewhat. Rotate the silver throttle plate on the burner and it enlarges-restricts the air.

Mostly, I just tune Hotrods and Harleys. Time to get mine out today, 93 is forecast. I have my brew kettle "apart" about five feet from the unfinished 57GMC hotrod.

I have a serious situation here, corny kegs, taps, beer, no kegerator. A local restaurant has a old Kelvinator ice cream freezer that looks perfect for the job, stainless lids and all. They want $25, and it out of their way. 1st stop today. Negotiation and purchase.
 
Thanks for the tip. I already adjusted the carb on the burners. the carb for the HLT is wide open. if I restrict airflow anymore the flames get worse.

The pilot light is next to the burner, might need to be mounted up higher. I will check the connections and go from there.
Hi.

Pilot light stub, make sure it is not too far into the flame ring, it might be getting more gas and not enough oxygen to continue to burn when the gas rushes in-around it. (blows it out) Too far back out and it "makes a heck of a poof" and makes you wet yourself as it ignites. Of course check the line for tightness or kinks, or a surge-drop in pressure as the main valve opens.

A "pot" on top of the burners may change the way the flame behaves by air flow, (tune like you are using it) thou I like to tune the "silver plate carburetor for air flow" when you get the "flame size and heat right", that will change the color on the tips somewhat. Rotate the silver throttle plate on the burner and it enlarges-restricts the air.

Mostly, I just tune Hotrods and Harleys. Time to get mine out today, 93 is forecast. I have my brew kettle "apart" about five feet from the unfinished 57GMC hotrod.

I have a serious situation here, corny kegs, taps, beer, no kegerator. A local restaurant has a old Kelvinator ice cream freezer that looks perfect for the job, stainless lids and all. They want $25, and it out of their way. 1st stop today. Negotiation and purchase.
 
It has been almost a month since my last post. The build is complete! a lot has happend in the past month. Cleaned up all of the electrical, moved the pumps to the bottom of the stand, and finished all three kegs. I'm going to get the first brew this saturday! might post a few more pics. I have a very extensive parts and price sheet. Let me know if you are interested and I will post it.

wp_20130707_0262-60431.jpg
 
Did you get your burner and pilot issue fixed?

The build looks really nice by the way.
 
Amazing build! Any chance you'd be willing to share the parts list? Specifically I'm interested in the parts and wiring process for the control panel. I'm contemplating a very similar set up and this is the only part I can't find anything really definitive on. Really nice work.
 
Thanks Guys, I can't wait to put it to use this weekend.

De3isit - I was messing around with the gas system tonight. I fixed the issues with the HLT (Left) adjusted the LG spring and tested with the kettle on top. I found that the pilot line for the BK (Right) was loose. I bent the tube to give it more slack and tightened it down. Ran some test Auto and Manual BK on/off and the pilot light goes out from time to time with no rhyme or reason to it.

I noticed a little flame hanging around the bottom of the pilot valve, but that thing is solid. The only other thing I can think is taking the pilot gas line out and checking for burrs or ordering another pilot light assembly from Honeywell. it is functional, and i'm not worried about my first test batch this weekend but I want to get is resolved.
 
Amazing build! Any chance you'd be willing to share the parts list? Specifically I'm interested in the parts and wiring process for the control panel. I'm contemplating a very similar set up and this is the only part I can't find anything really definitive on. Really nice work.

When I get a chance this weekend I will post the parts list. with all of the buttons and a provider (Auber Ins.). Total cost for the project is around $2,500 but it was spread over almost 6 months. I could of saved some money in shipping and a things here and there. I'm not too worried about it though.

I don't have a wiring diagram but you want some morre detailed information, PM me.
 
Here is a link to the parts list. It is fairly complete. any questions let me know.

http://sdrv.ms/12XDcnK

First Brew:
the day was a success for the most part. The has system needs some more work. It took almost an hour to get the beer to boil, flames are yellow and scorched the bottom of my kettles. The pumps and everything else worked great! Found one very slow leak on the MLT intake, no biggie. Made five gallons of my IPA and it is happily fermenting away as we speak.

Few pics from the brew day. I tried to upload more but i kept hitting the 3mb limit :(
dsc095551-60488.jpg


dsc09482-60489.jpg
 

Latest posts

Back
Top