$4.87 keg tool

Homebrew Talk - Beer, Wine, Mead, & Cider Brewing Discussion Forum

Help Support Homebrew Talk - Beer, Wine, Mead, & Cider Brewing Discussion Forum:

This site may earn a commission from merchant affiliate links, including eBay, Amazon, and others.

caligula455

Member
Joined
Nov 26, 2012
Messages
14
Reaction score
11
Hi Everyone,

First off, I've learned so much from reading this forum over the past couple of months and I hope that this is helpful for someone else out there.

I'm putting together a new brew kettle and wanted to dimple and solder in a coupler but thought there had to be a cheaper alternative to the stainless parts from mcmaster that everyone has been using.

I didn't want to do any machining and I didn't want any ferrous metal scraping on the stainless and this version meets both criteria.

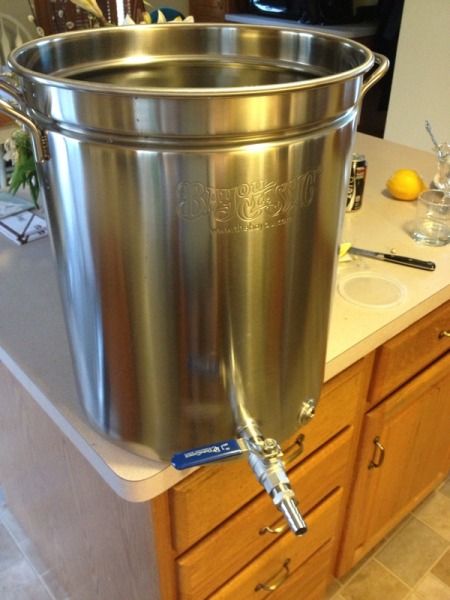
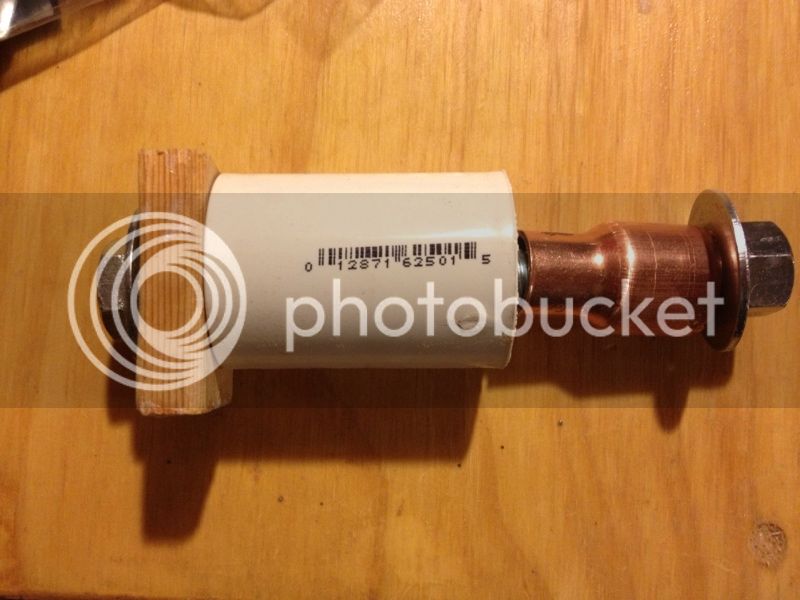
Here's what I came up with - it looks pretty ghetto but it sure did work! Total cost from Home Depot - $4.87

Parts:
(1) 3/4" x 1/2" copper coupling - $2.27
(1) 1" PVC coupling - $0.46
(1) 1/2" x 5" bolt - $1.21
(1) 1/2" nut - $0.20
(2) 1/2" cut washers $0.70
605ea33e-7821-4684-9e07-b1d923e9456c.jpg


Here is the procedure, it's basically the same but here's what it looks like with my cheapo version.

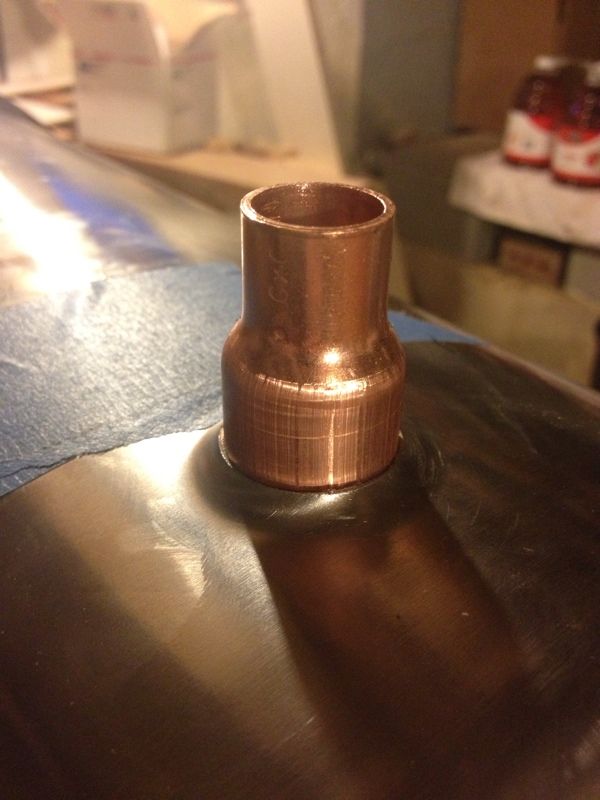
First drill a 7/8" hole and run the copper coupling through till the washer bottoms out.
53229624-1F3E-4627-9F5C-21CAEFC10EAE-10766-000002ABDC318246.jpg


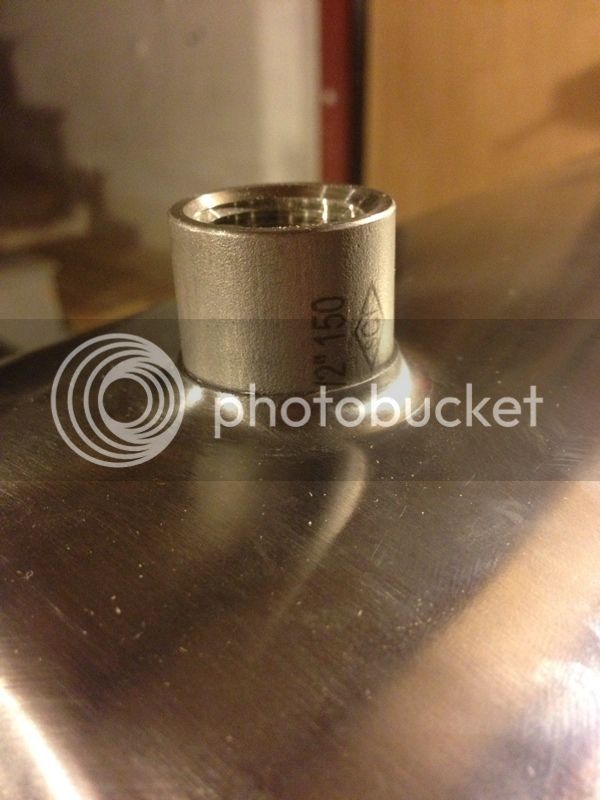
Then re-thread the bolt with the stainless full coupling behind the copper coupling. The diameters are close, but the stainless is a bit bigger. This is no problem at all, it self centers in the dimple and pulls right into place.
44882234-FC12-4EE6-9B9B-ECC5CD4F252C-10766-000002ABE38BB580.jpg


You might think that this copper piece is too thin to handle the pressure, but being a circle makes it very strong under compression on all sides. The copper is fairly soft but I'm pretty confident that it has some more life in it if I had any more dimples to make.

http://s307.photobucket.com/user/ca...6E-10766-000002ABF620B221.jpg.html?sort=3&o=1

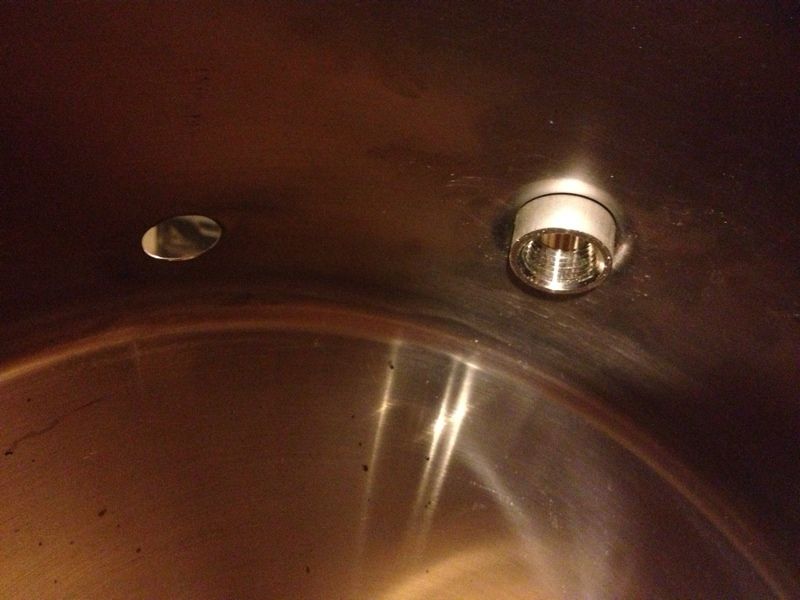
So here is the end result, a nice secure dimple ready for solder and some extra beer money in my pocket.
E210ED90-8D20-4CC7-B7D7-9F1FDFC997A3-10766-000002ABEE0104B8.jpg
 
Love it! I've got a set of Mittler Bros. punches that cost me $700 to do basically the same thing.
 
I'm no backwoods engineer, but I did stay at a Holiday Inn Express last night.....

That is one brilliant invention/tool. We wanna see the finished product - solder away!
 
That's some good ingenuity! What are you using for your brew kettle?

Thanks, I'm using a 44qt Bayou Classic with a basket and going for all electric. This is going serve triple duty:
  1. a counter top brutus 20 for 5 gal batches
  2. electric steamer for clam bakes
  3. sous vide cooker

I'd be curious to see someone try this on a keggle too.


Do you worry about the PVC failing?

It didn't seem too stressed and you are compressing a tube in it's strongest direction. I would wear safety glasses just in case.


As soon as it's warm outside I'm going to give stainless soldering a try. Hope I don't ruin a good dimple with a bad solder!
 
Works on a keg!
I just tried it.
Only trouble I had was (read not following directions) I used a punch tool backer because the 1/2" part of the copper reducer fit in nicely but it got off center when I was pulling and it mucked the end of it up and started to pull through crooked. Argh.

Switched to the PVC and worked just fine. Put the SS coupler behind it and it came through nice. Just had to rap it with a hammer to straighten it out.

Pic:

image-4135791592.jpg
 
Sweet! Guess this can be used to add drain to drip trays. Thanks for the how to.
 
Is there any problem/issue with running the dimple to the inside of the pot? That way you can apply the solder to the outside of the pot.
 
[*]electric steamer for clam bakes

I'm sure other people have done it and gotten it to work, but there is no way I would use my crawfish pot for beer. And maybe steaming would be different, but my Bayou Classic Crawfish pot has seasoning that won't come out with just regular cleaning. Not sure you could get it clean enough to not affect the beer.

Great solution on the tool though
 
Awesome! I spent the money for the other stuff but would have given this a try if you posted about two years ago.

I pulled my dimples from the inside out so the inside of the keggle was flush and easier to clean. I know from the other thread that a lot of people did it the other way, either way I'm sure is fine.
 
I guess I'll have to see about using the beer pot for other things. I'm hoping that hot PBW can take care of it because multi-purpose was part of the sales pitch to SWMBO.

I would think I can at least use it for sous vide cooking since the food is sealed.

Anyone else manage to use their beer equipment for anything else?
 
Damn, I would have done this instead of soldering on my locknut if I had known. I would never have thought the copper would hold up.

I wanted to dimple and pull in a coupler so that I can adjust the angle with a hammer before soldering. When you solder on a locknut, you are at the mercy of the side of the keg...on a keggle if you try to put the locknut as low as possible, it actually starts curving in near the bottom, so that tilts your element upward. With a coupler you can put it as low as possible and still hammer it so the element is level or even points downward.

Seriously considering buying a 1" plug and re-doing it this way.
 
Is there any problem/issue with running the dimple to the inside of the pot? That way you can apply the solder to the outside of the pot.

people do it either way, I think the soldered surface is smoother and easier to clean so I'm putting it inward. It is also nicer looking which is why some people put it outward.
 
I dont think you will have a problem cleaning a stainless pot thats why they use it in commercial food production. Now aluminum is a different story it is porous and will hold seasonings
 
Works brilliantly. What kind if solder did you use? Just regular plumbing kind or something special for the stainless ?
 
Works brilliantly. What kind if solder did you use? Just regular plumbing kind or something special for the stainless ?

Harris has a kit StayBrite silver solder and liquid flux that works well with stainless. Usually available from welding shops.
 
I used the Harris Stay-Brite silver solder kit, you can order it from HomeDepot and have them ship to a store for free.

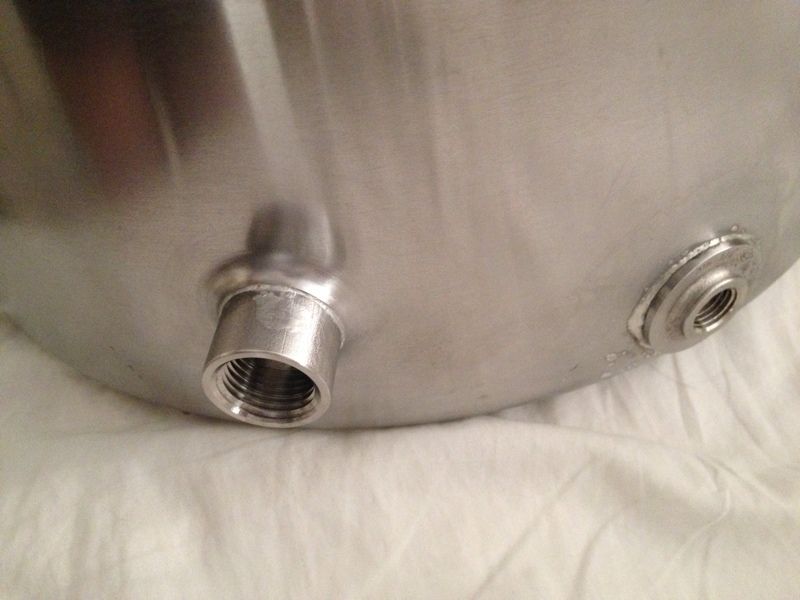
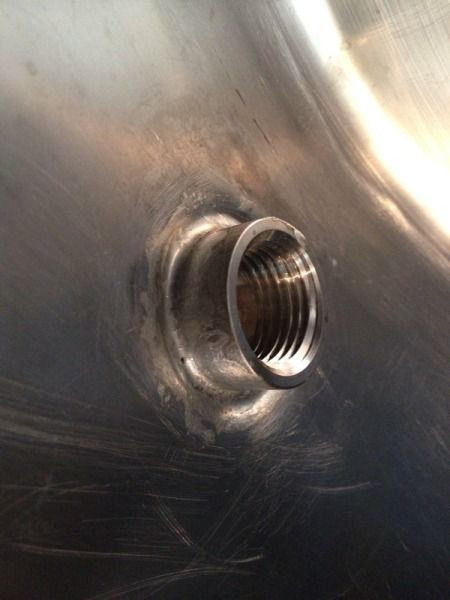
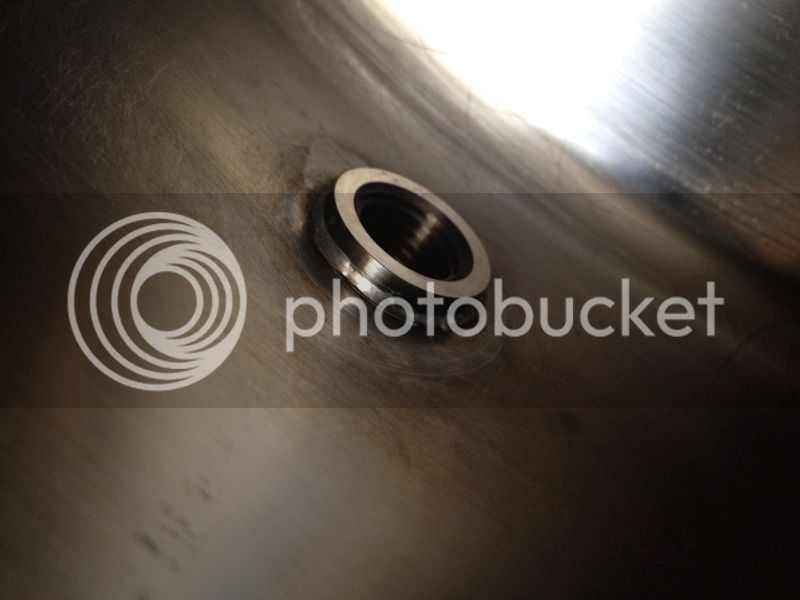
Here is how the soldering turned out...

D5A70E34-00F8-47B0-8F63-85F67C5F6F0F-15610-0000040413C39127.jpg


59ADD01C-E961-4983-BF84-4385C6A37820-16164-000004274A1B05CC.jpg


inside of 1/2" coupling

44B11F9D-5757-4499-AB29-053B7CAE72FF-16164-000004274F72893C.jpg


inside of 1/4" fitting

ED4355F7-3392-43A7-9188-221109658957-16164-0000042755069913.jpg


Now I need to buy or borrow something to make a hole big enough for the 1" heating element fitting, but in the mean time I can use it over a propane burner.
 
caligula455 said:
I used the Harris Stay-Brite silver solder kit, you can order it from HomeDepot and have them ship to a store for free.

You can get silver solder and flux at most refrigeration supply stores, here in Pittsburgh I use Johnstone Supply or United Refrigeration. Johnstone is a big chain and has outlets in many areas. If you go to the counter and ask for silver solder they will help you out. It's expensive, but they'll have it in stock and it'll probably be less expensive than HD.
 
caligula455, that is one heck of a first post. I have a quick question before I dive into this.

The 1/2" X 3/4" coupler I have measures 7/8" in diameter on the 3/4 end, which is the same size as the hole.

Am I missing something or is it supposed to be 1/2" X 1" coupler instead.

Thanks for the info
Bob
 
Nice going Caligula. Is that a tiny pinhole 3rd picture down? Might want to just heat that area up with a little bit of flux.
 
purplehaze said:
caligula455, that is one heck of a first post. I have a quick question before I dive into this.

The 1/2" X 3/4" coupler I have measures 7/8" in diameter on the 3/4 end, which is the same size as the hole.

Am I missing something or is it supposed to be 1/2" X 1" coupler instead.

Thanks for the info
Bob

You probably have a 1/2" x 3/4" street coupling. Those fittings are used to sweat into 3/4" fittings as opposed to over 3/4" copper pipe. The regular 1/2" x 3/4" coupling should measure just under 1" on the 3/4" side
 
caligula455 said:
Hi Everyone,

First off, I've learned so much from reading this forum over the past couple of months and I hope that this is helpful for someone else out there.

I'm putting together a new brew kettle and wanted to dimple and solder in a coupler but thought there had to be a cheaper alternative to the stainless parts from mcmaster that everyone has been using.

I didn't want to do any machining and I didn't want any ferrous metal scraping on the stainless and this version meets both criteria.

Here's what I came up with - it looks pretty ghetto but it sure did work! Total cost from Home Depot - $4.87

Parts:
(1) 3/4" x 1/2" copper coupling - $2.27
(1) 1" PVC coupling - $0.46
(1) 1/2" x 5" bolt - $1.21
(1) 1/2" nut - $0.20
(2) 1/2" cut washers $0.70

Here is the procedure, it's basically the same but here's what it looks like with my cheapo version.

First drill a 7/8" hole and run the copper coupling through till the washer bottoms out.

Then re-thread the bolt with the stainless full coupling behind the copper coupling. The diameters are close, but the stainless is a bit bigger. This is no problem at all, it self centers in the dimple and pulls right into place.

You might think that this copper piece is too thin to handle the pressure, but being a circle makes it very strong under compression on all sides. The copper is fairly soft but I'm pretty confident that it has some more life in it if I had any more dimples to make.

http://s307.photobucket.com/user/caligula455/media/Beer%20Brewing/28B35C54-1E4D-4A62-ACED-95118BB5CC6E-10766-000002ABF620B221.jpg.html?sort=3&o=1

So here is the end result, a nice secure dimple ready for solder and some extra beer money in my pocket.

Caligula, how hard was this to draw through the side wall of your pot? I tried this yesterday on my keggle and ended up crushing the end washers and bending the bolt before the copper fitting would draw through. The copper fitting actually started to crush on the 3/4" end I was wrenching on.
 
Those fittings are used to sweat into 3/4" fittings as opposed to over 3/4" copper pipe.

That's exactly what i was going to say. The two kinds of couplers look very similar, you want the one with the larger end designed to be the female side of a 3/4" pipe joint.
 
Caligula, how hard was this to draw through the side wall of your pot? I tried this yesterday on my keggle and ended up crushing the end washers and bending the bolt before the copper fitting would draw through. The copper fitting actually started to crush on the 3/4" end I was wrenching on.

Mine drew through pretty easily, someone that drew it through a keg wall would have to comment, but it shouldn't be crushing anything.

Couple thoughts on potential problems:
  • Is the copper fitting evenly sloped like the one in the picture or is it more of a steped shape. the more cone-like the better.
  • Is the outer pipe too small of a diameter and preventing the fitting from drawing through?
  • maybe try lubing the fitting to reduce the friction?
  • are you using steel bolts, i can't imagine your bending a 1/2" steel bolt unless something is pretty off.

Maybe post a pic and that will help diagnose the problem.
 
Nice going Caligula. Is that a tiny pinhole 3rd picture down? Might want to just heat that area up with a little bit of flux.

I saw that, but I think it was flux that didn't clean off. After more thorough cleaning I didn't see it anymore but i'll check it for a pinhole and reheat if it's still there. Don't want any crevices for gunk to hide in.
 
I knew I must have missed something when I got home and measured it. I just grabbed the first 1/2"X3/4" coupling I found and of course it was the wrong one.

Thanks for the clarification bigpapakielbasa and caligula455.
 
I either had a bad batch of PVC or the SS keggle is stronger than the cooking pot. The PVC would either shatter or deform before I could get the copper coupling to pull through.

I got this to work for me by inserting the 1" PVC into a 1 1/4" PVC. The added wall thickness and circumference worked perfectly with no failures. I would highly recommend eye protection.

Good info thanks
 
I wish I had seen this before I spent $50 on stainless fittings... (and another $25 on a cobalt drill bit to bore the reducer out to 5/8)

I actually ran into a problem with the butt weld stainless reducer. It seems to almost be slightly larger in diameter (we're talking a few thousandths) than the actual couplings, so they don't draw through real tight.

I did a test solder on the leftover cutout from the keg. The coupling was snug, but I could almost push it all the way in by hand. There were slight gaps so the solder wicked through a bit uneven.

So, with that said I may try using the copper reducer if it is a bit smaller than the coupling diameter - I might argue that it is BETTER than the but weld reducer for this because the fittings will draw through nice and tight.
 
I tried this, and it looked like it was fine. I shattered the PVC, so I substituted with a deep well socket which helped. When it was through the dimple wouldn't hold the coupler. I'm not sure if it didn't pull through straight, but one side was definitely dimpled out more then the other. I think I'm going to take my hole saw and make this spot now for a heating element.
 
Glad to hear people are experimenting with my method!

My dimple started to go a little crooked at first too, but I straightened it out before continuing. A larger bolt that holds the copper fitting more parallel might help keep things centered. I think even with the stainless parts you need to make sure everything stays straight an centered.

I think replacing the PVC piece with something more durable is a good idea. I didn't have any problems with mine, but I did wear safety glasses in case it broke and shattered.

I have all my fittings soldered on and the heating element installed now so I'll post some pics of how it all turned out.

I also have a nice looking but cheap hardware store way of grounding and covering the element wiring, stay tuned.
 
I tried this method with a polarware economy kettle (fairly thin stainless) and it worked great. I used a 5/8" bolt instead of the 1/2", the fit was perfect on the copper fitting with no slop. I also sanded the pvc coupler to match the curve inside the kettle to help even the pressure on it. I plan to try this setup on one of my keggles soon and will report my results.
 
I tried this, and it looked like it was fine. I shattered the PVC, so I substituted with a deep well socket which helped. When it was through the dimple wouldn't hold the coupler. I'm not sure if it didn't pull through straight, but one side was definitely dimpled out more then the other. I think I'm going to take my hole saw and make this spot now for a heating element.

Take a hammer and lightly tap the rim of the dimpled out part . It should close it enough to make it stay. I had to do something similar when I installed my 2" tri-clover ferrule for my heating element.
 
Back
Top