Kyle,
Thanks for turning me on to the 70 Qt Coleman, I really like this cooler as a Mash Tun. The flat bottom, and low drain really separates this cooler from many of the others out there. I made one of the 10 Home Depot Orange cooler conversions, but I quickly outgrew it with 10 Gallon batches, and was in need of a larger Mash Tun. I also wanted to switch from the braided hose to copper on this one. I have had an almost stuck sparge with a wheat on a braided line manifold.
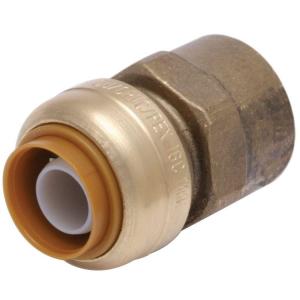
I like your setup but was concerned about loosing wart with the raised elbow, so I went a little different on the bottom manifold layout. I used a Shark fitting to attach the copper. The slip attachment of the Shark fitting allows for a slight angle in the connection, that combined with a small copper extension allows for the manifold to connect in almost straight-line to the drain. The T coupler takes care of the angle while keeping the manifold on the bottom.
Like you, the slip-fit assembly works great, easy to cleaning. My manifold holes were drilled using a drill press, so it wasn't so tedious, just time consuming. I put the holes laterally so that I have a solid bottom channel inside the pipe for the wart to outflow easier. I noticed better flow rates than with my 5gallon braided line tun. I haven't mashed a wheat in this one yet, so more holes may be required, but I'm quite happy with the performance so far.
I really like your sparge manifold idea. I'll have to play with that as I'm still using a layer of aluminum foil to distribute the HL.
Again thanks for the ideas. Cheers,
Tony