Modified P-J design, need verification

Homebrew Talk - Beer, Wine, Mead, & Cider Brewing Discussion Forum

Help Support Homebrew Talk - Beer, Wine, Mead, & Cider Brewing Discussion Forum:

This site may earn a commission from merchant affiliate links, including eBay, Amazon, and others.

LandoLincoln

Well-Known Member
Joined
Feb 15, 2011
Messages
2,978
Reaction score
1,143
Location
Joliet
Here's a design I took from the illustrious P-J and modified it a bit. Thank you very much for the original drawing, P-J, and thanks to jtkratzer for letting me stand on your shoulders for this build.

I just want to make sure that I didn't change anything to make it unsafe or unworkable.

Original drawing name: Auberin-wiring1-a11d-RM-SYL-2352-5500w dated 05/08/2012.

Original thread here

Changes made to the original drawing:
* 25a DIN-mounted breakers changed to 30a
* 240v element power lights changed to 120v
* SW1 switches changed to SW11 switches
* Added an SW2 switch to the HLT side of the alarm setup, so there would be individual off/on switches for each PID
* Changed the numbers of the SW2 switch connections
* Designated the 1A fuse going to the E-stop as "fast blow"
* Swapped the boil kettle stuff to the left and the HLT stuff to the right (no biggie)
* Changed the color of the illuminated switches (big freaking deal, I know)

And that's it.

I am also planning on adding two RTD temperature displays, one for the MLT and one for the chiller. I'm planning on adding these to the circuit that is powering the PIDs. There won't be any switches for them. I don't think that there is much chance of them overloading that circuit.

And I'm going to be installing float switches in the positive side of SSR circuits (between the PIDs and SSRs) to stop the SSRs from firing if the float switches say that there's not enough liquids in the kettle or HLT.

So please let me know if I'm doing anything wrong with this. Thanks!

auberinwiring1a11drmsyl.jpg


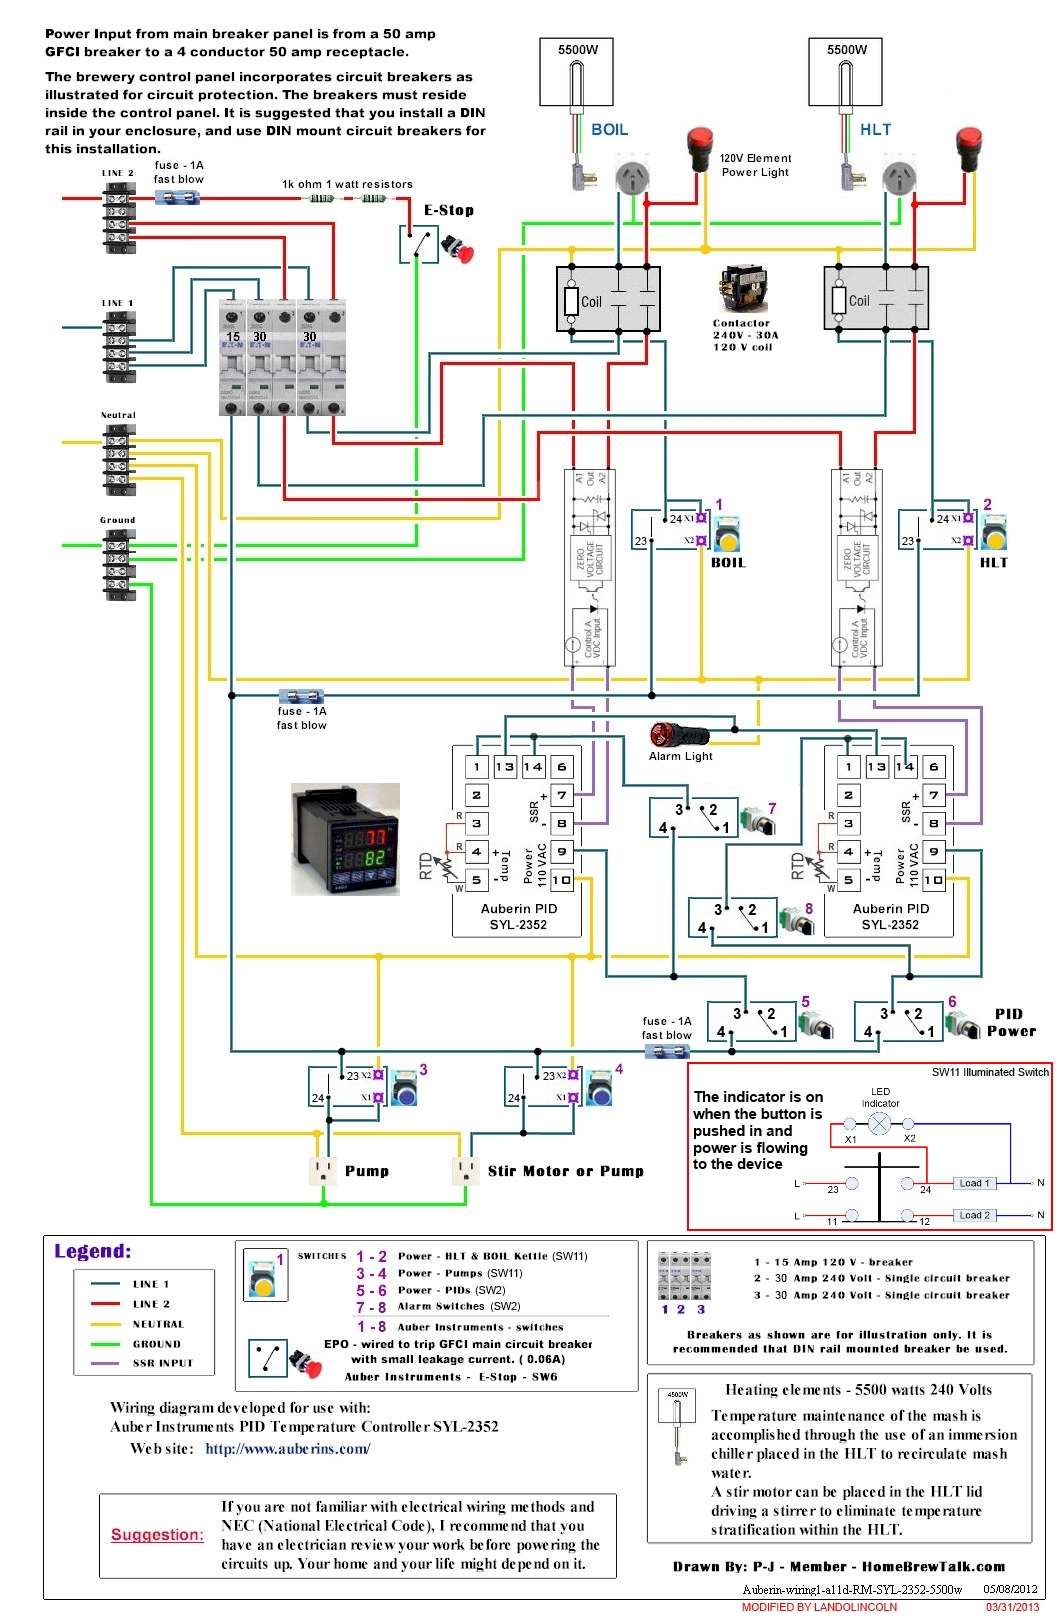
Link to the full-size drawing here in case the image doesn't show up
 
Good idea on the float switches. They will work fine in that configuration if they are NO (normally open).

If you are using the stainless ones with the M10 thread - can I ask how what you are doing for a washer to seal the connection? Thanks.
 
Good idea on the float switches. They will work fine in that configuration if they are NO (normally open).

If you are using the stainless ones with the M10 thread - can I ask how what you are doing for a washer to seal the connection? Thanks.

I haven't drilled the hole for them yet, but the SS Auber Instruments float switches come with a clear silicon flat washer and a locknut. I'll probably drill that this weekend and see how water tight it is. The end of the float switch where the wires come out is sealed shut with some clear epoxy. It looks like it would be pretty waterproof.
 
I haven't drilled the hole for them yet, but the SS Auber Instruments float switches come with a clear silicon flat washer and a locknut. I'll probably drill that this weekend and see how water tight it is. The end of the float switch where the wires come out is sealed shut with some clear epoxy. It looks like it would be pretty waterproof.
Hi,

I have a buring question for you regarding the Auber Instruments Float Switch Model: FSW1. The info on the Auber web site states that the switch is N/C when it is installed as shown (float at the bottom). They also say that if you want the action reversed the float switch has to be mounted with the float pointing up.

I have this idea buzzing around in my head that if you pull the bottom "C" clip and flip the actual float & then reclip it - the action of the switch will be reversed. i.e. it now becomes a N/O switch when the float is at the bottom. If this is true, the switch now becomes a superior product for our use. It sure would make your install a less cumbersome possibility.

Could you test out my theory and let me know? Please?

P-J

Yes, I could try that. I'll let you know the results sometime this week.
 
It looks like your design allows you to enable the contactors for Boil and HLT at the same time. Not a good idea since your input power is limited to 30amps.

Consider using a 3-way switch to select Boil OR HLT and enable the appropriate contactor.
 
It looks like your design allows you to enable the contactors for Boil and HLT at the same time. Not a good idea since your input power is limited to 30amps.

Consider using a 3-way switch to select Boil OR HLT and enable the appropriate contactor.
The power input is 50A feeding a set of circuit breakers for the different functions. The input power is not limited to 30A.
 
I don't know if I am pro or should be giving my two cents worth, but double check the pins on the PID's 1,13,14. Pin 13 I thought should be the hot coming in from the bus and Lines 1 and 14 should be the ones going to switches and to the alarm lights. If someone could double check this for me and confirm or deny. Just want to double check my own wiring diagram also not even sure that it matters as pins 1 and 14 should also close the relay and send power to the alarm light as is.
Thomas
 
I don't know if I am pro or should be giving my two cents worth, but double check the pins on the PID's 1,13,14. Pin 13 should be the hot coming in from the bus. and Lines 1 and 14 should be the ones going to switches and to the alarm lights. If someone could double check this for me and confirm or deny. Thomas
It does not matter as AL1 & AL2 common connection is 13. AL1 output is 1 and AL2 output is 14. Output 1 & 2 are connected.

No problem.

It will work just fine that way - or - just wire up your rig the way you want to do it.

No problem.
 
Did you ever try flipping the float? I'm also curious if it reverses the switch.

Oops. I forgot about this. I'll check it right now.

Yes, P-J was correct in his assumption. If you reverse the float, then the NO position goes to NC and vice-versa.
 
Okay, I finally built this sucker and it's beautiful! Only one problem so far...

The 120v red indicator lights (the ones that are supposed to tell you when the elements are firing) are always on. I'm assuming that I'm getting the cursed backfeed problem that other people have mentioned when using 120v indicator lights on a 240v system. And it doesn't matter if I have the heating elements hooked up to the control panel or not - they're always on.

So what are my options? The easiest, of course, would be to order some 240v indicator lights, but can I get away with using the 120v lights somehow?
That indicator light uses very little power to illuminate it. (I guess it is my bad in drawing the diagram - It should be a 240V light and BTW I could not find a diagram of mine that matches.) The current power path is through the SSR and it can and will leak a small amount of current. You need to change it out to a 240V indicator that is wired in parallel with the element.


Sorry.
P-J
 

Latest posts

Back
Top