E herm!

Homebrew Talk - Beer, Wine, Mead, & Cider Brewing Discussion Forum

Help Support Homebrew Talk - Beer, Wine, Mead, & Cider Brewing Discussion Forum:

This site may earn a commission from merchant affiliate links, including eBay, Amazon, and others.

MuddyCreek

Well-Known Member
Joined
Aug 30, 2012
Messages
791
Reaction score
458
Location
Butte
I have assembled all the components for a nice little EHERM setup. I'll be stealing various toolbox build ideas from other contributors and hopefully I'll end up with an automated system that lets me streamline my brewing day. (Currently I run about 6 hours for a full cycle, would like to move that closer to 4 or 4.5 if I can.)

I need to talk to an electrician to figure out how all the wiring should go. (Death sucks.) I believe I'm going to run both a 110 and 220 line into the box to control the mash/pump as well as the HLT/BK heating element separately.

Anyway, I will photograph the components and the process and document how I muddled through the whole mess. Hopefully I'll have it completed and running within a couple weeks.
 
What do you mean a 110 and 220 separately? 220v is 2, 110v line which can be controlled independently.
 
Why don't you post what you are looking to do (how many elements of what wattage running simultaneously, what pumps, what other controls), and we can make some suggestions as to what you would need for power. If you are going to be running new circuits, you will likely want to be able to specify a few things for the electrician.

For example, if I were running a new circuit for an e-brewery, I would definitely run a 4-wire (Hot, Hot, Neutral, Ground) 240v circuit rated appropriately for my amperage draw, and I would derive 120v from that inside my control panel.
 
I need to run two PID units, a pump and at least one 220V, 3500-5500 watt heating element simultaneously.

I know I can run everything off of the 220 line, but I thought it might be much easier from a wiring standpoint if I simply wired the pump/MLT controller to a 110 line and the HLT/BK controller to a dedicated 220 line. I need to figure out how to add a PWM controller one the heating element and I want to put power-on switches on both the pump control and the kettle control. (Alternatively, if I did 1 line, I could do just a single 'power on' switch for the whole box.)

I currently have a 3500 watt heating element from High Gravity which I will use in the HLT. I will pick up a 4500 or 5500 watt element for my BK and I'll simply plug its cord in to the HLT/BK plug in the controller when I am ready to start my boil. I also have a couple of PID controllers with SSRs.

http://www.ebay.com/itm/300708946166?ssPageName=STRK:MEWNX:IT&_trksid=p3984.m1439.l2649

Thermoprobes are also available and ready.

http://www.ebay.com/itm/230916927416?ssPageName=STRK:MEWNX:IT&_trksid=p3984.m1439.l2649

I admit, electricity is not my forte, and given the amount I'm already in for the various components I'm not averse to simply calling up a licensed electrician and paying him to wire it up while I watch.
 
You will likely want the electrician to run 6awg, 4 wires, H-H-N-G from a 50a breaker in your panel. You could go with a 50a GFCI breaker, but it is more cost effective (although nonsensical that it is) to go with a regular breaker and get a 50a GFCI spa panel. It will be easy enough to run both 240v and 120v in your control panel this way.

If your PIDs support a "manual mode," allowing you to set a % of full power, then that provides the same functionality as a PWM, albeit with a digital rather than an analog interface.
 
One suggestion I have (from experience!) is to place more plugs than you think you need. When my friend built my current control panel, I had a two tier stand with one pump, and we added an outlet for extra. I'm so glad we did- and wish we had done another!

I now have two pumps, and it was just a "plug n play" thing to add the second pump because it was an option in the CP already. I initially used it to plug in a fan, and I never thought that I would even use it. But a fan blowing over the rig on hot days really helped, and I plugged it in to the "pump #2" spot. My box is full now, otherwise I could see using yet another outlet for a shop vac to clean out the MLT, etc.
 
I thought about that Yooper, and I was planning on putting a dual outlet on the back of the toolbox (although I was only going to wire up one of the plugs with the pump controller PID.) The other I can just wire to be active all the time.

I have an independent power bar on my brew-stand currently and if I ever need a fan or a shop vac I can use the power bar already on the stand.
 
I need to talk to an electrician to figure out how all the wiring should go. (Death sucks.) I believe I'm going to run both a 110 and 220 line into the box to control the mash/pump as well as the HLT/BK heating element separately.

An electrician will be able to help you get 120/240v power over to your brewery with no problem but you need the automation part in a schematic for them to understand what you are doing.
 
I thought about that Yooper, and I was planning on putting a dual outlet on the back of the toolbox (although I was only going to wire up one of the plugs with the pump controller PID.) The other I can just wire to be active all the time.

I have an independent power bar on my brew-stand currently and if I ever need a fan or a shop vac I can use the power bar already on the stand.

Oh, one other thing I almost forgot! How are you recirculating the water in your HLT? I have a tiny stirrer with a fan, and that's also plugged into my CP box.
 
Alright, since I am the suck with Gimp and other photo editors and since I don't have any other wiring diagram software, here's what I am planning on doing with the CP. (I have a diagram written up but it's some ugly junk man... ugly junk...)

input: 240 v line.

outputs:

2 110 v outlets. 1 wired to the MLT PID as well as a switch that goes from auto/off/on. (auto goes through the PID, on goes directly to the outlet so I can simply turn on the pump if I want to.) The second outlet is wired to a 2 position rocker switch directly off of the main power on/off so I can simply turn that outlet on and off whenever I want. If I have room in the toolbox enclosure I might add an extra couple of outlets also tied to the rocker switch just to say I have extra power. (Yooper's suggestion.) That way If I want I can add some kind of 'stirrer/recirculator' to my HLT although I currently don't use one with the propane setup.

2 220 v outlets for my heating elements. I'm currently only using 1, but per Yoopers suggestion I want the ability to plug 2 in if I ever go with a bigger system. Both outlets will go through an auto/off/on 3 position switch. If the auto is selected, the power goes through the HLT/BK PID if on is selected both outlets are on. (BK get to boil quickly option.)

I will put in 2 separate alarm lights. a 110 red pilot light for the MLT PID and a 220 red buzzer alarm for the HLT/BK PID.

I'm using the MYPIN TD4 PIDs as well as some Thermoprobes make and manufacturer of whom I don't have on hand at the moment. I haven't added an emergency kill switch. I simply figured the on/of switch was adequate.

Other components (some of these I have already talked about, but here's the list...)

(1) 2-position illuminated on/off switch for master power.
(2) 3-position illuminated green auto/on/off switches for MLT and HLT/BK power
(2) 25 amp SSR for the 110 outlets
(2) 40 amp SSR for the 220 outlets
(1) heat sink... need to find something for this or just have the electrician figure it out.
(1) 110v red pilot alarm light (MLT PID alarm)
(1) 220v red buzzer alarm (HLT/BK PID alarm)
(2) thermoprobes
(2) MYPIN TD4 PID controllers
(1) 3500 w heating element (HLT heating element. I'll likely buy a 5500 w BK element as well.)
(1) March HLT pump. (I will likely pick up a transfer pump soon, that will go into one of the 'switched' outlets.)
(1) 240v power receptacle

And that's about the best I can do. I'm sure there's stuff I'm missing that will require several trips to the hardware store etc.

Anybody see anything really glaring that I need to add to this? Much appreciated. I'm an admitted electric build newb. I've looked at Kal's stuff and actually used his parts list to order some of the components. I decided since I only have 2 controllers I would wire the alarms separately and I'm just going to use ye old wireless digital timers (IE kitchen timers) for my mash time, boil time and hops additions. I assume there needs to be some fuses added somewhere but I'll count on the electrician to let me know what I need there.

Also, as mentioned above, this is planned for a toolbox build so it's mobile and easy to cut. I may need to get a bigger toolbox though as I've added a few lights and outlets and it may be asking a bit much to fit it all into the current box.

Any suggestions would be much appreciated.
 
It's finished. I tested this weekend and even brewed an ad-hoc batch of beer. Lots of dialing-in and process improvements to be made, but we have beer!

It was a thing of pure joy to watch the pump and HLT heating element turn themselves on and off automagically. I admit I knew next to nothing about the components and wiring and through the life of the project and help from this board I managed to put it all together myself.

Thanks to Kal, P-J and all the people on the board who gave me advice, tips and corrections. I ended up spending quite a bit more than I would have if I had known what I was doing, but I suppose that's just the price of my education.

I'll post pictures of the completed control panel in a day or two. I did do something interesting with it. Since Yooper had suggested I add a couple of extra outlets, I did so with a switch to turn them on or off as desired. Instead of putting heatsinks on the SSRs, I cannibalized an AC/DC 12v converter from Radio Shack and wired it to a beastly little computer fan which I installed in the back of the box. Now I can turn the fan on with a flip of the switch and air blows happily through the box and no heat sinks are sticking out.

I still have to go back in and pretty up some things inside. I was trying to get everything working and now that I have it all put together properly there's some room for aesthetic improvement.

Anyway, color me giddy. I have an E-Herms brewery!
 
What do you mean a 100 and 200 separately? 220v is 2, 110v line which can be controlled independently.

I need to figure out how to add a PWM controller one the heating element and I want to put power-on switches on both the pump control and the kettle control.
 
I talked with a couple electricians and it was suggested that I make life a bit easier by running a 110 line in for the pump side and a separate 220 line in for the heat side.

The electricians' point was that running the pump, 2 PID controllers and up to four outlets off one leg of the 220 and then continuing that leg over to the heating element may either overload or draw too much out of the line to drive the heating elements as efficiently.

I have two 3-way switches, one for the pump and one for the heating element. (On the heating element switch, I have 18 gauge wire (powered by a 12V ac/dc converter plug) going into the 'ON' side of the switch this provides enough voltage to switch the SSR and turn on the heating element without going through the PID.

The pump switch is wired a little differently. In that case the 'ON' switch has a 110 line going directly to the pump outlet, bypassing the SSR.

From a wiring point of view it was really much easier to do it that way (a 110 and a 220 line separately) too. I have a plug for the 110 line and I use that to run everything but the heating elements. The 220 line has one leg going directly to the heating element plug and the other going through the 40 amp SSR controlled by the HLT/BK pid. I also installed a fan which uses a 12V ac/dc converter which conveniently plugs in to one of my 4 outlets (Good thinking Yooper.)

I know it adds an extra line into the system but it works really well and by the time I'd decided how to route all my power it was, I think the best for me.
 
Put the 5500 watt heating element for the BK together this morning and installed it. Works just fine except that my wee SSR is definitely going to need a heatsink along with the fans. I was hoping the fans might be enough but that is clearly NOT the case.

Ironically I had an extra 40 amp SSR with heatsink delivered today via FedEx... to my office. So I can't get the item until Monday.

So, in the true spirit of the American Homebrewer, I will likely be mortaring ceramic tile to the top of my brewstand tonight.

I also need to clean up my wires in the toolbox enclosure and make it all a little prettier and now I'll need to come up with a plan for affixing the heatsink to the SSR and arranging for the bulk of it to vent outside the toolbox. May have to go with the slot-method. I'll keep you posted, because somewhere, deep inside I hope somebody cares, just a little bit.
 
Heatsink in my possession, I also picked up some thermal compound. I'll be mounting the heatsink to the SSR this evening. I have some SS plates with holes drilled in them (for connecting lumber) I'm going to cut a slot into the SS to mount the heatsink and then I will cut holes in the toolbox which are slightly smaller than the plates.

I'll affix the plates to the toolbox with screws and voila, instant fan-vent grating and heatsink mount. I am in hopes that the heatsink with thermal compound along with the fan-venting and fan will be sufficient to keep the heat under control.

I'll let you know by early next week. What's the worst that can happen? ; )
 
Some photos. Please be gentle, it was my first attempt. I know it's ugly, but it's safe and it's mine...

top-59603.jpg


thumb2_2-59811.jpg


thumb2_3-59812.jpg


thumb2_right_side-59602.jpg


left_side-59601.jpg
 
For those who haven't kept up on the thread... in summation:

I was advised by an electrician to run 2 lines. I have a dedicated 110 line that runs the PIDs, the outlets and the alarms. I also have a dedicated 220 line that only runs the heating elements.

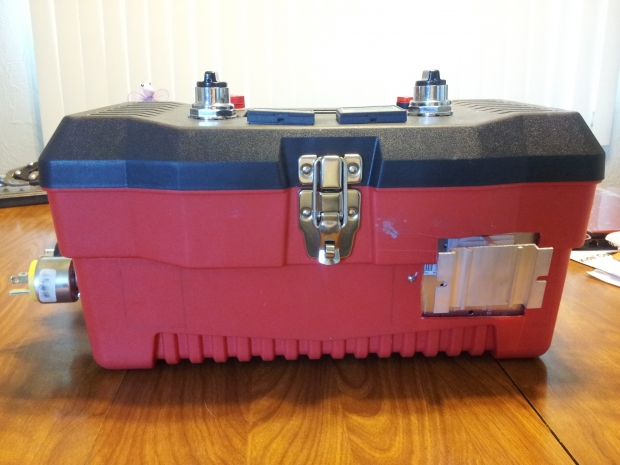
One of the outlets on the back is activated by a switch, the other outlet is controlled by the PID. This allows me to attach fans, additional pumps whatever and be able to switch them on or off at my discretion. (Yooper suggestion.)

You'll also note the particularly ugly thermo-couple wires coming out the back of the box. I needed to come up with a 'farmer Brown' method of handling quicker disconnect of the thermocouple wires so I simply added a post where the wires attached to the PIDs can connect easily with the wires of the thermocouple. Yes, I know... it's ugly.

You'll also note the 12v AC/DC converter plug back there. This runs my cooling fan and also serves as the dc power side of my 'ON' switch for the heating side. The 12v passed through the three way switch provide enough power to switch my SSR and turn the heating element on in manual mode.

The top of the box features two 3-way switches. This enables me to turn either the pump side or heating side to "ON", "AUTO" or "OFF".

I am only running one heating element plug out of the box (room constraints, although had I planned ahead I probably could have figured out how to cram two outlets in there.) The PID is used in auto mode to run the HLT and manual mode when I switch over to the BK. The HLT uses a 3500w element while the BK uses a 5500w element.

I was hopeful that I could get away without a heatsink for the heating side PID. This was a completely unfounded hope. I had to cut a hole in the front of the box, attach a stainless steel plate with a slit cut in it for the heatsink and attach the SSR with thermal compound. Having done so, the system works very well.

Tested the BK side last night. Started with 50 degree water (wanted to really put the element and the SSR through it's paces to make sure everything was good.) Got the water to boiling in about 30 minutes, cranked the PID down to 72% to maintain a light rolling boil.

So there you go. It was a journey and a half. I admit it probably won't win any artistic awards, but I have already used the control panel to handle the HLT and MLT processes. (I used propane for the BK on that brew day.) Everything went fairly smoothly considering new equipment and starting to figure out new processes. I am excited about my automated EHerms and will give updates on the quality of my brews henceforth.

Thanks to everyone for their advice, suggestions and help. I stole things from Kal and JP even though they didn't know I was stealing. (Ninja... that's me). Other people helped me troubleshoot and figure things out with all the components. I started this project completely ignorant. (No really... completely) and now I already know all the things I would do differently. ; )

For those of you considering putting together an EHerms system. It aint cheap, but man it's challenging and fun.. and when you fire it up and the darn thing works... well, that's just the icing on the cake, isn't it.
 
Back
Top