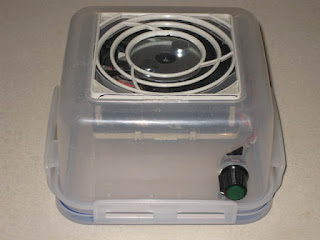
Show us your DIY stir plate!

Homebrew Talk - Beer, Wine, Mead, & Cider Brewing Discussion Forum

Help Support Homebrew Talk - Beer, Wine, Mead, & Cider Brewing Discussion Forum:

This site may earn a commission from merchant affiliate links, including eBay, Amazon, and others.
Quick project but I love how it turned out! I used a spare case fan and 12v wall wart I had lying around, and built a LM317 adjustable voltage regulator to control it. Built the whole thing into a cigar case picked up from Stanley Pappas, a great local cigar shop here in Denver.

It'll hold a 1" stir rod up to about 80% power, haven't tried anything larger. Looking forward to making a starter tomorrow for a dunkel, my first true lager!

200487_4798102064541_1272187721_n.jpg


582483_4798102184544_1230430668_n.jpg


197002_4798102224545_318100788_n.jpg


527405_4798105264621_1381601506_n.jpg
 
I just tossed a nail into the flask for the photo, the stir bar creates a great vortex when used.

IMG_0259.jpg
 
I have the 20mm Vulcan round tap handle right now and the 40mm MK19 round in the cupboard. I forgot the name of the maker but he sells on Amazon and I think Etsy as well.

But we digress.
 
Kind of plain jane, but it works pretty well. I have a 2L Flask on order.

I used a 110V fan and a plug-in dimmer. I have a really good electronics store locally and the staff are guys that generally know their stuff. One of the guys I've had help me before recommended that I use a 110V fan and a dimmer so I didn't have to worry about losing torque at the lower speeds. Of course, it's high voltage, so you have to be a bit more careful. Seems to work pretty well. Spins a 2-inch bar really well. I have 2 neodymium magnets hot glued to the fan with opposite poles facing up. I have to admit, though, I expected a lot more torque with the 110V fan.

Here's the inline dimmer (don't buy it here... I paid less than half):
http://www.amazon.com/gp/product/B004GIDW70/ref=pd_lpo_k2_dp_sr_1?pf_rd_p=486539851&pf_rd_s=lpo-top-stripe-1&pf_rd_t=201&pf_rd_i=B009GKUPDC&pf_rd_m=ATVPDKIKX0DER&pf_rd_r=1S0SF3YDXJTFZY3WASHR

I just pulled the guts out and mounted them in the case.


537258_10200096998498263_498996067_n.jpg


13799_10200096998698268_1926065375_n.jpg


Pay no attention to those loose screws:

150226_10200096998458262_1674622213_n.jpg
 
Last edited by a moderator:
Can anybody provide some guidance (or links) as to how I should splice the wires from the fan to the potentiometer and wall charger? Never done electrical work before so it is all new to me.

Thanks
 
Hook the negative from the wall adapter straight to the negative on the fan. Then hook the + from the wall adapter to the potentiometer then the other pin form the potentiometer to the fan. The "ground" pin if there is one should not be used on the potentiometer.
 
So I finally built my stir plate. It was about $30 in the end, so I saved about $20 over the cheapest that I have seen online. The power brick, magnets and the fan were free. I bought a PWM speed controller on eBay for about $8 to control speed, after reading up on the pros and cons of rheostats and voltage controllers. I was not interested in doing any soldering. I can get everything from a gentle stir to a large vortex in my 2L flask.

photo 1.jpg


photo 2.jpg


photo 3.jpg


photo 4.jpg
 
Just finished. Only missing the magnet.

Bought a 4 pack of 12v fans from Newegg for $11.00 and I've got a small fruit crate lying around that would be perfect for a double stirplate. Think I'll throw that together pretty soon.

If someone had told me 1 year ago that I'd be this excited about yeast I would have slapped them and then thrown up from laughing so hard.

...yet here I am...contemplating the purchase of Petri dishes and vials. Who knew?!?

image-4127507571.jpg


image-2223419749.jpg
 
Kind of plain jane, but it works pretty well. I have a 2L Flask on order.

I used a 110V fan and a plug-in dimmer. I have a really good electronics store locally and the staff are guys that generally know their stuff. One of the guys I've had help me before recommended that I use a 110V fan and a dimmer so I didn't have to worry about losing torque at the lower speeds. Of course, it's high voltage, so you have to be a bit more careful. Seems to work pretty well. Spins a 2-inch bar really well. I have 2 neodymium magnets hot glued to the fan with opposite poles facing up. I have to admit, though, I expected a lot more torque with the 110V fan.

I just pulled the guts out and mounted them in the case.

What'd you use for the box??
 
Here is my stir plate. Couldn't pass up these little metal boxes from the hobby lobby. They are the perfect size for a stir plate.

IMG_0248.jpg
 
IMG_1318.resized.JPG


Parts list:

1 Dell PC fan (junk)
1 LM2596 adjustable step down DC-DC converter (ebay, $1.54 shipped)
1 10K ohm linear taper potentiometer + knob (Tayda, $0.50 + $0.22)
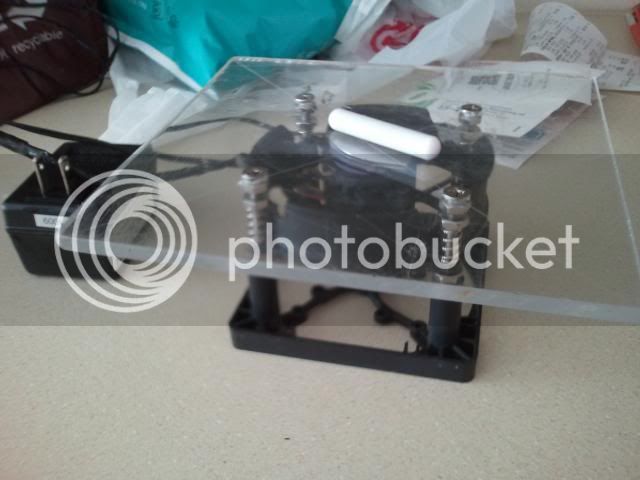
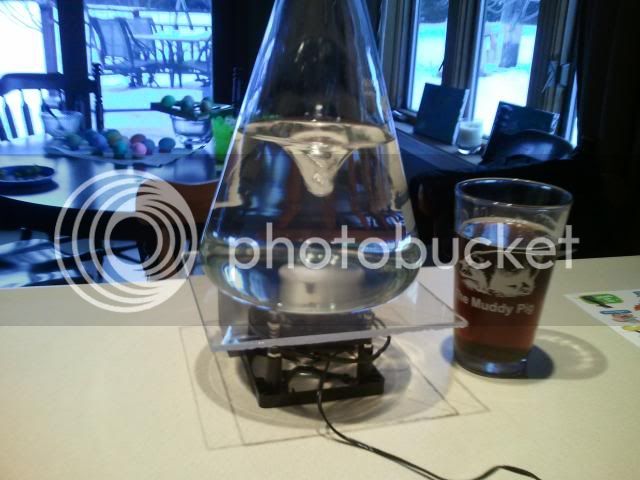
5pcs Neodymium disc magnets, 3mm x 21mm (ebay, $1.35 shipped)
1 large penny washer (Ace hardware, $0.37)
1 barrel-type DC power jack 2.1mm (Tayda, $0.16)
1 12V power supply (junk)
1 food container
3-pin angle header, 0.1" pitch (Tayda, from 40 pin strip $0.17) (optional)
3 female-female jumpers (ebay, from 40-way strip, $2.80 shipped) (optional)
Epoxy resin
Hot glue
Solder
Hook-up wire

The step down DC converter came with a 10K multiturn trimmer that was too fiddly to use, so desoldered it and put a 3-pin header in its place. I connected a 10K potentiometer to the header using jumpers, but I could have just soldered wires in place. All that remained was to solder the barrel jack to the inputs and the fan to the outputs, and hot glue the fan in place. I used epoxy glue to stick a penny washer on the top of the fan and stick the Neodymium disc magnets to the washer. Total cost, less than $5 but I had a few bits and pieces lying around.

If I can be bothered, I'll put in a little microcontroller like a Attiny2313 to monitor the tachometer output from the fan and show the RPM on a 4 digit LED display.

Edit: RPM meter up and running but needs a few tweaks.
 
Back when they were the hip new thing, I bought an external DVD burner and it came housed in this unit. This made my build super easy as I was able to use the existing power supply and just had to hook all the cables up. The only downfall is that with the DVD drive, the outside of the box lit up with really cool blue lights. I haven't been able to make those work, but it looks pretty slick otherwise and was a super easy project.

image-3246198489.jpg


image-3659622552.jpg


image-3557657726.jpg


image-2610055376.jpg
 
Thanks!
The top is just a 1/4" thick piece of acrylic that was a drop from a product we make and I used the computer-fan-housing thing as the base.
I counter sank the screw heads as best I could in the 30 seconds I spent with the drill in my hand.
The springs came with the computer fan that was laying around the office. They worked pretty well for balancing the level without taking the thing apart.
Pretty simple.

2013-03-23150927_zpse7f61a85.jpg


2013-03-23191733_zps869cd581.jpg
 
I was bored over the weekend and I had an old computer laying around so I pulled it apart and was going to try and make on of these. I am having an issue with my fan and magnet. My magnet slows my fan speed down like crazy. I have a ball bearing fan, I don't know if that matters. I have a power source for a charger from a set of 2 way radios or something. Can anyone help me here?
 
Plain and simple, Light-Up fan, plexi sheet, and 4 bolts with 12 nuts for adjusting how close the fan is to the bottom of flask, and electrics from old computer. (on/off switch) I got the P-meter from RS. I can do up to the 5 L flask. I guess I shoulda took some pics with water in the flasks. I didn't yet...lol

:mug:

DSC03272.jpg


DSC03270.jpg


DSC03268.jpg


DSC03269.jpg


DSC03267.jpg
 
100% free stir plate made from garage scraps and stuff from the dead electronics pile at work. No real measuring, I pretty much eyeballed everything.

The box is scrap wood, leftover plexiglass, screws and finish nails. Stained & finished just for looks.

The electronics were pieced together from a 12v computer fan, hard drive magnets, a switch from a dead projector, a volume knob from a broken radio and a random 12v 0.7ma transformer.

The fan is adjustable and supported from the bottom with really thick bolts and a series of nuts that I had laying around. I cut the excess bolt length off with bolt cutters, but the break is razor sharp and jagged. Probably should have used a hacksaw. I had to Dremel out some tabs on the plastic fan body to make room for the bolts and nuts.

I tried it out with a mason jar, once with a magnet and once with a nail. Both worked alright. And, with the money I saved on the stirplate, I can re-invest in a flask and stir bar.

I still have stir-plate envy browsing through this thread, but I'm pleased with this one. Not the prettiest one ever, but it works and it's mine! :mug:

IMG_0849.jpg


IMG_0852.jpg


IMG_0853.jpg
 
Here is my newly finished DYI plate... Total cost was $2.66 which was for the cigar box... I do not have a on/off switch or an external speed control, but I used an old Zalman fan mate, for speed settings, and figure I can set it and forget it... :p

IMG_20130711_133524_753.jpg
 
Back
Top