I've been brewing BIAB for a while now and I'm brewing good beers but I'm always looking for ways to improve.
One limitation I was trying to address is that you don't set a good grain bed with BIAB because pulling the bag out disturbs it. I've also noticed that the less I disturb the bag, the less solids I find in my beer when transferring to the fermenter.
More recently I've also been paying close attention to my mash temperatures in different parts of the mash and with different angles of the recirculation being redirected to the pot and found that there are huge inconsistencies. And it makes sense because the liquid is probably finding the path of least resistance in the circulation loop and probably bypassing most of the grain.
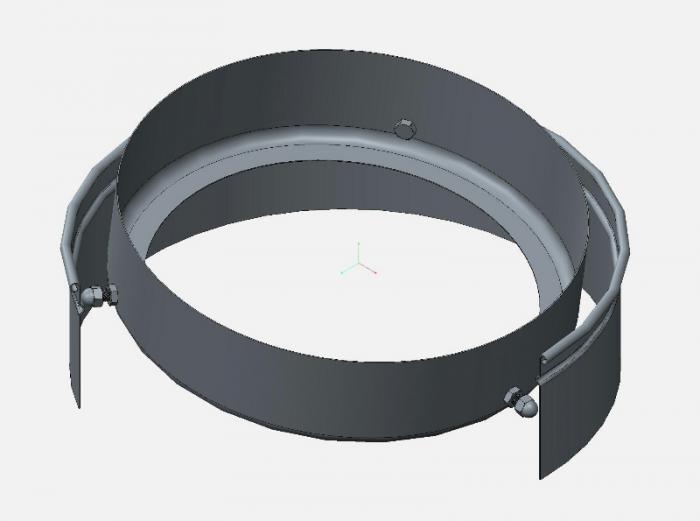
So I decided to build a method of still using the simplicity of BIAB/no sparge, but have better control over the flow of wort, and I built this "directional bag holder" (no idea what to call it, really) to work like a simplified (and cheaper) false-bottom setup that I can just remove from my pot.
Tools and Parts Needed:
===================
- Stainless stock pot of appropriate size. Thin guage is good for this use. I used a 16 quart pot from Wal-Mart.
- 3 x Stainless stove bolts and nuts
- Masking tape
- Sharpie
- Small drill bit (for pilot holes)
- Step bit
- Drill (I also used a corded drill for more torque)
- Angle grinder with metal disk and brass wire wheel
- Dremmel tool with metal grinding bit (forgot for the picture)
I'm sorry I didn't document the process with photos while I was doing it, so my explanation and pictures of the final product will have to do.
1) Cover the bottom of the pot with masking tape and use your punches and the sharpie to lay out your hole pattern. Be sure to mark the centres of the holes as well since that's where you'll drill pilot holes. In my case, I just marked the locations of the largest holes to start and filled in the spaces later.
2) Drill small pilot holes.
3) Enlarge holes with step bit. These holes have to be big enough for the spindle of the hole punch to fit through, and different punches have different diameters.
4) Use appropriate sized punch to create larger holes. I put the sharp cutting side on the inside of the pot because it will produce sharp edges on the bottom that you'll want to know down later (and it's easier to use the angle grinder on the bottom). Watch your fingers while using the punch set... there's sharp edges at this point!
5) Use smaller punches or just the step bit to fill in holes in the smaller voids.
6) Once your holes are all in you're going to want to smooth out the finish. I used a combination of the Dremmel (mostly for the inside of the larger holes), and the angle grinder with the metal disk. Most of your burrs should be on the bottom anyway and should be easy to get at.
7) I then used the brass wire brush to knock down any remaining small burrs on the outside, and the small wire brush in my drill to go over the inside a bit.
8) Drill 3 smaller holes around the perimeter and install stainless stove bolts with stainless nuts to act as legs to keep it off the bottom of the pot.
9) Give it a wash and you're done!
This nests in my pot (32 quart for 2.5 gallon batches) and the lid fits on, and a paint strainer bag fits in the pot perfectly, so refill bags will be super-cheap! I see no reason why this couldn't be scaled up to 5-gallon batches with a 5-gallon pot.
I'm excited to try this out early next week and see if it improves what I want it to.


One limitation I was trying to address is that you don't set a good grain bed with BIAB because pulling the bag out disturbs it. I've also noticed that the less I disturb the bag, the less solids I find in my beer when transferring to the fermenter.
More recently I've also been paying close attention to my mash temperatures in different parts of the mash and with different angles of the recirculation being redirected to the pot and found that there are huge inconsistencies. And it makes sense because the liquid is probably finding the path of least resistance in the circulation loop and probably bypassing most of the grain.
So I decided to build a method of still using the simplicity of BIAB/no sparge, but have better control over the flow of wort, and I built this "directional bag holder" (no idea what to call it, really) to work like a simplified (and cheaper) false-bottom setup that I can just remove from my pot.
Tools and Parts Needed:
===================
- Stainless stock pot of appropriate size. Thin guage is good for this use. I used a 16 quart pot from Wal-Mart.
- 3 x Stainless stove bolts and nuts
- Masking tape
- Sharpie
- Small drill bit (for pilot holes)
- Step bit
- Drill (I also used a corded drill for more torque)
- Angle grinder with metal disk and brass wire wheel
- Dremmel tool with metal grinding bit (forgot for the picture)
I'm sorry I didn't document the process with photos while I was doing it, so my explanation and pictures of the final product will have to do.
1) Cover the bottom of the pot with masking tape and use your punches and the sharpie to lay out your hole pattern. Be sure to mark the centres of the holes as well since that's where you'll drill pilot holes. In my case, I just marked the locations of the largest holes to start and filled in the spaces later.
2) Drill small pilot holes.
3) Enlarge holes with step bit. These holes have to be big enough for the spindle of the hole punch to fit through, and different punches have different diameters.
4) Use appropriate sized punch to create larger holes. I put the sharp cutting side on the inside of the pot because it will produce sharp edges on the bottom that you'll want to know down later (and it's easier to use the angle grinder on the bottom). Watch your fingers while using the punch set... there's sharp edges at this point!
5) Use smaller punches or just the step bit to fill in holes in the smaller voids.
6) Once your holes are all in you're going to want to smooth out the finish. I used a combination of the Dremmel (mostly for the inside of the larger holes), and the angle grinder with the metal disk. Most of your burrs should be on the bottom anyway and should be easy to get at.
7) I then used the brass wire brush to knock down any remaining small burrs on the outside, and the small wire brush in my drill to go over the inside a bit.
8) Drill 3 smaller holes around the perimeter and install stainless stove bolts with stainless nuts to act as legs to keep it off the bottom of the pot.
9) Give it a wash and you're done!
This nests in my pot (32 quart for 2.5 gallon batches) and the lid fits on, and a paint strainer bag fits in the pot perfectly, so refill bags will be super-cheap! I see no reason why this couldn't be scaled up to 5-gallon batches with a 5-gallon pot.
I'm excited to try this out early next week and see if it improves what I want it to.
")