Chill Wizard Inspired Pump/Chiller Station

Homebrew Talk - Beer, Wine, Mead, & Cider Brewing Discussion Forum

Help Support Homebrew Talk - Beer, Wine, Mead, & Cider Brewing Discussion Forum:

This site may earn a commission from merchant affiliate links, including eBay, Amazon, and others.

headfullahops

Well-Known Member
Joined
Apr 2, 2009
Messages
315
Reaction score
27
Location
Waterford
I live in Michigan and we get some fairly cold and snowy winters. Even though I do most of my brewing outside on a propane burner, this hasn't stopped me from brewing year-round. That being said, up to yesterday (April 26th), I haven't brewed since mid-October because of my work schedule. I did, however, use the time off to collect some new gear and do some pretty in-depth brainstorming on how I want to use it and update my process.

The thing that was the biggest change for me was incorporating a Chugger pump and 30-plate chiller from Bobby_M at brewhardware.com into my brewery. I don't have a brew stand/sculpture or really any place to store something like that if I did, so I need my gear to be modular enough for one person to haul up/down to/from my basement as well as condensed enough that I'm not spending all day on the stairs (if that makes sense).

So, I wanted to come up with a cradle/carrier that would incorporate the plate chiller and pump in a way that would take as little time to set up, sanitize, clean, tear down, etc. and still be able to use the pump at other points in the process without using tools and teflon tape. All that to say, I was very intrigued by the concept/design of the Sabco Chill Wizard and at the same time very turned off by the cost. Here's what I came up with:

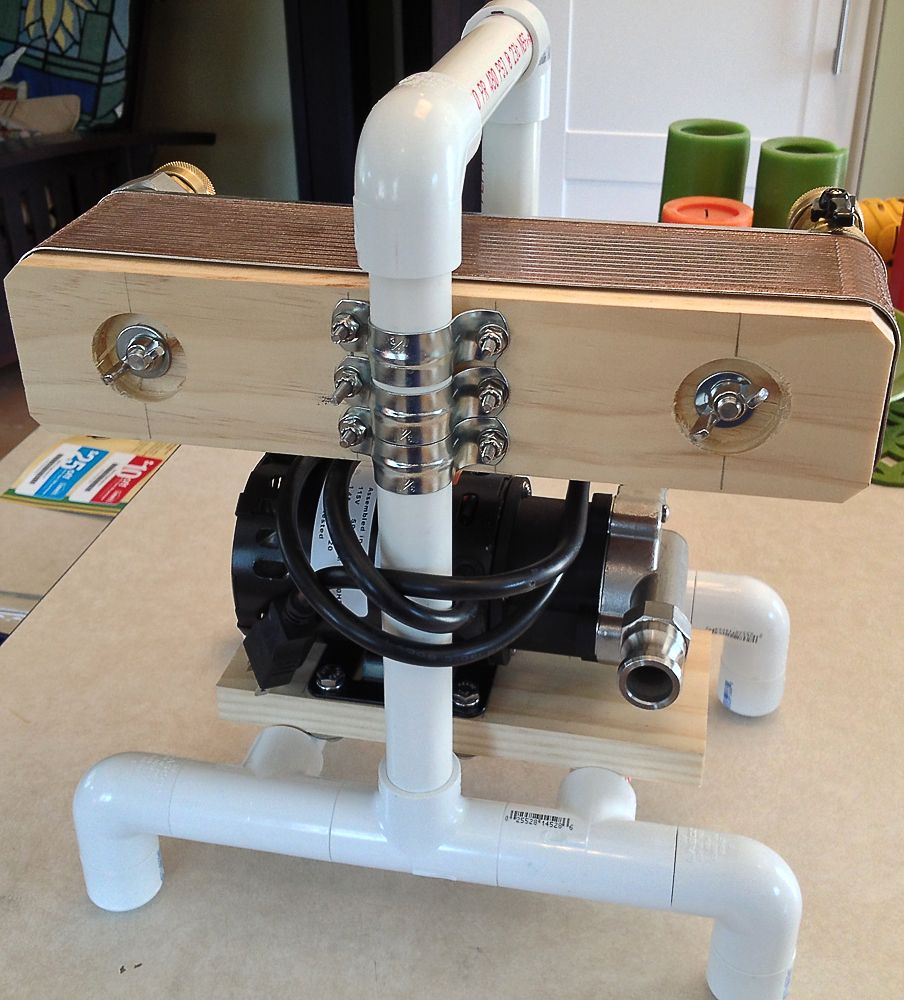
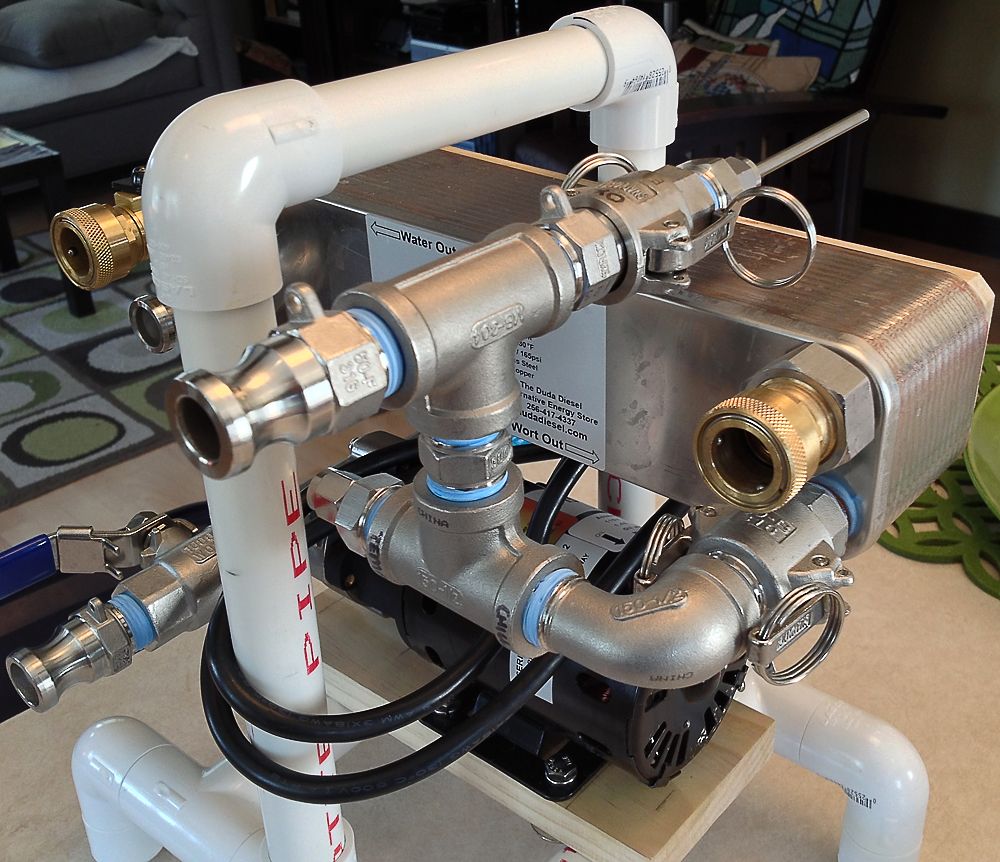
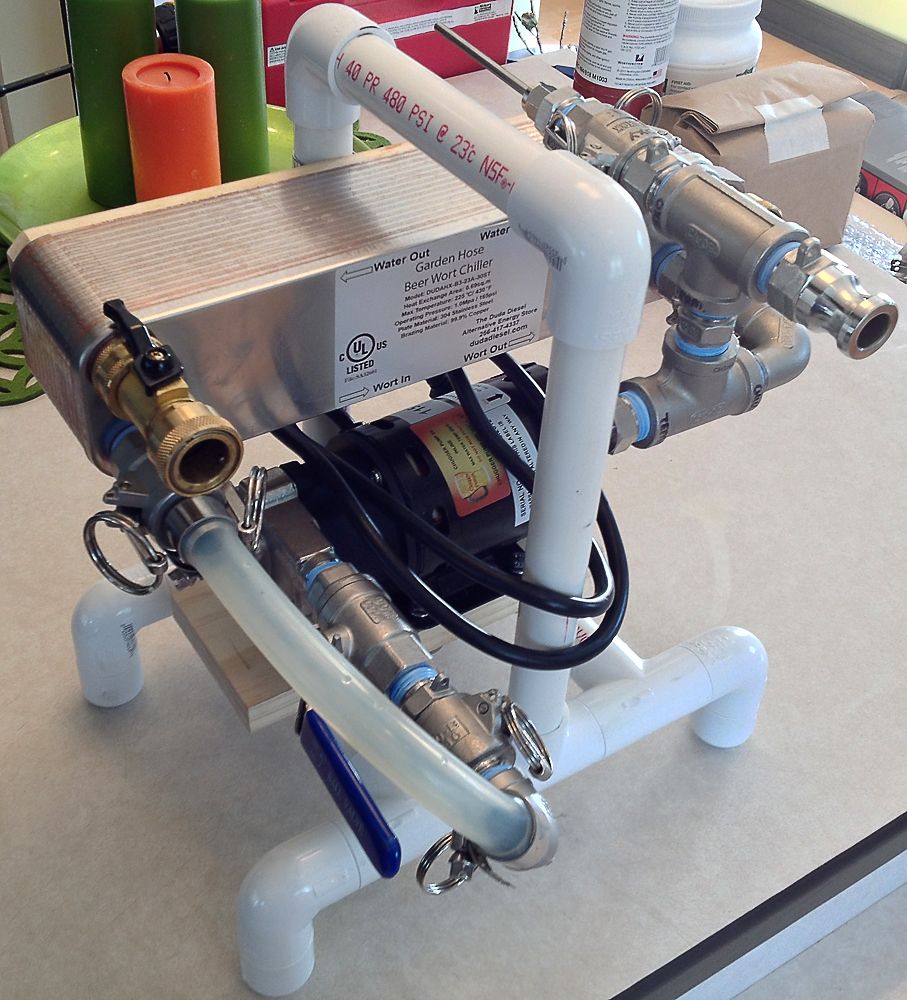
• A 3/4" PVC cradle/carrier with the pump and chiller mounted to 3/4" finish pine boards mounted to the PVC with pipe straps.

Chiller-Station-7.jpg

Chiller-Station-6.jpg

Chiller-Station-5.jpg


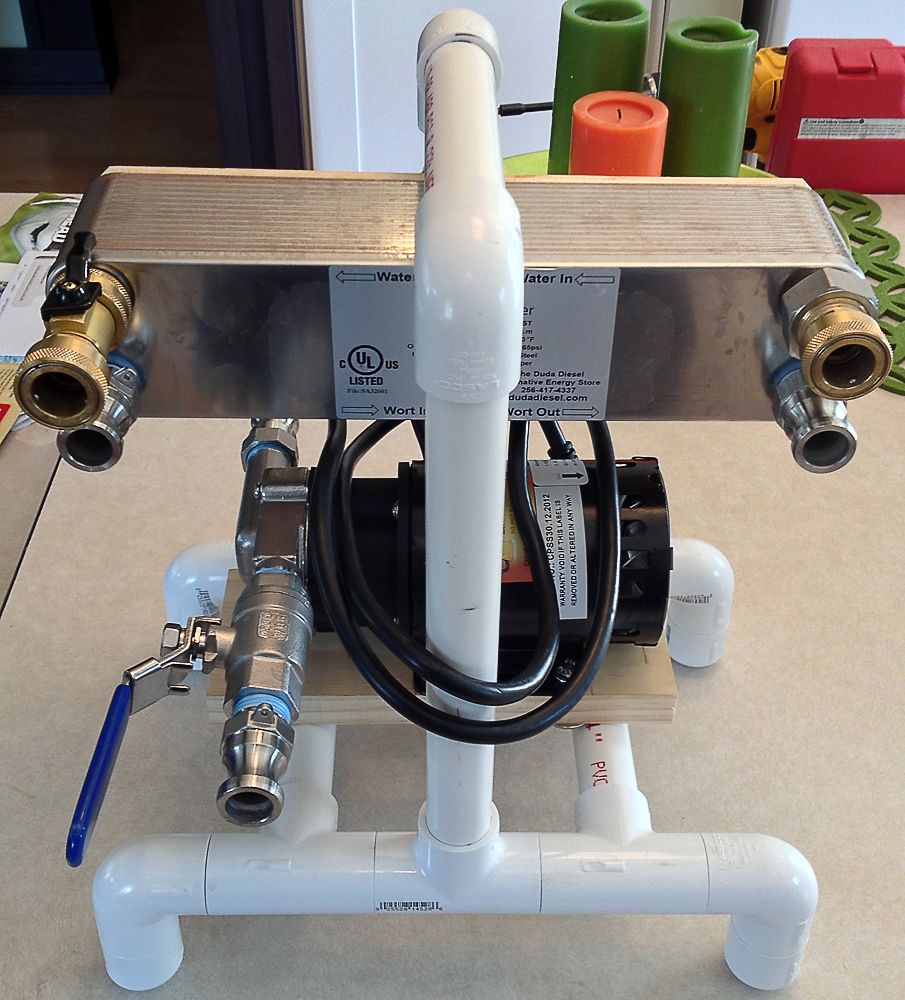
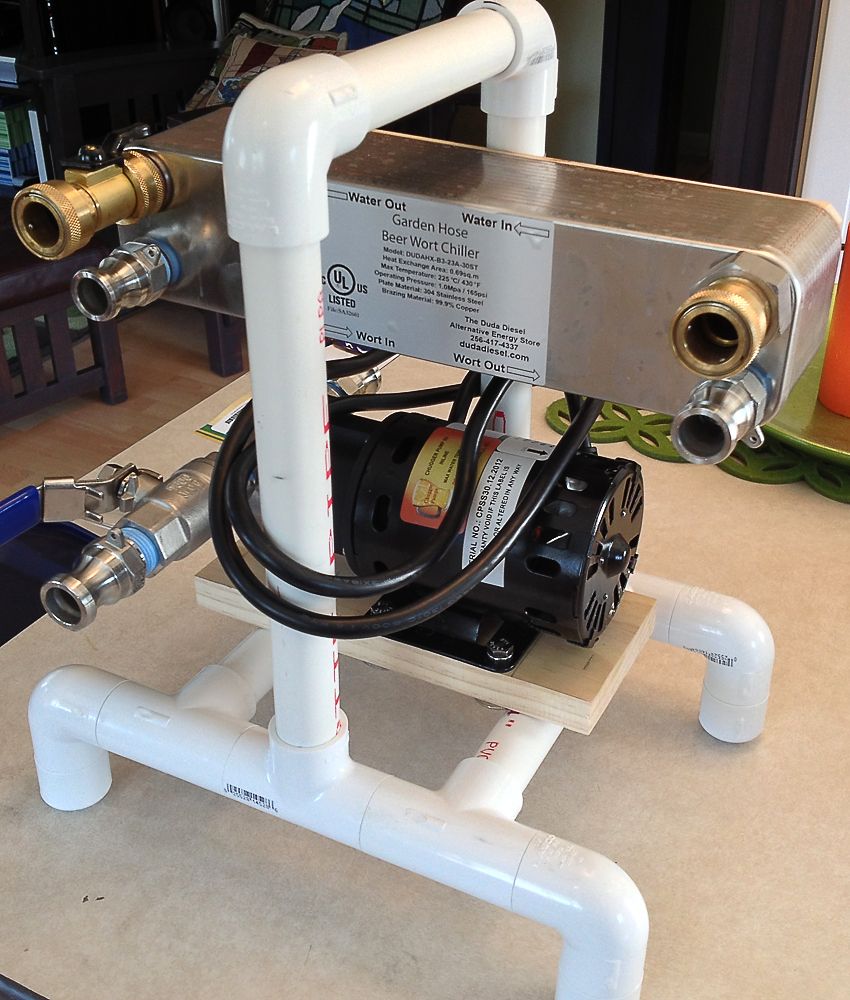
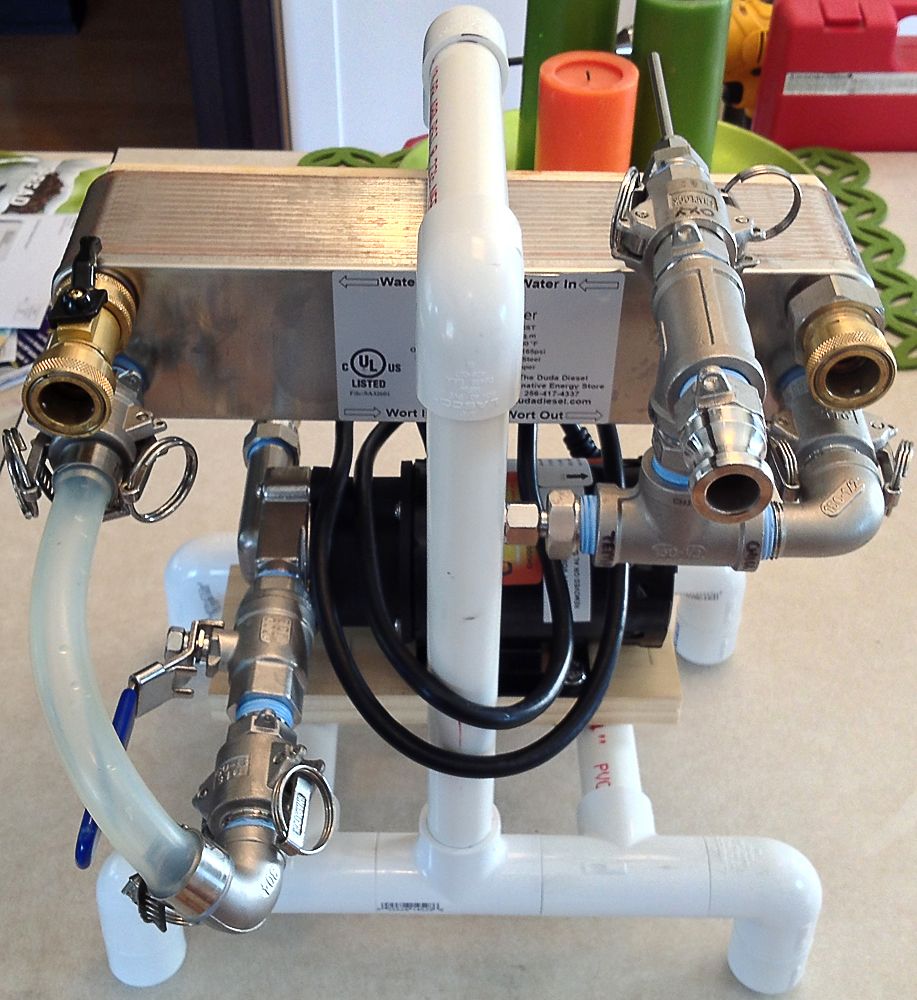
• All connections on camlock QD's (hose QD's from Ace Hardware) plumbed with 1/2" ID silicone tubing.
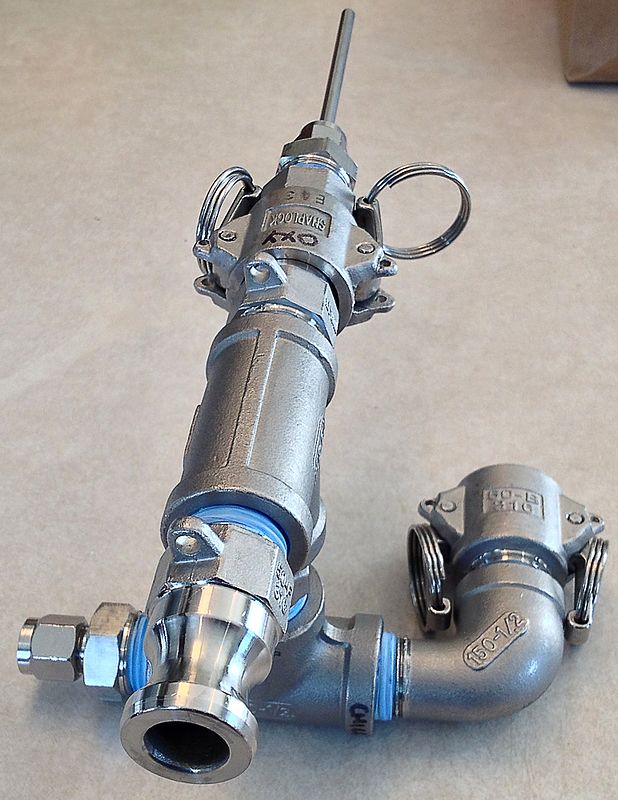
• 1/2" MPT fitting on out-side of chiller that incorporates a digital thermometer and inline oxygen stone.

Chiller-Station-2.jpg

Chiller-Station-3.jpg

Chiller-Station-1.jpg

Chiller-Station-4.jpg
 
99.9% of my first brew day with this rig went without any issue. The one problem I had was regarding my digital thermometer on the wort-out fitting.

The thermometer I used was an oven probe style with the probe on a heat shielded cable. I used it (as I always do) at other points in the process, but I think I may have gotten liquid down in the probe from the point where the cable actually enters the probe and shorted the sensor (thermistor?) in the probe tip. My temp measurements were dead on until I started recirc'ing wort to sanitize near the end of the boil. The temp read like 310˚F so I knew something was rotten in Denmark.

After I added flameout hops I turned on the coolant flow (outdoor garden hose), which I would guess couldn't have been warmer than 50˚F at the moment. The temp on the readout said it was 135˚F with the hose and pump at full blast. So, now I'm flying blind on my first run with this gear. Awesome. I don't know for sure what the temp of the wort was coming out at, but the whole temp/oxy fitting was COLD to the touch, so I close the valve on the pump,move the hose over to the fermenter, ran the oxygen, and pitched my starter. The carboy felt cold to the touch as well, so I highly doubt I pitched hot, but I really would like to know FOR SURE what temp I am hitting at the chiller output.

BTW, the batch was fermenting normally when I checked it this morning so I'm not sweating it. I just tend toward being a control freak when it comes to this stuff.

Cheers! :mug:
 
amandabab said:
could you add a 1/2 npt thermowell for the probe?

btw: that thing is awesome :D

I don't know about thermowells, but I believe the compression fitting I have the probe in will take up to a 1/4" probe. It's just a 1/4" compression to 1/2" MPT fitting (with a pair of silicone o-rings instead of a metal ferrule) in a 1/2" tee fitting. I believe I bought everything on the wort side from brewhardware.com

I'm certain none of that had anything to do with your thermowell question, sorry. Cheers! :mug:

EDIT: The problem didn't begin in the chiller fitting. It started when I dropped the probe into wort in my MLT (like an idiot). I ordered a pair if replacement probes today, just in case.
 
goodgodilovebeer said:
Great job on this. It's like a briefcase of awesome! :rockin:

She's a stout briefcase. I bet it weighs 20+ pounds with all the fittings mounted.
Thanks, cheers! :mug:
 
I also plan on painting the PVC and wood black, probably tomorrow. I wanted to wait to run it during a brew day to make certain that I was happy with the layout and functionality. Should look like an $800 unit when it's finished!
 
Man that is nice. Great design work. It's cheap, compact, very portable, AND looks good to boot!
I use a CFC, but I'm going to "borrow" the PVC stand idea, and make a transport station for my pump. I also set up on the fly with no brew stand....yet!
 
Esmitee said:
Man that is nice. Great design work. It's cheap, compact, very portable, AND looks good to boot!
I use a CFC, but I'm going to "borrow" the PVC stand idea, and make a transport station for my pump. I also set up on the fly with no brew stand....yet!

Thanks! Yeah, everything but the pump, chiller, and camlocks were cheap. LOL! But the 1x board was a piece of scrap I had in my shed and the PVC pipe/fittings and miscellaneous hardware couldn't have cost more than $20. Plus, I still have enough PVC pipe left over to make another stand.
Cheers! :mug:
 
I didn't mean to imply that your build was cheap.
I was focused on your design of the stand !

BTW. your PVC and plumbing work, are perfect looking. Did you even glue the PVC, Cause it's so perfect, it don't look like ya did. :mug:
 
Esmitee said:
I didn't mean to imply that your build was cheap.
I was focused on your design of the stand !

BTW. your PVC and plumbing work, are perfect looking. Did you even glue the PVC, Cause it's so perfect, it don't look like ya did. :mug:

No worries; I didn't take it like that. I bet the stand its self and related hardware didn't cost more than $20. As far as the PVC build goes, the best investment I made was a pair of ratcheting PVC cutters; clean, straight, and accurate cutting of the pipe. It is glued together, but where you usually see purple cement around the joint, I used a cement that was clear and was pretty careful about how I applied it. That 3/4" schedule 40 is really solid once it's glued up.

Cheers! :mug:
 
Nice job!

Thanks a lot! I'm hoping I'll have time to strip it down and paint the PVC and wood pieces tomorrow and have it back together before I brew Saturday.

OFF TOPIC: I just got a Blingmann Hop Rocket delivered from Northern Brewer yesterday and the 4 pounds of leaf hops I ordered from Label Peelers just came literally 2 minutes ago.

I'll post some pics of my setup in action this weekend.

Cheers! :mug:
 
Well, didn't get around to painting the stand, but got some shots in action this past brew day.

Also excited to see what difference the Hop Rocket makes on my all Centennial IPA I am transferring here!

image-1149116889.jpg


image-3968231793.jpg


image-407976409.jpg


image-2752000338.jpg
 
do you have a drawing or schematic on what you built or was this eyeballed? I'd like to do something similar with my pump and plate chiller.
 
Just wondering if you are using the hop rocket before or after the plate chiller? Seems to make sense before the chiller, but then heat on the hops would be higher. Could aid in filtering the wort however. Couldn't tell from the images.

Great setup. Maybe my next purchase.
 
Also, are you using the same port for oxygen as for the temp probe? If not, is there an oxygen stone or some other part you ordered to make that work?

Will you post a shopping list for this? Maybe some photos of it being assembled?

Thanks,
KG
 
Great job. I switched from an IC to a plate chiller around the first of the year. I built a stand for chill wizard knockoff but I didn't incorporate the O2 stone like you did. Here is my version (I like yours better.)

2013 01 12_0001.jpg
 
Very cool setup. I used my 40-plate chiller last weekend and just sat it all on the floor below my CLT. I started looking at all the C-Wizard clones and all I saw were made by guys who could weld. So I started thinking about the angled steel stuff like the post above. The PVC version is great! It is easy to construct, easy to move around, easy to clean and light in weight.
 
I whipped up one of these tonight. It took about 30-minutes to cut and assemble. I had a section of 1" PVC that I had left over from another project. All I needed was elbows and Tees from Home Depot. All I need now are my wooden shelves for the pump and the plate chiller and I'm basically done.

DSC_0042.jpg


DSC_0043.jpg
 
Thanks to the OP for the inspiration. I mounted my dedicated chiller pump and have a temporary solution to the plate chiller. My chiller did not have any mounting capability built-in. So, I need to find some brackets that will fit around it. But for now, the cable ties do work.

DSC_0046.jpg
 
I brewed a Bourbon Barrel Porter yesterday and the new chiller setup really worked well...great actually.

DSC_0048.jpg
 
okay, since I have just hijacked the OPs thread with copies of his excellent design, I'll post my most recent mod to mine.

Wheels!

DSC_0053.jpg
 
I've been reading through this thread and another similar one for a couple of months now. I just want to thank you guys for the input and pics. This week I finally assembled the parts and pieced together my own version. I tested it tonight and it worked flawlessly. It took 7 gallons of boiling water to 53 F in under 5 minutes. I'll probably need to dial in the discharge to try and get the temp up a little higher towards ale pitch temp, but overall I'm stoked.

2zemdro.jpg


2n8n4ba.jpg
 
@Jordo_nb actually got me to build one of these as well, and since posting his around has further inspired me to share my build.

My only tips if you want to build something like this of your own are 1) dry fit everything and mark so you know how it lines up (mine wobbles a little) and 2) lay out your full system to minimize hoses crossing and shoren hoses as much as you can (I went back and cut a lot of mine shorter on brew day). A special shoutout to Warren Dodd for helping me with the wood. Here are a few pics of mine:

Assembled Stand


Full System


Pump Housing


In Action
 
Hi,
Here is a parts list for the fittings and camlock parts that I made from looking at the pictures of headfullahops's build. Pricing was found around the net. All credit goes to the OP.

Screen Shot 2015-05-16 at 12.50.12 AM.png
 
Last edited:
I really love this design and plan to make a similar stand this weekend.

One question I have though is how did you attach the pine board to the plate chiller?

Is it glued or something?
 
Just wanted to say thanks to those who posted in here. Built a stand over the weekend, hoping to give it a trial run here soon.

Photo%20Sep%2027%2C%208%2057%2052%20PM.jpg
 
It's funny, after having posted this thread in 2013, I took a break from homebrewing because of time constraints. Now that I'm back, it looks like I got something started. That's pretty cool! I know it's been a while, but some people were asking where I got parts for everything. I got all the hardware, including the pump and chiller, from Bobby at brewhardware.com and the PVC, wood, and miscellaneous mounting hardware came from Lowe's.

I may be remaking the PVC portion to include a RIMS tube and PID controller very soon, too. Cheers!
 
You know what, I just thought that the oxy stone was a kit from Williams Brewing that was a stone on the end of a stainless wand long enough to reach the bottom of a carboy. I cut the wand to about 4" long with a tubing cutter and ran it through a compression fitting meant for a thermometer probe attached to a quick disconnect (both from brewhardware).

The wort comes out of the chiller, hits a thermometer probe, goes up to the oxy stone and out to the fermenter.

FYI, more beer or some other place sells aeration stones with 1/2" npt threads.
 
I already had the wand before I went to the pump/plate chiller setup, so I just repurposed it. It works better for how I have it put together than one attached to 1/2" NPT. I have it on a camlock QD and the 1/2" NPT version would end up back out of the wort flow. This way, I can slide the stone into the path of the wort coming out of the chiller. Also, I use the little disposable oxy tanks from the hardware store and the valve I have has a barb for a very small diameter of tubing (1/8" ID maybe?), same as the end of the wand. If I recall correctly, the 1/2" NPT stone has a larger barb on it (for connecting to medical oxy maybe?).
 
Great work guys! Are these things a little top heavy? Those chillers are pretty heavy, seems like mounting them as low as possible might help make them more stable.
 
Back
Top