
ViperMan
Well-Known Member
Greetings Brewers!
As a bit of a computer geek (and a guy with maybe too much spare time at work) I've been working on maximizing my benefits out of Beersmith. Today I finally got around to creating some Mash profiles that I typically use, and thought that maybe I'd share my experience/advice here in the hopes that it'll help out someone trying to figure out how to do the same.
For some dumb reason, I keep rebuilding my mash profile with every beer, so when it suddenly dawned on me today that I could just build a profile to reuse, I felt a bit silly!
For this little tutorial, I've selected a medium-body profile. Now, the first thing someone might point out is that my target temp is 1-2 degrees above that for a medium body beer, but I've done this for a few reasons - the temperature will drop that 1-2 degrees relatively quick, and in the event that you do end up a bit too warm, it's much easier to cool wort (read: ice) than it is to heat it. Toss in a cube or two, stir, and voila.
I'll also preface this by pointing out that I use a 10-gallon igloo cooler (the annoyingly vibrant orange cylindrical kind) which has a stainless steel wrap-around false bottom. I also built a foam insulator disc to put down into the cooler, but haven't actually used it yet.
So, step one - click the profile tabs in Beersmith and click "Add Mash". Name it however you want, but I like to use initials at the beginning so that it's easier to find my created mashes quickly. I go by "VDB" for "ViperDen Brewery".
Here is my completed mash screen, but I'll go into more detail as to how I got here as we go on.
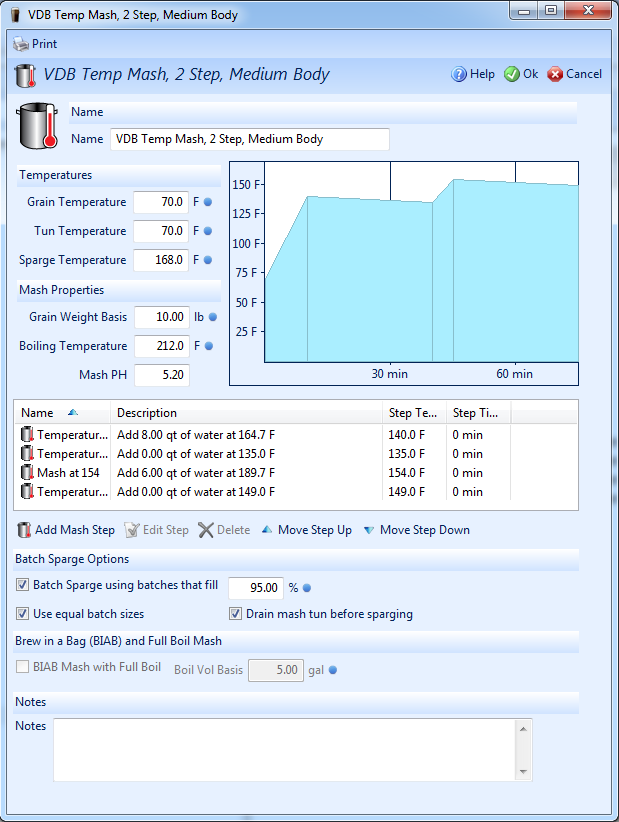
As you can see, I've set my temperatures to 70 degrees as that's what my house sits at. Also my cooler and grains will usually sit on the floor as I'm getting ready and it's a bit cooler on the floor. The rest of the figures I generally leave alone. You can also see my selections for batch sparging at the bottom. I've honestly had a lot of trouble trying to get Beersmith to understand that I like to use two batch sparges after draining the cooler and I like each batch to be equal volume. The "percentage of mash tun to fill with each batch step" utilizes math that seems to make no sense whatsoever (feedback is welcome...) I generally just take whatever total volume it gives me, bring the whole amount to temp, and then eyeball half of it for the first batch and dump in the rest for the last batch.
But these next screens are the important part, as I think they make your mash schedule MUCH less frustrating and confusing.
So step 1 - Add a Mash Step. Here's what we want to fill in:

Now, I like to do a quick temp rest at 140 to encourage enzyme activity. I know it isn't required for "well-modified malts" but let's face it, this stuff has been sitting in trucks and on shelves and in bags for who knows how long, so waking up those enzymes isn't a terribly bad idea.
I'm going to set it at 140. But let's face it - it won't STAY at 140 - it'll quickly cool because that's how energy works, right? So instead of setting any duration for step time, I'm going to leave it at zero. The rise time I set at 10 just to make the graph pretty, but truthfully, it goes from 70 to 140 basically as soon as I dump the water in. Lastly, I set my water/grain ratio at .8. I've found in my experience that anything more requires your mash water to be above boiling. Hit okay to save this step. By the way - even though this is a temp rest, don't select the "temperature" type or Beersmith assumes that you have the ability to heat your mash tun.
Now, let's add our next mash step.
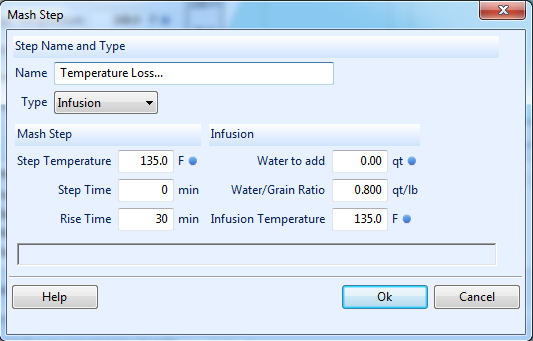
THIS is where I have really improved my mash. This step maintains our water/grain ratio, but compensates for temperature loss during the first mash step. I've assumed a 5-degree loss over 30 minutes. What's key here is that just before you add your next batch of hot water to begin the actual mash, you want to take the mash temp and adjust the step temperature of this step - that'll make Beersmith recalc the infusion temperature on the next step and help you hit that perfect temperature. The step time is again 0, as nothing maintains, but the rise time IS the duration time for this enzyme rest. You can see it as the slow temperature drop in the first image - it shows the delta temperature change during the rest.
Mash step number three - the MASH.
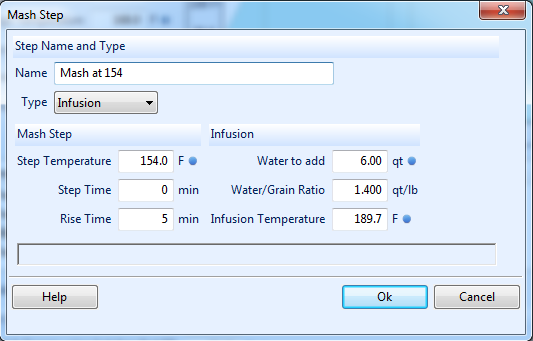
I've put the desired temp in my mash step name just to help with organization. I've also aimed for 1.4 qts-per-pound of grain, though you can go with less (Beersmith's default is about 1.25-1.3.) It'll reduce your sparge water, but I haven't had a problem with this. What's important here is that the infusion temperature (the 189.7) is what will CHANGE when you enter a different step temperature at the previous step. This is what will let you hone in on that perfect temp.
Lastly, I've added a fourth mash step for the temp loss during the mash. This isn't necessary, but we've gone through all the hassle up to this point, why not see it through to the end?!

Last tip of course is the body of beer you're aiming for. My "Full body" is set at 158, my light body at 151 (though I don't think I've brewed a light-body beer in over a year now). Obviously you can choose your own temps - my goal here is to show you how to use mash steps for the temperature loss to help you hit that perfect temperature. I think the real benefit to the enzyme rest is that my cooler has already warmed up, and the temperature of the step doesn't require precision. So when I add the hot water to obtain my mash temperature, a lot of the challenges in hitting that perfect strike temp have already been negated.
With this change in my mash schedule, as well as using tap water instead of RO water, my efficiency went from high-60's to low 80's.
I hope this helps someone out there! Cheers!
As a bit of a computer geek (and a guy with maybe too much spare time at work) I've been working on maximizing my benefits out of Beersmith. Today I finally got around to creating some Mash profiles that I typically use, and thought that maybe I'd share my experience/advice here in the hopes that it'll help out someone trying to figure out how to do the same.
For some dumb reason, I keep rebuilding my mash profile with every beer, so when it suddenly dawned on me today that I could just build a profile to reuse, I felt a bit silly!
For this little tutorial, I've selected a medium-body profile. Now, the first thing someone might point out is that my target temp is 1-2 degrees above that for a medium body beer, but I've done this for a few reasons - the temperature will drop that 1-2 degrees relatively quick, and in the event that you do end up a bit too warm, it's much easier to cool wort (read: ice) than it is to heat it. Toss in a cube or two, stir, and voila.
I'll also preface this by pointing out that I use a 10-gallon igloo cooler (the annoyingly vibrant orange cylindrical kind) which has a stainless steel wrap-around false bottom. I also built a foam insulator disc to put down into the cooler, but haven't actually used it yet.
So, step one - click the profile tabs in Beersmith and click "Add Mash". Name it however you want, but I like to use initials at the beginning so that it's easier to find my created mashes quickly. I go by "VDB" for "ViperDen Brewery".
Here is my completed mash screen, but I'll go into more detail as to how I got here as we go on.
As you can see, I've set my temperatures to 70 degrees as that's what my house sits at. Also my cooler and grains will usually sit on the floor as I'm getting ready and it's a bit cooler on the floor. The rest of the figures I generally leave alone. You can also see my selections for batch sparging at the bottom. I've honestly had a lot of trouble trying to get Beersmith to understand that I like to use two batch sparges after draining the cooler and I like each batch to be equal volume. The "percentage of mash tun to fill with each batch step" utilizes math that seems to make no sense whatsoever (feedback is welcome...) I generally just take whatever total volume it gives me, bring the whole amount to temp, and then eyeball half of it for the first batch and dump in the rest for the last batch.
But these next screens are the important part, as I think they make your mash schedule MUCH less frustrating and confusing.
So step 1 - Add a Mash Step. Here's what we want to fill in:
Now, I like to do a quick temp rest at 140 to encourage enzyme activity. I know it isn't required for "well-modified malts" but let's face it, this stuff has been sitting in trucks and on shelves and in bags for who knows how long, so waking up those enzymes isn't a terribly bad idea.
I'm going to set it at 140. But let's face it - it won't STAY at 140 - it'll quickly cool because that's how energy works, right? So instead of setting any duration for step time, I'm going to leave it at zero. The rise time I set at 10 just to make the graph pretty, but truthfully, it goes from 70 to 140 basically as soon as I dump the water in. Lastly, I set my water/grain ratio at .8. I've found in my experience that anything more requires your mash water to be above boiling. Hit okay to save this step. By the way - even though this is a temp rest, don't select the "temperature" type or Beersmith assumes that you have the ability to heat your mash tun.
Now, let's add our next mash step.
THIS is where I have really improved my mash. This step maintains our water/grain ratio, but compensates for temperature loss during the first mash step. I've assumed a 5-degree loss over 30 minutes. What's key here is that just before you add your next batch of hot water to begin the actual mash, you want to take the mash temp and adjust the step temperature of this step - that'll make Beersmith recalc the infusion temperature on the next step and help you hit that perfect temperature. The step time is again 0, as nothing maintains, but the rise time IS the duration time for this enzyme rest. You can see it as the slow temperature drop in the first image - it shows the delta temperature change during the rest.
Mash step number three - the MASH.
I've put the desired temp in my mash step name just to help with organization. I've also aimed for 1.4 qts-per-pound of grain, though you can go with less (Beersmith's default is about 1.25-1.3.) It'll reduce your sparge water, but I haven't had a problem with this. What's important here is that the infusion temperature (the 189.7) is what will CHANGE when you enter a different step temperature at the previous step. This is what will let you hone in on that perfect temp.
Lastly, I've added a fourth mash step for the temp loss during the mash. This isn't necessary, but we've gone through all the hassle up to this point, why not see it through to the end?!
Last tip of course is the body of beer you're aiming for. My "Full body" is set at 158, my light body at 151 (though I don't think I've brewed a light-body beer in over a year now). Obviously you can choose your own temps - my goal here is to show you how to use mash steps for the temperature loss to help you hit that perfect temperature. I think the real benefit to the enzyme rest is that my cooler has already warmed up, and the temperature of the step doesn't require precision. So when I add the hot water to obtain my mash temperature, a lot of the challenges in hitting that perfect strike temp have already been negated.
With this change in my mash schedule, as well as using tap water instead of RO water, my efficiency went from high-60's to low 80's.
I hope this helps someone out there! Cheers!
