The Multa Fermentation Chamber

Homebrew Talk - Beer, Wine, Mead, & Cider Brewing Discussion Forum

Help Support Homebrew Talk - Beer, Wine, Mead, & Cider Brewing Discussion Forum:

This site may earn a commission from merchant affiliate links, including eBay, Amazon, and others.

user 78027

Well-Known Member
Joined
Apr 15, 2011
Messages
274
Reaction score
13
I have been struggling to solve several problem and have finally decided what to do. I have severe arthritis in both hands so lugging around 6 gallon or even 3 gallon glass carboys is a problem. I also like variety, I brew in 2.5 gallon batches and will someday do more, but this is where I want to be right now. Another problem is that I am stuck in the garage, I have no basement and there is no way I can brew in the house. The solution that I came up with this weekend is based on Huaco's thread

3 Temp Fermentation Controller 1 chamber
https://www.homebrewtalk.com/f51/3-temp-fermentation-controller-1-chamber-388549/

Here is the plan, I am starting it this week and any suggestions, feedback, or that won't work will be appreciated as it is a fairly expensive project.

First I bought a freezer for my garage, Frigadare 9 cu ft. The sign at lowes says it is 9 cu ft, but the online add says 8.8. Anyway that doesn't matter. The base area is 16.25 inches x 24.5 inches. It has an 18 AWG power plug so this will simplify the wiring of the controller.

The area will fit 6 3 gallon Better Bottle fermentor bottles, they are 7.5 inches on a side, in a 3x2 configuration with plenty of room left for insulation between the bottles.

It will also fit 1 6 gallon BB Fermentor bottle and 2 3 gallon BB's.

I will use Huaco's 3 station and build a 6 station controller, not all at once, I only need a 3 level version to start with. Then as I get more money I can build out the rest.

Each bottle will be setup in one of the two choices, I don't have a bottle so I don't know all the size information.

a) 6" reptile heat tape around the center, I figure that it is about 28" around at the center. The 6" tape is 12 watts per foot and 2.5 foot is more then enough heat. Maybe I will just do 2 sides.

or

b) 4" reptile heat tape around the bottom, heat rises so this might be the best idea. The 4" heat tape is 6 watts per foot and the perimeter is 30" long. This is 2.5 feet or 15 watts.

Whichever I do, I will wrap each bottle in Reflectix insulation.

For the thermowells, but think I can get away with the 3/8 version which will save a little cash.

For the cap I will use the Standard Carboy Cap
http://www.northernbrewer.com/shop/3-5-6-gall-carboy-cap-orange.html

with the thermowell in the center hole. Thats a reason I think I can get away, need to get away with the 3/8" od thermowell.

An additional thing I thought about doing is building a device with an arduino like processor that I can stick a temperature probe, DS18B20 which measures the temp in 1/16 degree increments in Celsius. I can keep track of the temperature swing etc so I know if I need better insulation, ...

I hope to have a started version, I have ordered the freezer and 3 of the controllers and if this is successful I will then do the other 3.

Any feedback would be greatly appreciated and I will update this as I make progress.
 
Excellent start! I say "start" only because a system like this tends to stay a work in process even if it works right off the bat. Always something that can be tweaked! :) Make sure not to skimp on the Reflectix and you should be good to go. In fact, unless you plan on chilling the box to lagering temp and fermenting ales you should be able to get by with less heat if insulated well.... Again, a good "tweaking" project.

Good luck!
 
Seems like a pretty slick plan. You WILL want to use a larger box than my project. Also, make sure to calculate your consumption and use wire approved for that. You probably don't want to wire this thing with 18ga. That just seems a bit light seeing that you will be running the freezer and all the heating tapes off of it. If you have trouble getting your wire to stay in the STC-1000 mounting board, use pin terminals. They hold VERY well.
Also, take note of my removable probes. I used mono jack but you may want to upgrade to a more sound connection. (sorry... bad pun) Use either RCA or XLR connections. Keep them color coded so that you keep the SAME PROBE with it's respective controller.
 
Huaco, I am most concerned with how much heat to have available for each bottle. You used 4 ft of the 12 inch tape which is 23 watts per foot or 92 total watts. If you are going to brew say 12 gallons thats about 8 watts per gallon. Each of my fermentors will be 2.5 gallons so if I just calculate straight across it is 20 watts that I would need. the 4" tape is 6 watts per foot and 2.5 ft around is only 15 watts and the 6" tape is 12 watts or 30 watts. The question is, when you look back would you rather have more power then you have now or less power? It might come down to how much difference will there be between the fridge temp and any of the individual fermentors.

The difference in cost is .10 per foot and if I did 5 fermentors at 2.5 feet each makes the cost difference about 1.25. I have no problem with more heat available unless it causes some bad side affect.

As for the power, it is strange that the power cord is so low. I will have at least 16 guage for the fridge and a separate 16 guage for the heat devices controllers.
 
I have a question, the 3 gallon BB are 19 inches tall, is there any reason I can't save a little money and buy the 18" version?
 
I would think this is more an issue of surface area than heat per gallon. This tape is never going to get hot enough to "cook" anything. During active fermentation, that wort will be churning itself and won't have a chance to "overheat" at the walls of the fermentor. I would go with the widest tape you can get. In my case, about 90 watts... that is one lightbulb's worth of heat over 576 sq. inches. That's not a lot of heat at all. The tape is only ever just slightly warm while in use.
Does that make sense?
 
It does make sense, the heat of the tape should never be more then a degree or two over the fermenting temperature. The more area that is covered the faster the warming tape can do its job of heating the wort. I really wished the 3 gallon BB shape was better. If the made it square without the slight indent in the middle it would be better. They probably did it to make it stronger.

I am looking for other food grade 3 gallon containers. I found a 6 gallon rectangular container that I am thinking of getting one of to see how it would work.
 
I have finally got all of the parts and built the controller. I still need to finish the partitioning of the freezer and will do that tomorrow.

I will submit other pictures if anyone is interested.

fermentor Controller.jpg
 
It is hooked up and found my first glitch. It turns out that the ambient temperature is lower then the goal temperature at night and I think I have to modify my situation some. I think I need to set the freezer temperature lower then ambient temperature and use a heater on the 6th bottle. My thought is that if I heat the 6th bottle then everything will work as planned, except, I now have to cutout a new hole in the board and I'm not sure I have space for it.
 
I have been following Huaco 's build also but I plan on similar smaller batch issues as you and I would love to see plenty of pics on how you arranged your freezer sections, temps and heat tape. That is some elaborate controller box.
 
I have been following Huaco 's build also but I plan on similar smaller batch issues as you and I would love to see plenty of pics on how you arranged your freezer sections, temps and heat tape. That is some elaborate controller box.

Unfortunately it doesn't work. When any of the controllers go on heat there is still no voltage across the heating terminals. When I figure out whats wrong I will post more.
 
So let me get this straight.
Your "Primary" fermentor is getting too cold because it is too cold outside?
I would suggest running heating on the primary. You would just have to make sure all the other fermentations are at a higher temp than the primary.
 
Here is the first mod. I can now heat and cool the first station. Not sure why I ignored this obvious problem when I first built the device.

Fermentor2.jpg
 
It is a box I made out of 1/8 inch abs. It fits between the studs and has sides that are 3 inches deep. It has no back so I can have access to the wiring. One problem with this box is that to get at the screws to wire up the devices the device has to be outside the box so the wires are all a little longer then I want.

I need to take it down in a bit. It is running a test on water with the temperature just above ambient and it seems to be working. The temperature fluctuation is about 2 degrees C. I have an arduino and a temperature probe down the thermowell and I keep track of the range.

I will post a couple more images later.
 
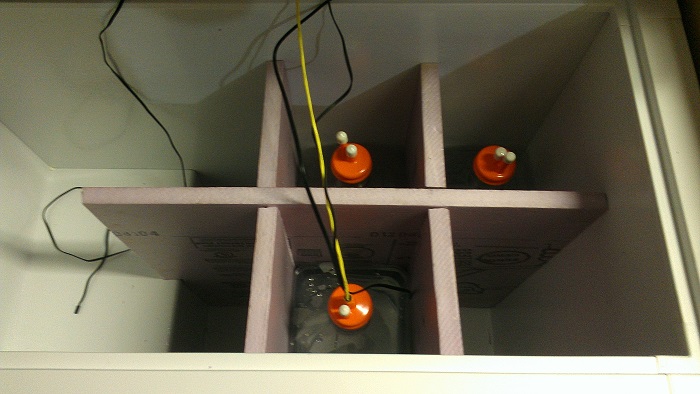
I did a rough cutout of the partitioning I want to do inside the freezer. I started thinking I would just wrap the Better Bottles in Reflexiv insulation and would be able to probably get a couple of wraps on each bottle. When I did some measuring I found that maybe I could use a better insulation so I bought some 1 inch hard board insulation.

The inside dimensions of the freezer are 16.25 inches deep and 24.75 inches wide. I used 1 inch hard insulation that has an R of 5. It turns out there is about 1/8 inch extra in both directions so the better bottles just slide right in. I only have 3 at this point but I will order the remaining 3 tomorrow.

I need to tape it up some but that will require me to remove the top and I think I will wait till my son comes home from college so I have 2 extra hands to make the tape work right.

FermChamber.jpg


FermChamber2.jpg
 
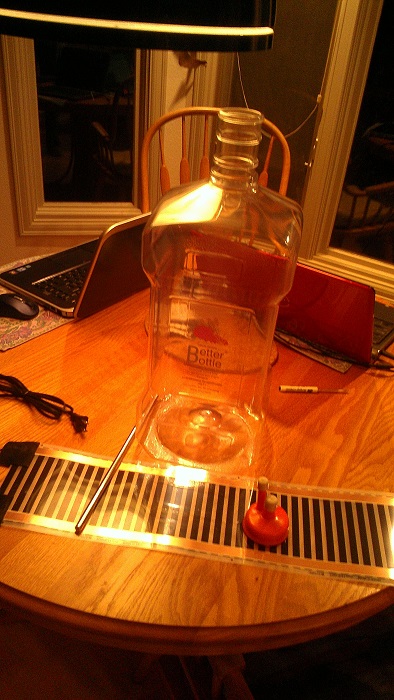
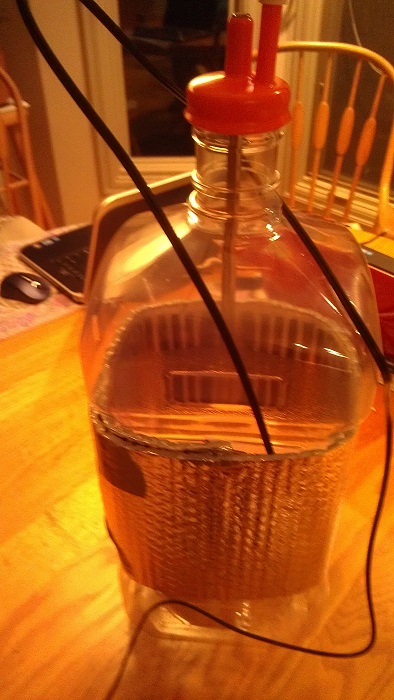
Here are some images of the bottle and accessories.

I used a 12" thermowell, it sits just above the halfway point in the bottle. Since heat rises, I didn't want it sitting in the bottom of the bottle, an 18 inch devive would have been too long. The bottles are 19 inches high.

The heat tape is 6 inches wide and I bought mine too long. You could get away with 2 feet long, they would only be short by 1 inch. I didn't have the bottles yet so I ordered each to be 2 ft 6 inches.

The heat tape is wrapped around the skinny portion of the bottle and is outer wrapped with Reflexiv wrap. I don't think it is necessary but it provides a surface to wrap the tape with. I am currently using tape to hold the reflexive in place but will eventually go to velco straps. I did buy some, but I got them too short, urgh. I didn't know that 5 inches would be taken up with the fastening end.

In the bottom image, the just created bottle is at the bottom. The heat tape and the reflexiv take up the space where the better bottle is skinny making it a perfect fit.

FermBottle.jpg


FermBottle2.jpg


FermBottle3.jpg
 
Looks like a really great setup for splitting batches for experimentation and small batches.
Good work!

Thanks, All I did was copy your idea but made everything smaller. I got really lucky with the size and the insulation. Now all I hope is it works. I just put in my first batch, "BierMuncher's Centennial Ale".

I am the only beer drinker here so I don't want to much of one thing hanging around. I also have severe arthritis in both hands and can't do too much lifting. If this system works I can do a small batch every week and have more variety.

My next project has to be a keezer because this bottling thing sucks big time. I get 24 bottles for each batch and I just get it all figured out and I am done.
 
I can tell that this is going to be a long term project.

Either my expectations are too high, or the approach is wrong.

The fermentor has been running for about a day and a half. The temperature for the fermentation was set at 16 C. The temperature swing is from 15.4C to 17.9C. It seems to me that the amount of insulation is stopping the fermenting carboy from influencing temperature of the carboy that is controlling the the freezer. The carboy that is controlling the freezer is just water at this point and it is set at 14C.

So,

1) My expectations are too high and a 2.5 degree C temperature swing is fine.

2) The insulation is preventing the temperature adjustment

3) The controlling temperature needs to be lower so that each of the fermenting carboys can rely on its own heater to control the temperature.

Anyone with an opinion?

Edit,

It seems that the issue is only relevant during the fast heat buildup generated by the fermentation process. Once it gets to a steady state it seems to work perfectly. I am going to put the second fermentation in the device on thursday and will see how that responds.
 
Taking more advice from Huaco, I decided to color code the sensors. I was hoping I didn't have to, another $10 for 5 colors of heat shrink where I am only using 3 inches, 1 1/2 inch on each side. But then I thought, with all this cost, what is $10 more to make life easier.

So now I have a table of color and temp adjustments so I can move the temp probe from one controller to another and do cold crash on every batch.

I'm still not sure if I am going to add the arduino stuff, this works so well, I can use my time on the next project.
 
Back
Top