Computer controlled single tier

Homebrew Talk - Beer, Wine, Mead, & Cider Brewing Discussion Forum

Help Support Homebrew Talk - Beer, Wine, Mead, & Cider Brewing Discussion Forum:

This site may earn a commission from merchant affiliate links, including eBay, Amazon, and others.

androidmaniac

Active Member
Joined
Apr 17, 2013
Messages
27
Reaction score
0
Location
Columbus,OH
So I recently left my job and decided to take some time to build a brewing rig, because unemployed people need beer. Before I left I had been getting into arduino and raspberry pi development so when I saw some of the fantastic creations people here and other places on the net had been building I had to get to it. I want to thank all the people who have gone to the trouble to post their experiences, I learned a lot about what to do and what not to do. I'm still learning of course, but I've made it this far with my eyebrows intact. Hopefully something in here helps someone.

I chose a single tier design like the brutus. I modeled it after the brutus, the blackheart, berrywise's build and a bunch of other great designs here. I wanted the frame to be made of stainless steel so I could store it outside and not worry about rust. I don't have any pictures of me welding the frame.

Obviously the pumps and valves and whatnot aren't going to be as resilient as the frame, so I made it so that the plumbing can be detached. Here's half the pump/valve system.

IMG_0400A.jpg
 
Here's the plumbing sitting on the frame. There's studs welded to the frame and they just sit up there with one nut per pump making sure they don't topple. The two halves of the plumbing are connected with a cam lock. This is before I did any wiring, and before I finished the kegs, so the cooling coil is still just hanging out. I made my hoses and went thru a not-entirely-dry run, making sure everything flowed the way I expected, from one keg to the next, etc. I made some changes to the plumbing and threw a couple more valves in for a separate circuit.

IMG_0405A.jpg
 
It turned out that the burners were sending a lot of heat overflowing around the kegs, causing the valves to get too hot for my comfort. I decided to add a shield, or as my girlfriend calls it 'pants'. I mounted it to the front and a bar in the back, and welded little shields in between the burners. Much more comfortable to stand around.

IMG_0424A.jpg
 
I cut the coil and hooked up some stainless compression fittings, mounted cam lock fittings to the keg so the could can be removed and cleaned easily, but still stay put when installed.

P1010585A.jpg
 
I wanted to have everything driven by computer in order to minimize mistakes, it gets pretty confusing manually flipping 11 ball valves, and pouring a bunch of fresh water into the boil instead of the coil would probably cause me to go off the deep end.

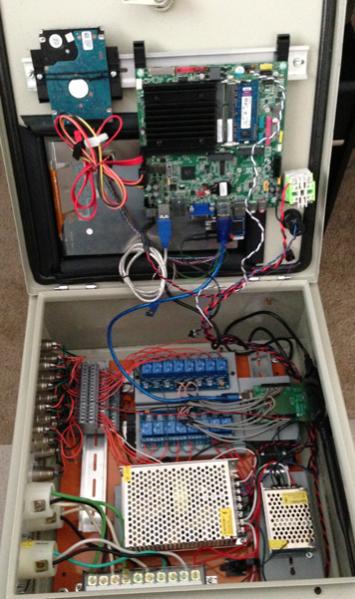
I bought the metal case that everyone uses. I didn't want to drill out the metal plate that comes with it, and I have a CNC mill, so I made a replacement.

IMG_0404A.jpg
 
I cut a hole in the front panel of the box for the touchscreen and mounted it with locking gasket. I think it's ugly. I'll have to replace it later. Here's the case mostly assembled.

P1010579A.jpg
 
Here's the whole thing wired up and ready to go. This was the first brew day. I ordered the wiring back when I was still worried about heat, so it's all PTFE insulated. I think I could route that wire right through the flame if I wanted to. I haven't made the shields for the pumps yet, so a couple amazon boxes came in handy. Pretty ghetto, but it worked.

P1010577A.jpg
 
I started off using an arduino uno to control external valves, pumps and burners via relays, and read the temperature probes using the Dallas one wire library. I also used a raspberry pi to drive the process and UI, but it just can't run a browser at an acceptable speed. I ended up moving to an atom based PC. My first run was running on the pi, but it really was only good for display. Again, the gasket holding the screen has to go.


The UI is not done yet, but it's pretty functional. you can move from step to step by clicking on the circuit you want to be active.

I want to get it to the point where it can load XML recipes and figure out what to do based on the data. I also want to hook up one of those bubbler pressure sensor things to have it auto fill the HLT and run the lauter until it has enough in the kettle. I also need to redo some of the UI, it's very bland. Always something more to do...


Sorry about all the posts. Ugh

P1010586A.jpg
 
Awesome build! I bought my first Arduino about a year ago, I suppose. I think I've done pretty well with it. I've been brewing, with a breadboard & Arduino, a mashtun on a bench and my e-keggle propped up on some ammo cans.

I bought a welder last weekend, so the sculpture build is now inevitable. The plan (for the moment) is to use a Due to run it, but use an Android table just for the interface. I guess kind of like a DIY BCS460.

I'm really surprise that no one has chimed in on this yet. Great looking build!
 
Beautiful build!!! What type of programming are you using for the ui?
 
Beautiful build!!! What type of programming are you using for the ui?

I'm using a perl backend to provide a restful API to the front end which is all javascript. I'm using Sencha Touch as the UI. All the services that interact with the arduino and other devices are written in perl too. I was going to try to learn a new language, but perl was too easy.
 
I bought a welder last weekend, so the sculpture build is now inevitable. The plan (for the moment) is to use a Due to run it, but use an Android table just for the interface. I guess kind of like a DIY BCS460.

I recently got a mig welder too. This was my second or third project. Came out OK, but a lot of grinding was required to clean up my mistakes. I will say any polishing of the frame I did was a complete waste of time. It gets scratched up pretty quick.

Are you going to use a wifi shield for the arduino or some sort of USB connection?
 
I expect I'll be drawing my own shield in Eagle and having a batch of boards done by iTead. I've had excellent luck & results so far with both.

I haven't done the first bit of Android programming yet, I don't even own the tablet. For now, I'm guessing that putting a bluetooth module on my board will be the route of least resistance. "The plan" for the moment is to build a control panel with three 8x2 lcds (temp and volume for each container) and a 20x4 for everything else (machine state, time remaining for each step, etc). That will be easy enough, and I can teach myself Android as slowly as I want at that point.

What you've done here, though, seems years ahead of what I envision even my finished product to be.
 
What you've done here, though, seems years ahead of what I envision even my finished product to be.

Is there any interest in me putting a demo of the software up that people can poke at? I'd have to fake some of the temperature data I guess since I don't want a propane burner hooked up to the internet. :)
 
I expect I'll be drawing my own shield in Eagle and having a batch of boards done by iTead. I've had excellent luck & results so far with both.

I've been learning/using Eagle as well to design board for this and other projects and mill them on my CNC mill.

Here's my first attempt at making a board for this project.

IMG_0423A.jpg
 
Only a few reasons I like the beagle board: 1. I run there ad campaigns, 2. They are a small company unlike Pi who is owned by Avnet, 3. Much faster board as stated for only $10 bucks more.
 
So I recently left my job and decided to take some time to build a brewing rig, because unemployed people need beer. Before I left I had been getting into arduino and raspberry pi development so when I saw some of the fantastic creations people here and other places on the net had been building I had to get to it. I want to thank all the people who have gone to the trouble to post their experiences, I learned a lot about what to do and what not to do. I'm still learning of course, but I've made it this far with my eyebrows intact. Hopefully something in here helps someone.

I chose a single tier design like the brutus. I modeled it after the brutus, the blackheart, berrywise's build and a bunch of other great designs here. I wanted the frame to be made of stainless steel so I could store it outside and not worry about rust. I don't have any pictures of me welding the frame.

Obviously the pumps and valves and whatnot aren't going to be as resilient as the frame, so I made it so that the plumbing can be detached. Here's half the pump/valve system.

Awesome build! Do you by any chance have a parts list of this build? I'm especially interested in the solenoid valves you are using for this setup.

Also, this thing going to be open source??

Thanks,
Tomek
 
The solenoid valves are just the gas valves in the back and the water in valve. Those are from valves4projects on ebay. The rest of the valves, the blue boxes are automatic ball valves, they don't clog like a solenoid valve might. Those I got from oscsys.com, but they're Chinese so you might be able to get them other places.

I'm not sure what I'm going to do with the software. It's not really ready to be given to people, some of it is still specific to 1 tier systems.
 
Wow, I am building almost the exact same thing, but I'm starting out with an AMD APU board for my OS right off the bat. I'm also planning on writing everything in .NET since it's what I know. Do you have pics of the inside of your enclosure? Also curious about what touchscreen you got? I have a 15" off of ebay that I'm going to struggle just to fit into my enclosure, was hoping for something a little smaller if the price is right.

Great work!
 
For what it's worth I think that looks pretty good. :) If mine ends up looking that clean I'll be happy.

I'm a little worried about space since mine is also electric so I'm going to have some SSRs and a few more plugs to fit into a 16x16x8 box. A buddy of mine is doing something pretty similar but he's just using a tablet that he'll mount on the front of the control box and connect via a usb port, thereby eliminating the internal screen, pc and HD entirely.

I like the idea of writing the UI one time like you because I also want to use my phone to remotely monitor/control, I've been trying to wrap my head around the best way to do that. Is it safe to say that all of your program logic is in javascript and your perl back end is basically just an interface to your arduino via REST? Or is your back end doing more than that?

Eventually I want to be able to basically load my ingredients into hoppers, load a beerXML/Beersmith recipe in and hit GO with no further configuration. Maybe that takes something out of the whole hobby but I would totally geek out over being able to do that. Plus I could always do a "manual mode" if I wanted to be more hands on or brew something ad-hoc without building a recipe first.

Probably what I'm most excited about, though, is the prospect of making it self-cleaning. The idea of being able to vacuum my grains out, add a scoop of PBW, hit a "Clean" button and walk away is what keeps me going through all this. :)
 
No, all the logic is in the backend, the last thing I want is to lose a recipe or state because I refreshed the page right? All of the getting and setting is done via APIs, but I'm not sure if they'd be RESTful strictly speaking.

For your friend, I'd recommend the $25 for a raspberry pi and the $10 for a wireless usb device as opposed to having to be plugged in, but I'm just some guy on the internet.

I also want to get to the point where you're just loading a BeerXML recipe and pressing go, but right now I have to at least send it to the next step each time.

Cleaning is a hassle, that's for sure. At least it's MOSTLY clean by the time I'm done.
 
Back
Top